
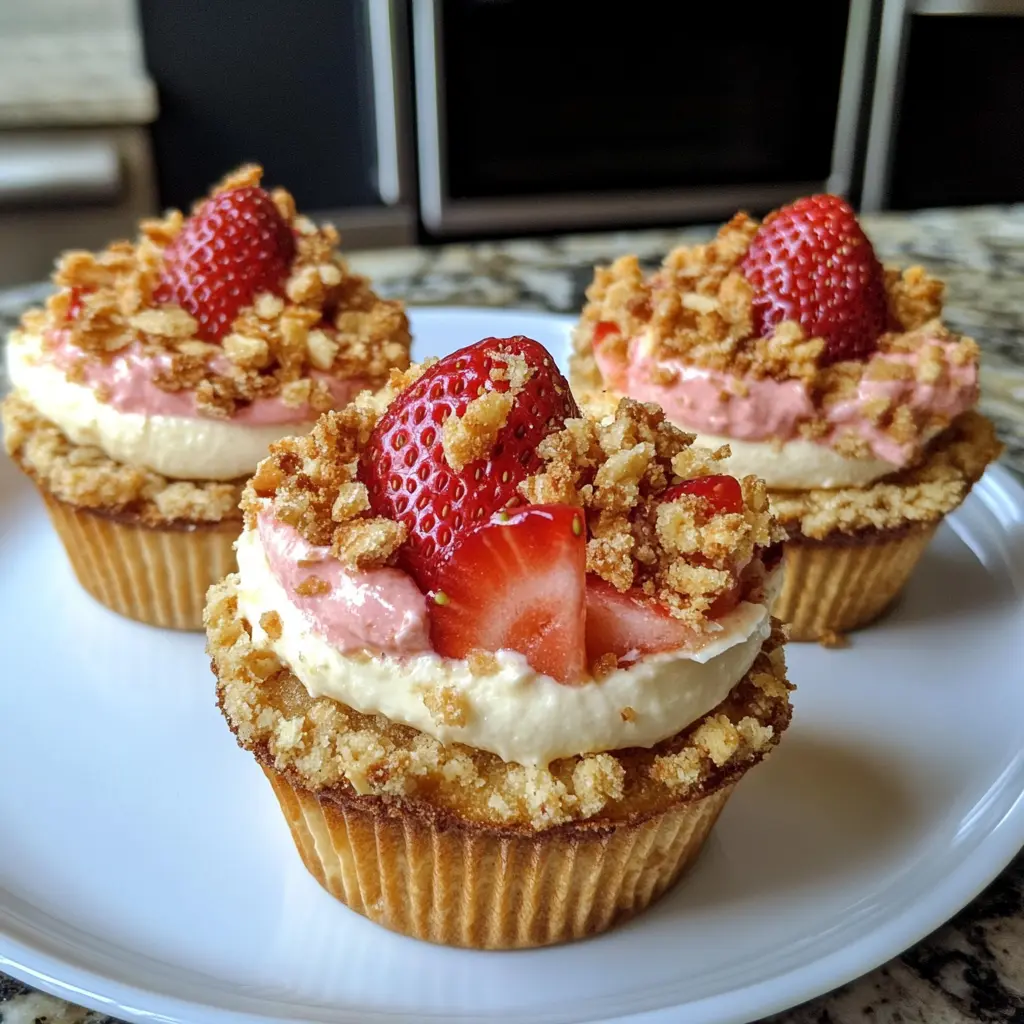
Strawberry Cheesecake Crunch Cups: The Ultimate No-Bake Dessert Recipe
What Are Strawberry Cheesecake Crunch Cups?
Strawberry Cheesecake Crunch Cups are individual no-bake desserts that combine creamy cheesecake filling with buttery cookie crumbs and a signature strawberry crunch topping. These portable treats feature layers of graham cracker or vanilla cookie crust, smooth cream cheese mixture, fresh strawberries, and a delightful crunchy topping made with freeze-dried strawberries. Moreover, they offer all the delicious flavors of traditional cheesecake without requiring an oven.
The dessert has gained tremendous popularity on social media platforms. Additionally, these individual portions make serving and portion control incredibly easy. Each cup delivers the perfect balance of textures and flavors in every spoonful.
Why This No-Bake Dessert Is Perfect for Any Occasion
No-bake strawberry cheesecake cups save you valuable time in the kitchen. Furthermore, they’re ideal for summer gatherings when you don’t want to heat up your kitchen. The individual serving sizes eliminate the need for slicing and plating.
These dessert cups work wonderfully for various events. For instance, they’re perfect for birthday parties, potlucks, bridal showers, and family gatherings. The portable nature means guests can easily grab and enjoy them.
Benefits of Individual Dessert Cups
Individual portions help with portion control and reduce waste. Similarly, they allow you to customize different flavors for various preferences. The cups can be prepared hours or even a day ahead. Therefore, you’ll have more time to focus on other party preparations.
The presentation is always impressive and professional-looking. In addition, cleanup becomes much simpler compared to traditional whole cheesecakes. Each guest gets their own perfect serving without any mess.
Essential Ingredients for Perfect Cheesecake Cups
Creating exceptional Strawberry Cheesecake Crunch Cups requires quality ingredients organized into three main components.
For the Cookie Crust Base
The foundation starts with crushed cookies or crackers. You’ll need approximately 1-2 cups of graham cracker crumbs or crushed vanilla sandwich cookies. Golden Oreos are particularly popular for this recipe.
Melted butter binds the crumbs together perfectly. Typically, you’ll use 4-5 tablespoons of unsalted butter, melted. A small amount of granulated sugar (1-2 tablespoons) adds extra sweetness.
For the Creamy Cheesecake Filling
The star ingredient is cream cheese, which should be fully softened to room temperature. Most recipes call for 8-24 ounces depending on batch size. Room temperature cream cheese mixes smoothly without lumps.
Sweetened condensed milk creates a luscious, sweet filling. Alternatively, some recipes use granulated sugar combined with heavy cream. Heavy whipping cream (1-1.5 cups) adds lightness and volume when whipped.
Vanilla extract enhances the overall flavor profile. Additionally, fresh or chopped strawberries can be folded into the filling. Some recipes incorporate strawberry preserves for concentrated flavor.
For the Signature Strawberry Crunch Topping
Freeze-dried strawberries are the key to authentic strawberry crunch. They provide intense strawberry flavor without adding moisture. You’ll typically need 1-2 cups of freeze-dried strawberries, crushed into powder.
More cookies form the crunchy base of the topping. Golden Oreos, vanilla wafers, or shortbread cookies work wonderfully. Melted butter (2-8 tablespoons) helps the mixture hold together.
The combination creates that iconic pink, crunchy topping. Furthermore, it adds a beautiful pop of color to your dessert cups.
Step-by-Step Instructions
Follow these detailed instructions to create perfect Strawberry Cheesecake Crunch Cups every time.
Preparing the Cookie Crust
First, crush your chosen cookies into fine crumbs. You can use a food processor for quick results. Alternatively, place cookies in a sealed plastic bag and crush with a rolling pin.
Transfer the crumbs to a medium mixing bowl. Then, add melted butter and sugar if using. Mix thoroughly until the mixture resembles wet sand. All the crumbs should be evenly coated with butter.
Divide the crumb mixture among your serving cups or glasses. Use approximately 2-3 tablespoons per cup. Press down gently using the bottom of a small glass or spoon. However, don’t pack too tightly, as this makes the dessert difficult to eat.
Place the cups in the refrigerator while preparing the filling. This helps the crust firm up nicely.
Making the Cheesecake Filling
Begin by ensuring your cream cheese is at room temperature. This is crucial for achieving a smooth, lump-free filling. Beat the cream cheese in a large bowl using an electric mixer until completely smooth.
Add your sweetener, whether sweetened condensed milk or granulated sugar. Mix well until fully incorporated. Then, add vanilla extract and mix again.
If using heavy cream, whip it separately until medium peaks form. Gently fold the whipped cream into the cream cheese mixture. This technique keeps the filling light and airy. Use a rubber spatula and fold slowly to maintain the fluffy texture.
For strawberry-flavored filling, fold in chopped fresh strawberries now. Alternatively, mix in strawberry preserves for deeper flavor. Some recipes incorporate freeze-dried strawberry powder directly into the filling.
Creating the Strawberry Crunch Topping
Place freeze-dried strawberries in a food processor or blender. Pulse until they form a fine powder. Add your cookies to the processor and pulse together.
Alternatively, crush both ingredients in a freezer bag with a rolling pin. The texture should be a mix of coarse crumbs and fine powder.
Transfer the mixture to a bowl and stir in melted butter. Mix until everything is well combined. The topping should hold together slightly when pressed.
You can spread the mixture on a parchment-lined baking sheet to dry slightly. However, this step is optional and depends on your preference.
Assembling Your Dessert Cups
Remove the chilled crusts from the refrigerator. Spoon or pipe the cheesecake filling over the crust layer. Fill each cup about three-quarters full.
Smooth the top with a spatula or offset knife. For neater presentation, use a piping bag fitted with a large round tip. This method provides better control and professional appearance.
Add a layer of fresh chopped strawberries if desired. Then, sprinkle the strawberry crunch topping generously over each cup. Reserve some topping if you want to add it just before serving for maximum crunchiness.
Cover the cups with lids or plastic wrap. Refrigerate for at least 2-4 hours before serving. This chilling time allows the filling to set properly.
The Secret to Amazing Strawberry Crunch Topping
The signature strawberry crunch topping sets these dessert cups apart from ordinary cheesecake. Understanding the science behind this component helps you achieve perfect results every time.
Why Freeze-Dried Strawberries Work Best
Freeze-dried strawberries deliver concentrated strawberry flavor without adding moisture. Fresh or frozen strawberries would make the topping soggy. The freeze-drying process removes all water while preserving the fruit’s natural sweetness and color.
You can find freeze-dried strawberries in most grocery stores. They’re typically located in the dried fruit section or near the produce area. Online retailers also offer them in various package sizes.
Choosing the Right Cookies
Golden Oreos are the most popular choice for strawberry crunch topping. They provide sweetness and a light color that doesn’t overpower the pink strawberry hue. Vanilla wafers or Nilla wafers offer a similar effect.
Shortbread cookies create a more buttery, crumbly texture. You can even combine different cookies for unique flavor profiles. Regular chocolate Oreos aren’t recommended as they darken the topping’s appearance.
Getting the Perfect Texture
The ideal strawberry crunch has both fine powder and coarser crumbs. This combination provides visual interest and varied texture. Pulse your food processor carefully to achieve this balance.
Don’t over-process the mixture into completely fine powder. Leave some larger pieces for satisfying crunch. The melted butter should coat everything without making it too wet.
Pro Tips for Maximum Crunchiness
For the crunchiest topping, add it just before serving. Storing it separately prevents moisture from the filling from softening the crumbs. Keep the topping in an airtight container at room temperature.
Some recipes suggest briefly spreading the mixture on a baking sheet to dry. This optional step can enhance crunchiness. However, it’s not necessary for good results.
Tips for Making the Best Cheesecake Filling
Achieving the perfect creamy, smooth cheesecake filling requires attention to several key factors.
Temperature Matters
Always use room temperature cream cheese. Cold cream cheese creates lumps that are difficult to eliminate. Set your cream cheese out 30-60 minutes before starting.
If you forgot to soften it, cut the cream cheese into small cubes. This helps it come to temperature faster. Alternatively, microwave it in short 10-second bursts, checking frequently.
Mixing Techniques
Beat the cream cheese alone first until completely smooth. This step ensures no lumps before adding other ingredients. Scrape down the bowl sides frequently during mixing.
Add ingredients gradually rather than all at once. This approach promotes better incorporation. Mix on medium speed to avoid incorporating too much air, which can cause the filling to deflate.
When folding in whipped cream, use gentle motions. Aggressive stirring deflates the air bubbles you worked to create. A rubber spatula works best for this delicate task.
Sweetness Balance
Taste your filling before assembling the cups. Sweetness preferences vary among individuals. Sweetened condensed milk creates a very sweet filling.
If using granulated sugar, you can adjust the amount to taste. Start with less sugar and add more as needed. Remember that fresh strawberries and the crunch topping also add sweetness.
Adding Strawberry Flavor
Fresh strawberries should be washed, dried thoroughly, and chopped small. Excess moisture can make the filling watery. Pat them dry with paper towels before adding to the mixture.
Strawberry preserves or jam provide more concentrated flavor. They also add a beautiful pink color to the filling. Fold them in gently to create a marbled effect or mix completely for uniform color.
Freeze-dried strawberry powder offers intense flavor without moisture. Blend the strawberries into fine powder before adding. This method creates a striking pink filling with bold strawberry taste.
Creative Variations and Flavor Ideas
Strawberry Cheesecake Crunch Cups serve as an excellent base for numerous creative variations.
Different Fruit Options
While strawberries are classic, other fruits work beautifully too. Blueberries, raspberries, or blackberries create delicious alternatives. Mixed berries offer a colorful, flavorful combination.
Peaches work wonderfully, especially canned peaches in light syrup. Drain them well and chop into small pieces. Fresh mango adds tropical flair and vibrant color.
Lemon cheesecake cups feature lemon juice and zest in the filling. They’re refreshing and perfect for warm weather. Top with lemon zest curls for elegant presentation.
Cookie Crust Variations
Graham crackers provide traditional cheesecake flavor. Chocolate graham crackers add rich, chocolatey notes. Digestive biscuits offer a less sweet, more sophisticated base.
Gingersnap cookies create a spicy, warming crust. This pairs exceptionally well with autumn fruits like apples or pears. Biscoff cookies deliver caramel-like flavor that complements many fillings.
Vanilla wafer crusts taste delicate and light. They allow the cheesecake flavor to shine through. Oreo cookie crusts (chocolate or golden) always please a crowd.
Flavored Fillings
Chocolate cheesecake filling combines cocoa powder with the cream cheese. Melted and cooled chocolate creates richer flavor. White chocolate adds sweetness without darkening the color.
Coffee or espresso powder mixed into the filling satisfies coffee lovers. Just a tablespoon or two provides noticeable flavor. Caramel cheesecake incorporates caramel sauce throughout.
Peanut butter cheesecake uses peanut butter in place of some cream cheese. It pairs wonderfully with chocolate crusts and toppings. Nutella creates a hazelnut-chocolate variation that’s always popular.
Topping Alternatives
While strawberry crunch is signature, other toppings work too. Whipped cream or Cool Whip adds classic appeal. Chocolate shavings provide elegant simplicity.
Fresh fruit slices create a light, healthy-looking finish. Caramel or chocolate sauce drizzled on top adds decadence. Chopped nuts like almonds or pecans contribute pleasant crunch.
Cookie crumbles without freeze-dried fruit offer simpler preparation. Crushed candy bars or cookies create fun, playful variations. Graham cracker crumbs sprinkled on top provide traditional cheesecake appearance.
Storage and Make-Ahead Tips
Proper storage ensures your Strawberry Cheesecake Crunch Cups maintain quality and freshness.
Refrigerator Storage
These dessert cups must be stored in the refrigerator. They contain cream cheese and dairy products that require cold storage. Cover each cup individually with plastic wrap or lids.
Alternatively, arrange cups on a large baking sheet. Cover the entire tray with one large piece of plastic wrap. This method saves time when dealing with multiple servings.
Properly stored cheesecake cups last 2-3 days in the refrigerator. The quality remains excellent during this timeframe. Beyond three days, the crust may become soggy and flavors may diminish.
Make-Ahead Strategies
These desserts are perfect for advance preparation. Make them the evening before your event for stress-free entertaining. This also allows adequate chilling time for the filling to set properly.
You can prepare components separately for even more flexibility. Make the crust and filling up to 24 hours ahead. Store them separately in the refrigerator until assembly time.
The strawberry crunch topping stores well in an airtight container at room temperature. Keep it separate until just before serving for maximum crunchiness. This prevents moisture from softening the delicate crumbs.
Freezing Guidelines
While not ideal, cheesecake cups can be frozen for longer storage. Freeze them without the strawberry crunch topping or whipped cream garnishes. These elements don’t freeze well and become soggy when thawed.
Wrap each cup tightly in plastic wrap, then aluminum foil. This double wrapping prevents freezer burn and odor absorption. Frozen cheesecake cups keep for up to one month.
Thaw frozen cups overnight in the refrigerator. Never thaw at room temperature, as this promotes bacterial growth. Add fresh topping and garnishes after thawing for best results.
Maintaining Crunch
The biggest challenge is keeping the topping crunchy. Moisture from the filling gradually softens the crumbs over time. Add the strawberry crunch topping within 2-4 hours of serving for optimal texture.
Store extra topping separately in an airtight container. Guests can add their own topping at serving time if preferred. This interactive element can be fun for parties.
Keep the cups covered to prevent the cream cheese from absorbing refrigerator odors. Proper covering also prevents the surface from drying out. Use tight-fitting lids or plastic wrap pressed directly onto the surface.
Serving Suggestions and Presentation Ideas
Beautiful presentation elevates Strawberry Cheesecake Crunch Cups from simple desserts to stunning showpieces.
Choosing the Right Containers
Clear glass containers showcase the beautiful layers. Mason jars, parfait glasses, or small glass jars work wonderfully. The transparency allows guests to see all the components.
Plastic dessert cups with lids are practical for large gatherings. They’re portable, affordable, and disposable for easy cleanup. Many craft stores sell these in various sizes.
Small bowls or ramekins offer a more rustic presentation. Short, wide glasses provide easy access with spoons. Wine glasses or champagne flutes create elegant, sophisticated appeal for special occasions.
Layering Techniques
Create visual interest through thoughtful layering. Start with crust, add filling, then strawberries, more filling, and finally the crunch topping. This creates distinct, attractive layers.
Alternate colors for maximum impact. The white cream cheese, red strawberries, and pink crunch create stunning contrast. Ensure each layer is visible from the outside of clear containers.
Use a piping bag for neat, professional layers. Pipe the filling in a circular motion from outside to center. This technique eliminates air pockets and creates smooth layers.
Garnishing Ideas
Fresh strawberry slices make classic, beautiful garnishes. Cut them thin and press against the inside of glass containers before filling. Alternatively, place a whole or halved strawberry on top.
Fresh mint leaves add a pop of green color. They also provide a subtle, refreshing aroma. A small sprig tucked beside the strawberry looks professional.
Whipped cream rosettes piped on top add elegance. Use a star tip for beautiful designs. A light dusting of extra strawberry crunch over whipped cream adds texture and color.
Serving Temperature and Timing
Serve cheesecake cups chilled straight from the refrigerator. They taste best when cold and firm. Remove them from the refrigerator just before serving.
If serving at an outdoor event, keep cups on ice or in a cooler. Dairy-based desserts should not sit at room temperature for extended periods. Plan to serve them within 2 hours of removing from refrigeration.
Provide small spoons appropriate for the container size. Long-handled spoons work best for tall, narrow glasses. Regular dessert spoons suit wider, shorter cups.
Portion Control and Sizing
Individual cups naturally control portions. This helps guests enjoy dessert without overindulging. It also makes calculating quantities easier for events.
Small 2-4 ounce cups work well for rich, sweet fillings. Larger 6-8 ounce servings suit lighter, less sweet versions. Consider your audience when choosing container sizes.
For parties, offer varying sizes to accommodate different appetites. Mini cups allow people to sample without commitment. Larger portions satisfy serious cheesecake enthusiasts.
Troubleshooting Common Problems
Even experienced bakers occasionally encounter issues when making Strawberry Cheesecake Crunch Cups.
Lumpy Cheesecake Filling
Lumps usually result from cold cream cheese. Always bring cream cheese to room temperature before mixing. This simple step prevents most lump-related problems.
If lumps appear despite proper temperature, continue beating longer. Use medium-high speed and scrape down the bowl frequently. A hand mixer or stand mixer works better than manual whisking for eliminating lumps.
For stubborn lumps, press the mixture through a fine-mesh strainer. This removes lumps but requires patience and effort. Prevention through proper temperature is much easier.
Watery or Runny Filling
Excess moisture from fresh strawberries can thin the filling. Always pat strawberries completely dry before adding. Consider using fewer strawberries or switching to preserves.
Over-beating the mixture can deflate whipped cream. This makes the filling less stable and more prone to weeping. Fold whipped cream gently using a spatula rather than beating.
Insufficient chilling time leaves filling soft and loose. Ensure cups chill for at least 4 hours before serving. Overnight chilling produces the firmest, best-textured results.
Soggy Crust
Moisture migration from the filling softens crusts over time. This is natural and somewhat unavoidable in no-bake desserts. Assemble cups no more than 24 hours before serving.
Insufficient butter in the crust prevents proper binding. The crust should feel like wet sand and hold together when pressed. Add more melted butter if the mixture seems too dry.
Not pressing the crust firmly enough creates loose, crumbly bases. However, don’t pack it too tightly in cups, as this makes eating difficult. Find a balance between firm and not overly compressed.
Crunch Topping Problems
The topping becomes soggy when added too far in advance. Add it within a few hours of serving for best crunchiness. Store extra topping separately until needed.
Too much butter makes the topping greasy and wet. Add melted butter gradually until the mixture just holds together. You may not need all the butter specified in some recipes.
Freeze-dried strawberries absorb moisture from humid environments. Store them in airtight containers in cool, dry places. Consider using desiccant packets for areas with high humidity.
Difficulty Assembling
Filling that’s too thick won’t pipe or spread easily. Slightly over-beaten cream can make the mixture stiff. Beat the cream to soft, not stiff, peaks for easier handling.
Cups that are too small make layering challenging. Choose appropriately sized containers for your recipe quantities. Wider openings are easier to fill than narrow ones.
Using a piping bag simplifies filling narrow or tall containers. Cut the tip opening large enough for easy piping. A large round tip or no tip at all works well.
Nutritional Considerations
Understanding the nutritional content helps you make informed decisions about serving Strawberry Cheesecake Crunch Cups.
Calorie Content
These dessert cups are indulgent treats with significant calories. A typical serving contains 250-400 calories depending on size and ingredients. The cream cheese and butter contribute most of the calories.
Larger portions naturally contain more calories. Mini cups with 2-3 ounces of filling have fewer calories than full-size 6-8 ounce servings. Consider portion size when planning your menu.
Ingredient Modifications
Reduced-fat cream cheese can lower overall fat and calories. However, it affects texture and may produce less creamy results. Light cream cheese works better than fat-free versions.
Greek yogurt can replace some or all of the cream cheese. This substitution reduces fat while adding protein. The flavor will be tangier and slightly different from traditional cheesecake.
Sugar-free or reduced-sugar options are available. Use sugar substitutes suitable for cold desserts. Keep in mind that these may affect texture and taste.
Dietary Restrictions
Standard recipes contain dairy, making them unsuitable for lactose intolerance or vegan diets. Dairy-free cream cheese and coconut cream offer alternatives. These substitutions create different but still delicious results.
Gluten-free cookie options accommodate gluten sensitivity. Many vanilla wafers and shortbread cookies come in gluten-free versions. Always check labels to verify gluten-free status.
The dessert is naturally egg-free in most no-bake versions. This makes it suitable for those with egg allergies. Always verify your specific recipe doesn’t include eggs.
Frequently Asked Questions
Can I make Strawberry Cheesecake Crunch Cups without cream cheese?
While cream cheese is traditional, you can substitute thick Greek yogurt. The result will have tangier flavor and slightly different texture. Mascarpone cheese offers a richer, creamier alternative. However, these substitutes won’t taste exactly like classic cheesecake.
How long do these dessert cups need to chill?
The minimum chilling time is 2 hours, but 4 hours produces better results. Overnight chilling ensures the firmest, best-textured filling. The longer chilling allows flavors to meld beautifully.
Can I use frozen strawberries instead of fresh?
Frozen strawberries work but require proper preparation. Thaw them completely and drain all excess liquid thoroughly. Pat them very dry with paper towels before adding to prevent watery filling.
Where can I find freeze-dried strawberries?
Most grocery stores carry freeze-dried strawberries in the dried fruit section. They’re also available near produce or in the natural foods aisle. Online retailers offer them in bulk at competitive prices.
Why is my cheesecake filling not setting?
Insufficient chilling time is the most common cause. Ensure cups chill for at least 4 hours. Watery ingredients or over-beating can also prevent proper setting. Check that you measured ingredients accurately.
Can I make these Strawberry Cheesecake Crunch Cups ahead of time?
Absolutely, these desserts are perfect for advance preparation. Make them up to 24 hours ahead and store covered in the refrigerator. Add the crunch topping just before serving for maximum freshness.
What’s the best container size for individual servings?
Size depends on the occasion and appetite. Small 2-4 ounce cups work well for parties with multiple desserts. Medium 6-8 ounce portions suit them as the main dessert. Choose clear containers to showcase the beautiful layers.
Can I substitute the Golden Oreos in the crunch topping?
Yes, several alternatives work well. Vanilla wafers, shortbread cookies, or graham crackers all create delicious variations. Each produces slightly different flavor and texture. Experiment to find your favorite combination.
Conclusion
Strawberry Cheesecake Crunch Cups deliver all the deliciousness of traditional cheesecake in convenient, portable portions. These no-bake desserts combine buttery crusts, creamy filling, fresh strawberries, and signature crunchy topping for perfect flavor and texture balance. Furthermore, they’re ideal for entertaining since you can prepare them completely in advance.
The recipe is surprisingly simple despite its impressive appearance. Even beginner bakers can achieve beautiful, professional-looking results. The individual serving format makes portion control easy while adding elegant presentation to any gathering.
Whether you’re hosting a summer party, celebrating a special occasion, or simply craving something sweet, these Strawberry Cheesecake Crunch Cups won’t disappoint. Start with the classic version, then experiment with creative variations to discover your favorites. Try making these delightful treats this weekend and watch them become your go-to dessert for every occasion!
Print
Strawberry Cheesecake Crunch Cups
- Total Time: 6 minutes
- Yield: 15 1x
Ingredients
For the Crunch Base:
1 cup graham cracker crumbs (or crushed digestive biscuits)
2 tablespoons melted butter
1 tablespoon sugar
For the Cheesecake Filling:
8 oz (225 g) cream cheese, softened
1/4 cup powdered sugar
1 teaspoon vanilla extract
1/2 cup heavy cream, whipped
For the Topping:
1 cup fresh strawberries, diced
Optional: crushed cookies or graham crackers, chocolate shavings, or mint leaves for garnish
Instructions
1. Prepare the Crunch Base
-
In a small bowl, combine graham cracker crumbs, melted butter, and sugar.
-
Press about 2 tablespoons of the mixture into the bottom of each serving cup.
2. Make the Cheesecake Filling
-
In a bowl, beat cream cheese until smooth.
-
Add powdered sugar and vanilla extract, mixing until combined.
-
Gently fold in whipped cream until light and fluffy.
3. Assemble the Cups
-
Spoon or pipe a layer of cheesecake filling over the crunch base.
-
Add a layer of diced strawberries.
-
Repeat layers if desired, finishing with strawberries on top.
4. Chill
-
Refrigerate for at least 1–2 hours to allow the cheesecake layer to set.
5. Serve
-
Optional: Garnish with crushed cookies, chocolate shavings, or mint leaves before serving.
Notes
Crunch options: Use shortbread cookies, Oreos, or graham crackers.
Cheesecake flavor: Add lemon zest or strawberry puree for extra flavor.
Make-ahead: Assemble cups a day in advance for convenience.
Layering: For a visually appealing presentation, use clear cups or jars.
- Prep Time: 6
Nutrition
- Calories: 320