
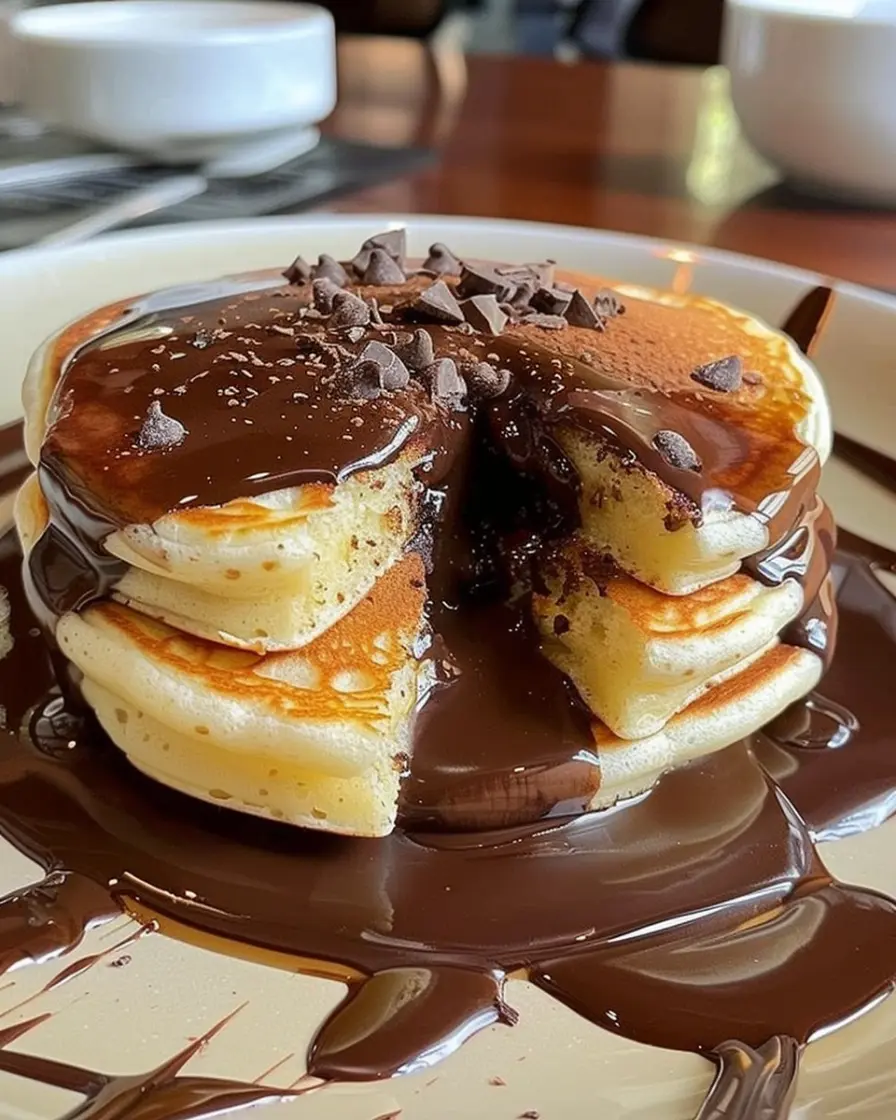
Fluffy Pancakes with Chocolate Filling: Your Dream Breakfast, Perfected
Ah, the humble pancake. We all know it, and we definitely all love it. But let’s be honest—sometimes, the standard stack needs a little je ne sais quoi. Imagine this instead: you slice into a cloud-like, impossibly fluffy pancake, and a river of rich, warm chocolate filling comes cascading out. It’s not just breakfast; it’s a show-stopping event, a guaranteed smile-maker, and honestly, the ultimate way to turn an ordinary morning into a celebration.
This guide is your one-way ticket to achieving that breakfast nirvana. We’re going to dive deep, leaving no stone unturned. First, we’ll unravel the delicious science behind what makes pancakes rise to the occasion. Next, you’ll get a foolproof, step-by-step recipe for these decadent treats. Furthermore, we’ll cover pro tips and tricks to avoid common pitfalls, explore fantastic variations to keep things exciting, and finally, answer all your burning questions. So, preheat your metaphorical skillets, and let’s get ready to create some magic.
The Irresistible Allure of the Fluffy, Filled Pancake
Why does the mere thought of fluffy pancakes with chocolate filling make our hearts beat a little faster? Well, it’s a masterclass in contrast and comfort. On one hand, you have the pillowy-soft, slightly tangy cake, a testament to simple, wholesome ingredients. On the other, you discover a hidden core of decadent, meltingly smooth chocolate. This combination isn’t just tasty; it’s a multi-sensory experience that feels indulgent and special.
Moreover, this dish brilliantly bridges the gap between everyday ease and weekend luxury. Sure, you could just sprinkle a few chocolate chips on your batter—and there’s absolutely nothing wrong with that! However, encasing a dedicated chocolate filling creates a glorious, gooey surprise in every single bite. Consequently, it transforms a quick meal into a memorable centerpiece for Saturday brunches, birthday breakfasts, or even a “just because” treat that shows your family a little extra love. Ultimately, it’s about creating a moment of pure, unadulterated joy, one delicious bite at a time.
The Anatomy of a Perfect Fluffy Pancake
So, what’s the secret behind achieving that ethereal fluffiness? It’s not magic—it’s science! Understanding a few key principles will transform your pancake game from flat and sad to toweringly light and tender.
First and foremost, the quest for the perfect fluffy pancake hinges on its structure. Essentially, you’re building a delicate network of gluten that’s inflated by tiny pockets of gas. Get this balance right, and you’re golden; quite literally.
The Role of Leavening Agents: Baking Powder vs. Baking Soda
This is the engine room of your pancake! Most importantly, these ingredients are responsible for the lift. Baking soda is a base that requires an acid (like buttermilk or yogurt) to activate, creating carbon dioxide bubbles immediately. Meanwhile, baking powder contains its own acid and activates twice: once when wet and again when heated. Therefore, using a combination of both, as many recipes do, gives you an immediate rise and a sustained one in the pan, resulting in that coveted light-as-air texture.
Gluten Development: The Key to Tenderness, Not Toughness
Ah, gluten—often misunderstood! In truth, you need just the right amount. When flour mixes with liquid, gluten proteins form. Mix too much, and you create a strong, chewy network better suited to bread; this is the enemy of a tender crumb. Conversely, mixing until just combined leaves the gluten loose and weak, perfect for trapping those gas bubbles without becoming tough. Remember, a few lumps in your batter are not just okay; they’re a sign you’re on the right track! For a deeper dive into this, check out this explanation on the science behind gluten development in pancakes.
Fats and Dairy: For Richness, Flavor, and a Tender Crumb
Finally, let’s talk about richness. Fats, like melted butter or oil, coat the flour proteins, which further inhibits gluten formation and ensures a supremely tender bite. Furthermore, the dairy you choose plays a huge role. Buttermilk, for instance, is the ultimate MVP. Its acidity not only activates the baking soda but also tenderizes the gluten, and its thick consistency contributes to a beautifully thick batter that doesn’t spread too thin on the griddle.
Crafting the Dreamy Chocolate Filling
Now, for the star of the show: that glorious, oozy center! The beauty of the chocolate filling is its versatility. You can choose your own adventure based on what you have in your pantry and how decadent you’re feeling.
The Simple Route: Chocolate Chips or Chopped Chocolate Bars
This is the “no-fuss, maximum reward” method. Simply scattering a few high-quality semi-sweet chocolate chips or small chunks of a dark chocolate bar onto the batter once it’s in the pan works wonders. As they heat, they melt into a perfect puddle. It’s incredibly easy and delivers that classic, satisfying meltiness.
The Luxurious Spread: Homemade Chocolate Ganache
If you want to truly impress, ganache is the way to go. It’s surprisingly simple: just heat cream and pour it over finely chopped chocolate, then stir until smooth. Once cooled, it thickens into a spreadable, intensely chocolatey paste that holds its shape beautifully inside the pancake, creating an almost lava-cake-like experience.
The Crowd-Pleaser: Nutella or Chocolate-Hazelnut Spread
For a surefire hit, especially with kids, reach for the jar of chocolate-hazelnut spread. It’s already the perfect consistency for spreading and it melts into a familiar, deliciously nutty river of joy. Honestly, it’s a nearly foolproof option that everyone adores.
Your Foolproof Recipe for Fluffy Pancakes with Chocolate Filling
Alright, enough theory—let’s get down to business! This recipe is designed for success, prioritizing technique to guarantee you get those fluffy pancakes every single time.
Ingredients You’ll Need
For the Pancake Batter:
-
2 cups all-purpose flour
-
2 tablespoons granulated sugar
-
2 teaspoons baking powder
-
1 teaspoon baking soda
-
½ teaspoon fine sea salt
-
2 cups buttermilk (cold)
-
2 large eggs
-
¼ cup unsalted butter, melted and cooled
-
1 teaspoon pure vanilla extract
For the Chocolate Filling:
-
1 cup semi-sweet chocolate chips OR
-
½ cup prepared chocolate ganache OR
-
½ cup chocolate-hazelnut spread
Essential Equipment
-
A good non-stick skillet or griddle
-
A large mixing bowl and a whisk
-
A ladle or ¼ cup measuring cup
-
A thin, flexible spatula
Step-by-Step Instructions
-
Preparing the Batter: First, in your large bowl, whisk together the dry ingredients: flour, sugar, baking powder, baking soda, and salt. In another jug, whisk the cold buttermilk, eggs, cooled melted butter, and vanilla. Then, create a well in the center of your dry ingredients and pour the wet mixture in. Gently fold them together with a spatula until just combined. Remember, walk away from the bowl while there are still a few dry streaks of flour! Let the batter rest for 5-10 minutes; this allows the flour to hydrate and the leavening agents to start working.
-
Preparing the Filling: While the batter rests, get your chocolate filling ready. If using chips or spread, have it measured and ready to go. If making ganache, prepare it ahead of time so it has time to cool and thicken.
-
The Cooking Process: Now, heat your skillet or griddle over a medium heat. To test if it’s ready, flick a few drops of water onto the surface—if they dance and evaporate quickly, you’re good to go. Lightly grease the surface with butter or oil. Then, ladle a portion of batter (about ¼ cup) onto the skillet. Immediately, drop a tablespoon of your chosen chocolate filling right into the center of the pancake. Quickly, cover the chocolate with another tablespoon or two of batter to encase it completely. Cook until the edges look set and bubbles form and pop on the surface (about 2-3 minutes).
-
Serving Immediately: Carefully slide your spatula underneath and flip that gorgeous pancake! Cook for another 1-2 minutes on the second side until golden brown and cooked through. Subsequently, serve them immediately right off the griddle. This is non-negotiable for the best texture and that iconic melt-y chocolate center.
Pro Tips for Pancake Perfection, Every Single Time
You’ve got the recipe, but these next-level tips will elevate you from a home cook to a breakfast short-order hero!
The Perfect Pan Temperature: The Water Droplet Test
Getting the temperature right is arguably the most crucial step. Too hot, and the outside burns before the inside cooks; too low, and you’ll get pale, greasy pancakes. The water droplet test is your best friend here. Furthermore, don’t be afraid to adjust the heat as you cook your first batch—the first pancake is often a test run!
How to Achieve a Perfectly Golden-Brown Color
That beautiful, even golden hue comes from the Maillard reaction—a chemical response between amino acids and sugars. For the best color, use a fat with a low smoke point, like butter, but clarify it first to prevent burning. Alternatively, a neutral oil like avocado or vegetable oil works great for a consistent, non-stick cook.
The Art of the Flip: Confidence is Key
Resist the urge to press down on the pancake with your spatula after flipping! This compresses all those beautiful air pockets you worked so hard to create. Instead, use a swift, confident wrist motion to flip it. Wait for those bubbles to appear and the edges to look matte instead of glossy—that’s your signal.
Keeping a Batch Warm for Serving
To serve everyone at once, keep finished pancakes warm on a wire rack set over a baking sheet in a preheated 200°F (95°C) oven. This prevents them from getting soggy on the bottom. For more details, see these expert techniques for keeping pancakes warm.
Pancake Problems? Here’s Your Fix-It Guide
Even the best of us have a kitchen mishap. Don’t worry—here’s how to troubleshoot common pancake pitfalls.
-
Problem: Pancakes are flat and dense.
-
Solution: Your baking powder or soda is likely expired! Test them by adding a pinch to hot water; if it doesn’t bubble vigorously, it’s time to replace them. Also, check that you didn’t overmix the batter.
-
-
Problem: Filling is leaking out everywhere.
-
Solution: You might not be encasing it properly. Ensure you cover the chocolate completely with a fresh layer of batter immediately after dolloping it. Also, avoid overfilling—a tablespoon is usually plenty.
-
-
Problem: Pancakes are burning on the outside but raw inside.
-
Solution: Your heat is way too high! Reduce the temperature to a true medium heat. The cooking process should be steady, not frantic.
-
-
Problem: Batter is too thick or too thin.
-
Solution: Batter thickness can vary based on humidity and flour type. If it’s too thick, add a splash of buttermilk. If it’s too thin, add a tablespoon of flour at a time until it reaches a scoopable, thick consistency.
-
Delicious Variations to Explore
Once you’ve mastered the classic, the world of fluffy pancakes with chocolate filling is your oyster! Here are some delicious twists.
Decadent Double Chocolate Pancakes
Why not go all in? Add ¼ cup of unsweetened cocoa powder to your dry ingredients. For clarity, you might need to add a touch more buttermilk to balance the dryness. This creates an intensely chocolatey experience from the first bite to the last.
The Ultimate S’mores Pancake Experience
Bring the campfire inside! Use a chocolate bar for the filling, then top the finished pancake with a dollop of marshmallow fluff (toast it with a kitchen torch if you’re feeling fancy) and a sprinkle of crushed graham cracker crumbs. It’s pure nostalgia on a plate.
Berry and Chocolate Bliss
The combination of rich chocolate and tart berries is a match made in heaven. Press a few fresh raspberries into the batter along with the chocolate filling, or simply serve your stack with a generous handful of fresh strawberries on top.
Dietary Modifications: Gluten-Free and Vegan Options
Gluten-Free: Simply swap the all-purpose flour for a reliable 1:1 gluten-free baking blend. The result is just as tender and fluffy!
Vegan: Use a flax egg (1 tbsp ground flaxseed + 3 tbsp water per egg), plant-based milk mixed with lemon juice for “buttermilk,” and vegan butter. For the filling, ensure your chocolate is dairy-free.
Serving Suggestions: Building the Perfect Bite
The journey doesn’t end when the pancakes leave the griddle. Presentation is the final flourish!
Classic Toppings: Maple syrup, whipped cream, fresh berries.
You can’t go wrong with the classics. A drizzle of pure maple syrup, a cloud of freshly whipped cream, and a handful of vibrant berries complement the chocolate without overpowering it.
Over-the-Top Indulgence: Ice cream, chocolate sauce, salted caramel.
Transform your breakfast into a dessert-worthy spectacle. Place a scoop of vanilla bean ice cream on a warm stack, drizzle with homemade chocolate sauce and salted caramel, and maybe even add some chopped nuts for crunch. It’s the ultimate weekend treat.
The Perfect Brunch Spread: What to serve alongside.
For a full feast, pair your pancakes with crispy bacon or savory breakfast sausages to balance the sweetness. Fresh fruit salad, a pot of strong coffee, and a glass of fresh orange juice complete the picture perfectly.
Frequently Asked Questions (FAQs)
Q: Can I make the pancake batter the night before?
A: While you can, it’s not ideal. The leavening agents will lose their potency overnight, leading to denser pancakes. For best results, mix your dry and wet ingredients separately the night before and quickly combine them in the morning.
Q: Why are my pancakes not fluffy?
A: The top three culprits are: 1) Overmixing the batter, 2) Using expired baking powder or soda, and 3) Incorrect pan temperature (usually too low). Check these three things first!
Q: What’s the best chocolate to use for the filling?
A: For the best flavor and melt, use a high-quality chocolate bar with a high cocoa butter content (around 60-70% works well). The quality of your chocolate makes a huge difference! Understanding the difference between cocoa and cacao powder can also help you choose better products.
Q: Can I freeze these pancakes for later?
A: Absolutely! Let them cool completely to room temperature first. Then, place them in a single layer on a parchment-lined baking sheet and flash-freeze for 1 hour. This prevents them from sticking together. Finally, transfer the frozen pancakes to a reusable zip-top bag or airtight container. They’ll keep for up to 2 months. Reheat straight from frozen in a toaster or a 350°F (175°C) oven until warm.
Q: How do I prevent the chocolate from burning?
A: By fully enclosing the filling within the batter, you protect it from the direct heat of the pan. Ensuring your pan is at a consistent medium heat, not high heat, is also crucial to prevent the outside—and by extension, the filling—from burning before the inside cooks.
Fluffy Pancakes with Chocolate Filling
Description
🥞 Fluffy Pancakes with Chocolate Filling
Ingredients (Makes 8–10 pancakes)
For the pancakes:
-
1 ½ cups all-purpose flour
-
2 tbsp sugar
-
2 tsp baking powder
-
½ tsp baking soda
-
¼ tsp salt
-
1 large egg
-
1 cup buttermilk (or 1 cup milk + 1 tbsp lemon juice, rested 5 min)
-
½ cup milk (adjust for batter consistency)
-
2 tbsp melted butter (plus more for cooking)
-
1 tsp vanilla extract
For the filling:
-
½ cup chocolate spread (Nutella, ganache, or melted chocolate)
Instructions
-
Prepare the chocolate filling (important step):
-
Line a tray with parchment paper.
-
Spoon small dollops (about 1 tbsp each) of chocolate spread and freeze for 30 minutes until firm.
-
This makes it easier to seal the filling inside the pancakes.
-
-
Make the pancake batter:
-
In a bowl, whisk together flour, sugar, baking powder, baking soda, and salt.
-
In another bowl, whisk egg, buttermilk, milk, melted butter, and vanilla.
-
Pour wet ingredients into dry, gently mixing until just combined (don’t overmix; lumps are okay).
-
-
Cook the pancakes with filling:
-
Heat a nonstick skillet over medium heat and lightly grease with butter.
-
Pour about 2 tbsp batter onto the skillet. Place a frozen chocolate disk in the center, then cover with another 2 tbsp batter.
-
Cook 2–3 minutes, until bubbles form and edges look set. Flip carefully and cook 1–2 minutes more until golden brown.
-
-
Serve:
-
Stack the fluffy pancakes, dust with powdered sugar, drizzle with chocolate syrup, or top with fresh berries and whipped cream.
-