
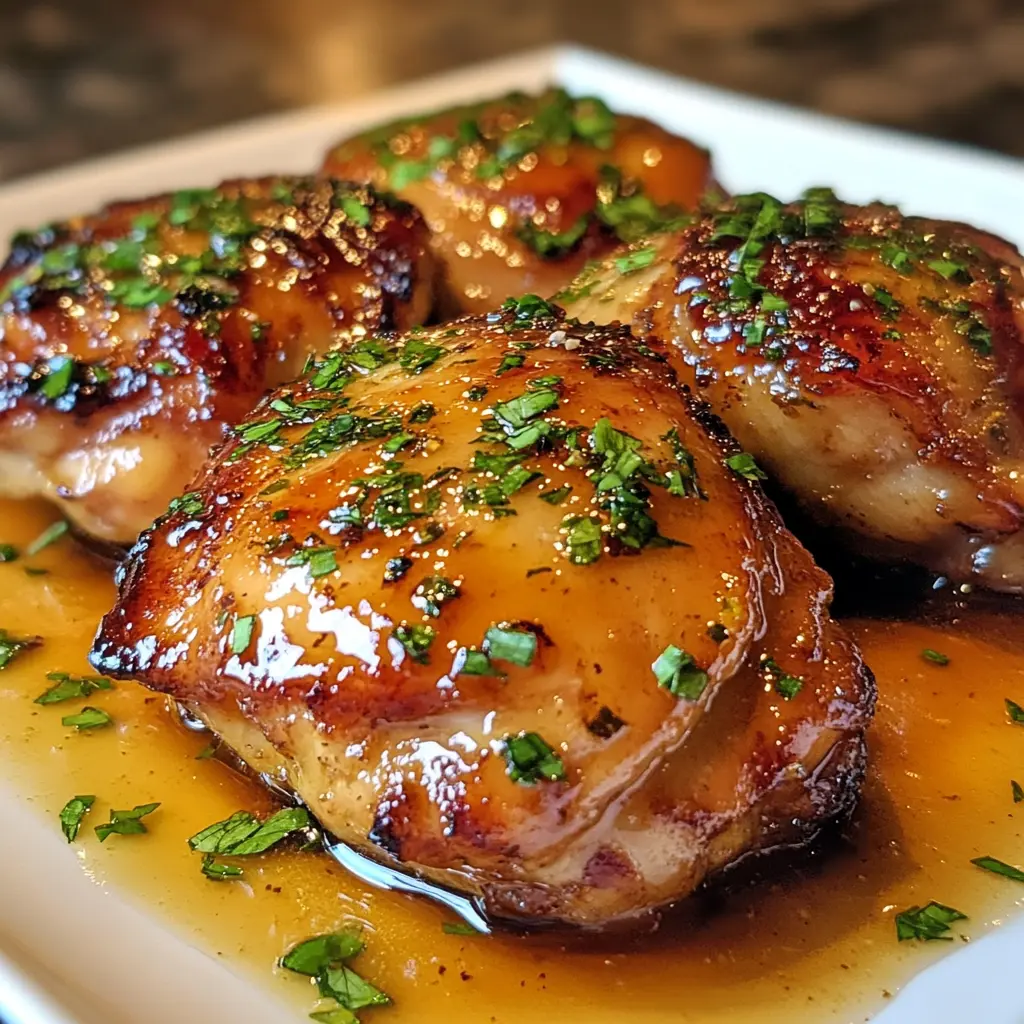
Honey Butter Glazed Chicken Thighs: The Ultimate Guide to Sweet and Savory Perfection
Introduction
Honey Butter Glazed Chicken Thighs represent the perfect marriage of sweet and savory flavors. This dish delivers restaurant-quality results in your home kitchen. Furthermore, the combination of rich butter, natural honey, and juicy chicken creates an irresistible meal.
The appeal of this recipe lies in its simplicity. Moreover, chicken thighs offer more flavor than breasts. Additionally, they remain tender and moist during cooking. Consequently, you’ll achieve perfect results every time.
This comprehensive guide will walk you through everything needed. Specifically, you’ll learn professional techniques for crispy skin. Similarly, you’ll master the art of creating that signature glaze. Therefore, your family will request this dish repeatedly.
What Makes Honey Butter Glazed Chicken Thighs Special
Superior Flavor Profile
Chicken thighs contain more fat than breast meat. As a result, they deliver richer, more pronounced flavors. Additionally, the dark meat stands up beautifully to bold glazes. Thus, the honey butter coating enhances rather than overwhelms.
The glaze itself creates incredible taste complexity. Indeed, honey provides natural sweetness without processed sugar. Meanwhile, butter adds luxurious richness and depth. Furthermore, savory elements like garlic and soy sauce balance everything perfectly.
Texture Excellence
Properly cooked chicken thighs offer multiple textures. Initially, you’ll experience crispy, golden-brown skin. Subsequently, you’ll bite into tender, juicy meat. Finally, the sticky glaze adds another delightful layer.
The cooking process creates these distinct textures. Specifically, high heat renders the fat from skin. Moreover, careful timing prevents dryness inside. Consequently, each component achieves its ideal state.
Essential Ingredients Breakdown
Main Components
Chicken Thighs: Choose bone-in, skin-on thighs for best results. They typically weigh 4-6 ounces each. Additionally, look for uniform sizing for even cooking.
Honey: Use pure, natural honey for optimal sweetness. Different varieties offer unique flavor notes. For instance, clover honey provides mild sweetness. Meanwhile, wildflower honey adds complexity.
Butter: Select unsalted butter to control sodium levels. It should be fresh and high-quality. Furthermore, European-style butter adds extra richness.
Seasoning Elements
Salt and Pepper: Essential for enhancing natural flavors. Use kosher salt for better control. Additionally, freshly ground black pepper delivers more punch.
Garlic: Fresh garlic provides the best flavor. Alternatively, garlic powder works in a pinch. However, fresh cloves offer superior taste.
Soy Sauce: Adds umami depth and saltiness. Light soy sauce works best for glazes. Moreover, it helps create beautiful color.
Coating Options
Flour or Starch: Creates that coveted crispy exterior. All-purpose flour is most common. However, potato starch delivers extra crispiness.
Kitchen Tools You’ll Need
Essential Equipment
A large, heavy-bottomed skillet is crucial for even heating. Cast iron works exceptionally well for this recipe. Additionally, it maintains consistent temperature throughout cooking.
A reliable meat thermometer ensures perfect doneness. Digital instant-read models provide quick, accurate readings. Furthermore, they prevent overcooking disasters.
Helpful Additions
A wire rack placed over a baking sheet helps. Specifically, it allows air circulation during oven finishing. Consequently, skin crisps from all sides.
Quality tongs make flipping easier and safer. Choose ones with silicone tips for nonstick pans. Moreover, they provide excellent grip control.
Step-by-Step Cooking Instructions
Preparation Phase
Remove chicken from refrigerator 20 minutes before cooking. Room temperature meat cooks more evenly. Additionally, pat thighs completely dry with paper towels. This crucial step ensures crispy skin.
Season chicken generously with salt and pepper. Make sure to season both sides thoroughly. Furthermore, don’t be timid with seasoning.
Mix flour with additional seasonings in a shallow dish. Include garlic powder and paprika if desired. Then, dredge each thigh lightly but completely.
Cooking Process
Heat oil in your skillet over medium-high heat. Wait until it shimmers before adding chicken. Moreover, avoid crowding the pan for proper browning.
Place chicken skin-side down first. Subsequently, resist the urge to move it. Indeed, letting it cook undisturbed creates better crust. Cook for 5-7 minutes until golden brown.
Flip chicken carefully using tongs. Then, cook the other side for another 5-7 minutes. Additionally, check internal temperature reaches 165°F. Remove chicken and set aside temporarily.
Creating the Glaze
Wipe excess oil from the pan carefully. Next, melt butter over medium heat. Add minced garlic and cook for 30 seconds until fragrant.
Pour in honey, soy sauce, and water. Stir continuously to combine all ingredients thoroughly. Furthermore, bring mixture to a gentle simmer.
Cook sauce for 2-3 minutes until slightly thickened. It should coat the back of a spoon. Additionally, the glaze will thicken more as it cools.
Final Assembly
Return chicken to the pan with glaze. Turn each piece to coat completely. Moreover, spoon sauce over the top repeatedly.
Cook for 1-2 additional minutes. This allows flavors to penetrate the meat. Consequently, every bite delivers that signature taste.
Achieving Perfect Crispy Skin
Pre-Cooking Secrets
Dry skin is absolutely essential for crispiness. Pat chicken thoroughly with paper towels. Additionally, air-drying in the refrigerator overnight helps tremendously.
Score the skin lightly in a crosshatch pattern. This allows fat to render more easily. Furthermore, it creates more surface area for crisping.
Cooking Techniques
Start chicken skin-side down in a cold pan. Then, gradually increase heat to medium-high. This method renders fat slowly and thoroughly.
Don’t move the chicken while it cooks. Indeed, patience is key for proper browning. Moreover, moving too early tears the skin.
Use a heavy pan that distributes heat evenly. Cast iron or stainless steel works best. Additionally, avoid nonstick pans for maximum crisping.
Finishing Touches
For extra-crispy results, finish under the broiler. Place chicken on a wire rack first. Then, broil for 2-3 minutes while watching carefully.
The skin should bubble and turn deep golden. However, monitor closely to prevent burning. Consequently, you’ll achieve restaurant-quality crispiness.
Making the Perfect Honey Butter Glaze
Ingredient Ratios
The classic ratio balances sweetness and richness beautifully. Typically, use 1/3 cup honey to 4 tablespoons butter. Additionally, include 2 tablespoons soy sauce for depth.
Water helps thin the glaze appropriately. Usually, 1/2 cup creates ideal consistency. Moreover, it prevents the glaze from becoming too thick.
Flavor Enhancements
Brown sugar adds caramelized notes to the glaze. Use 2 tablespoons for enhanced sweetness. Furthermore, it deepens the color beautifully.
Vinegar brightens the overall flavor profile. Just 1 tablespoon cuts through richness perfectly. Additionally, it prevents cloying sweetness.
Garlic powder provides savory balance. Use 1/2 teaspoon for subtle flavor. Alternatively, fresh minced garlic offers bolder taste.
Consistency Tips
Simmer the glaze until it thickens slightly. It should coat chicken without running off. However, avoid over-reducing, which creates syrup.
The glaze will thicken as it cools. Therefore, err on the thinner side initially. Additionally, you can always reduce it more.
Cooking Methods Compared
Skillet Method
Pan-frying delivers the crispiest skin possible. It also provides the most control over browning. Furthermore, you can make the glaze in the same pan.
This method works best for smaller batches. Typically, 4-6 thighs fit comfortably. Moreover, it requires active attention throughout cooking.
Oven-Baked Approach
Baking at 425°F produces excellent results. The high heat crisps skin while cooking meat evenly. Additionally, this method handles larger quantities easily.
Place thighs on a wire rack for best results. This promotes air circulation around chicken. Consequently, skin crisps on all sides.
Bake for 35-40 minutes until internal temperature reaches 170°F. Then, brush with glaze during the last 10 minutes. Finally, broil briefly for extra caramelization.
Combination Technique
Start chicken in a hot skillet for initial browning. Then, transfer to a 375°F oven to finish cooking. This method combines benefits of both approaches.
Sear skin-side down for 5 minutes first. Next, flip and place entire pan in oven. Cook for 20-25 minutes until done thoroughly.
Nutritional Benefits
Protein Powerhouse
Chicken thighs provide excellent protein content. One serving delivers approximately 40 grams of protein. Additionally, this supports muscle maintenance and growth.
Dark meat contains more iron than breast meat. Furthermore, it provides essential B vitamins. Consequently, it contributes to overall nutritional needs.
Balanced Macronutrients
One serving contains around 397 calories. This includes 13 grams of fat from chicken and butter. Moreover, the honey adds approximately 32 grams of carbohydrates.
The fat content helps with nutrient absorption. Specifically, fat-soluble vitamins need dietary fat. Additionally, it promotes satiety and satisfaction.
Healthier Preparation Tips
Remove skin before eating to reduce fat content. This cuts calories significantly without sacrificing flavor. However, cook with skin on for moisture retention.
Use less honey for lower sugar content. Alternatively, thin glaze with more broth instead of honey. Furthermore, increase garlic and spices for flavor compensation.
Common Mistakes to Avoid
Temperature Errors
Cooking from cold causes uneven results. Always bring chicken to room temperature first. Additionally, this prevents rubbery texture.
Cooking at too high heat burns the exterior. Meanwhile, the interior remains undercooked. Therefore, maintain medium to medium-high heat throughout.
Moisture Problems
Wet chicken skin will never crisp properly. Pat thighs thoroughly dry before seasoning. Moreover, avoid marinating for this recipe.
Adding glaze too early creates soggy coating. Wait until the end of cooking instead. Consequently, skin stays crispy underneath.
Overcrowding Issues
Too many thighs in the pan lower temperature dramatically. This causes steaming instead of browning. Furthermore, it prevents proper crisping.
Cook in batches if necessary for best results. Maintain space between each piece during cooking. Additionally, this ensures even heat distribution.
Storage and Reheating Tips
Proper Storage
Cool chicken completely before refrigerating. Then, store in airtight containers for up to 4 days. Additionally, keep glaze separate if possible.
Freeze cooked chicken for longer storage. Wrap individual pieces in plastic wrap first. Then, place in freezer bags for up to 3 months.
Reheating Methods
Oven reheating preserves texture best. Place chicken on a wire rack at 350°F. Heat for 15-20 minutes until warmed thoroughly.
Microwave reheating works for quick meals. However, skin won’t be crispy afterward. Therefore, use a microwave-safe cover to prevent drying.
Air fryer reheating restores crispiness wonderfully. Cook at 375°F for 5-7 minutes. Additionally, it heats faster than conventional ovens.
Delicious Serving Suggestions
Classic Pairings
Serve over fluffy white or brown rice. The grains soak up excess glaze perfectly. Additionally, rice provides satisfying bulk to the meal.
Mashed potatoes create a comforting combination. Their creamy texture complements sticky glaze beautifully. Furthermore, they’re family-friendly and filling.
Vegetable Sides
Roasted Brussels sprouts add nutritious crunch. Their slight bitterness balances honey sweetness nicely. Moreover, they roast at similar temperatures.
Sautéed green beans with garlic work wonderfully. They provide fresh, light contrast to rich chicken. Additionally, they cook quickly for easy timing.
Steamed broccoli offers healthy, simple pairing. Its neutral flavor doesn’t compete with glaze. Furthermore, kids typically enjoy this combination.
Fresh Options
A crisp garden salad adds refreshing contrast. Include mixed greens, tomatoes, and cucumbers. Moreover, a light vinaigrette cuts through richness.
Coleslaw provides crunchy, tangy balance. The acidity brightens each bite of chicken. Additionally, it’s perfect for casual meals.
Recipe Variations
Spicy Version
Add red pepper flakes to the glaze for heat. Start with 1/2 teaspoon and adjust accordingly. Additionally, include sriracha for extra kick.
Cayenne pepper in the flour coating works too. Use 1/4 teaspoon for subtle warmth. Furthermore, it adds color to the crust.
Asian-Inspired Twist
Replace butter with sesame oil partially. This creates authentic Asian flavor profile. Additionally, add grated ginger to the glaze.
Sprinkle toasted sesame seeds over finished dish. They add nutty flavor and visual appeal. Moreover, sliced green onions provide fresh contrast.
Herb-Enhanced Option
Fresh thyme pairs beautifully with honey butter. Add 1 tablespoon of chopped leaves to glaze. Additionally, rosemary creates earthy depth.
Dried herbs work when fresh aren’t available. Use 1 teaspoon dried thyme or oregano. However, reduce quantity since dried herbs concentrate flavor.
Citrus Addition
Orange zest brightens the glaze wonderfully. Add 1 tablespoon for subtle citrus notes. Furthermore, a squeeze of juice enhances complexity.
Lemon works equally well for different flavor. Its tartness balances sweetness perfectly. Additionally, it adds restaurant-quality sophistication.
Frequently Asked Questions
Can I use boneless chicken thighs for Honey Butter Glazed Chicken Thighs?
Yes, boneless thighs work perfectly for this recipe. However, they cook faster than bone-in versions. Therefore, reduce cooking time by 5-7 minutes. Additionally, check internal temperature reaches 165°F. Moreover, boneless thighs are easier to eat.
How do I know when chicken thighs are done?
Use a meat thermometer for accurate results. Insert it into the thickest part without touching bone. The temperature should reach 165°F minimum. Furthermore, 170°F ensures optimal texture and juiciness. Additionally, juices should run clear when pierced.
Can I make the glaze ahead of time?
Absolutely, prepare glaze up to 3 days ahead. Store it in an airtight container in the refrigerator. Then, reheat gently before using with chicken. However, it may thicken when cold. Therefore, add water to thin if necessary.
Why is my chicken skin not crispy?
Several factors affect skin crispiness. First, ensure chicken is completely dry before cooking. Additionally, avoid moving it too early during cooking. Furthermore, cooking temperature must be high enough. Moreover, crowding the pan creates steam instead of crisp.
Can I substitute honey with other sweeteners?
Maple syrup creates similar results with different flavor. Use the same quantity as honey in recipes. Additionally, agave nectar works well. However, avoid artificial sweeteners for glazes. They don’t caramelize properly during cooking.
How do I prevent the glaze from burning?
Add glaze only during the final cooking minutes. Additionally, reduce heat to medium when glazing. Furthermore, keep chicken moving to prevent sticking. Moreover, watch carefully during this step. Finally, remove from heat once coated.
What’s the best way to reheat leftovers?
The oven produces the best reheating results. Place chicken on a wire rack at 350°F. Heat for 15-20 minutes until warmed completely. Additionally, the air fryer works wonderfully. It restores crispiness while heating thoroughly. However, microwave is quickest but reduces crispiness.
Conclusion
Honey Butter Glazed Chicken Thighs deliver exceptional flavor with minimal effort. This recipe combines crispy skin, tender meat, and luscious glaze. Furthermore, it’s versatile enough for weeknight dinners or special occasions.
The techniques outlined ensure consistent, delicious results. Additionally, you now understand how to achieve perfect crispiness. Moreover, various cooking methods accommodate different preferences. Consequently, you can adapt the recipe to your kitchen.
Remember to pat chicken dry thoroughly before cooking. Additionally, don’t rush the browning process. Furthermore, add glaze only near the end. These simple steps guarantee success every time.
The nutritional benefits make this dish worthwhile. Protein-rich chicken supports muscle health and satiety. Additionally, moderate portions fit into balanced eating plans. Therefore, enjoy this meal without guilt.
Ready to create restaurant-quality chicken at home? Gather your ingredients and start cooking today. This recipe will quickly become a family favorite. Moreover, your confidence in the kitchen will soar. Try it tonight and taste the difference yourself!
Print
Honey Butter Glazed Chicken Thighs
Description
Honey Butter Glazed Chicken Thighs
Ingredients:
-
6 bone-in, skin-on chicken thighs
-
Salt and black pepper, to taste
-
2 tbsp olive oil
-
4 tbsp butter
-
3 tbsp honey
-
3 cloves garlic, minced
-
1 tsp smoked paprika
-
1 tsp dried thyme (optional)
-
Chopped parsley, for garnish
Instructions:
-
Season the Chicken:
-
Pat chicken thighs dry and season with salt, pepper, and smoked paprika.
-
-
Sear the Chicken:
-
Heat olive oil in a large skillet over medium-high heat.
-
Sear chicken thighs skin-side down for 5–6 minutes until golden brown. Flip and cook 4–5 minutes more. Remove from pan and set aside.
-
-
Make the Honey Butter Glaze:
-
In the same skillet, reduce heat to medium.
-
Add butter, honey, garlic, and thyme. Stir until melted and fragrant.
-
-
Glaze the Chicken:
-
Return chicken thighs to the pan and spoon glaze over them.
-
Cook another 5–6 minutes, basting occasionally, until chicken is cooked through (internal temperature 165°F / 74°C) and the glaze is sticky.
-
-
Serve:
-
Garnish with chopped parsley and serve with rice, roasted veggies, or mashed potatoes.
-