
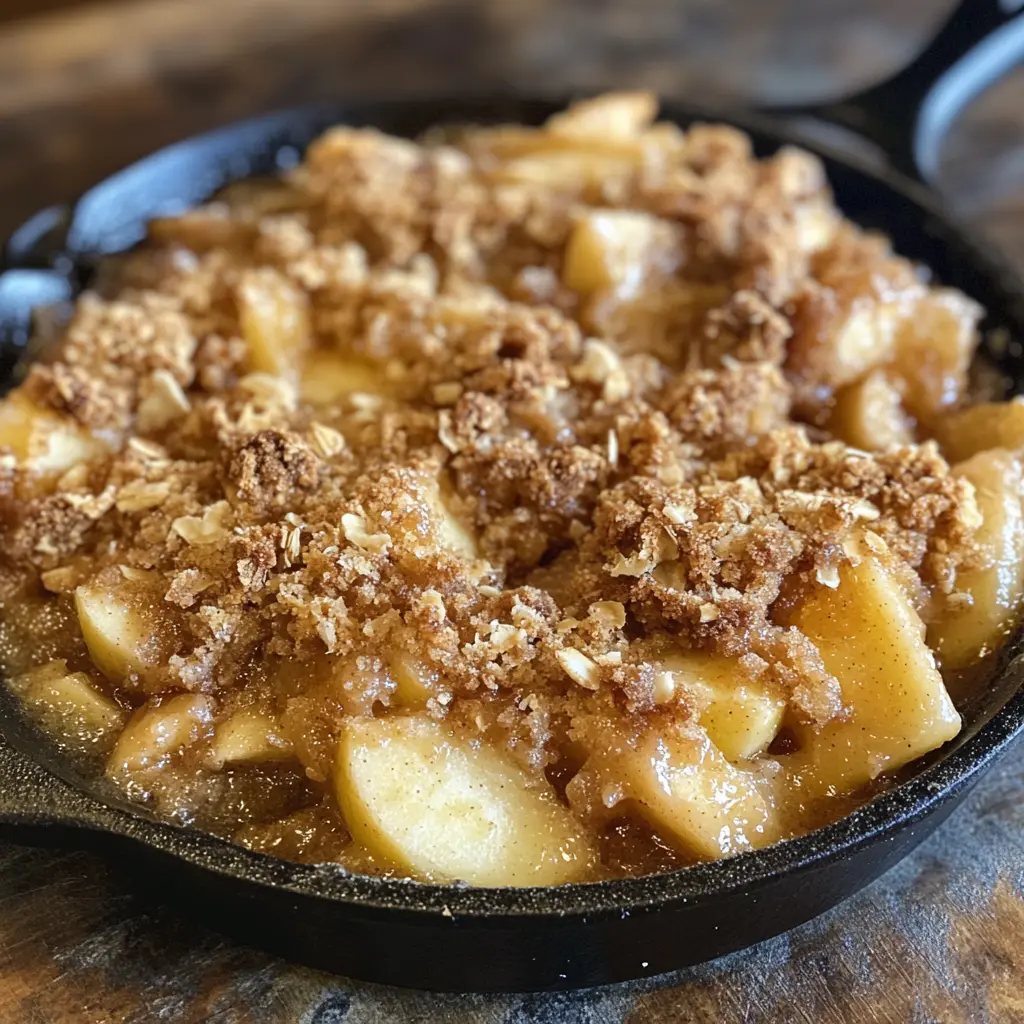
Rustic Cast Iron Apple Crisp
Introduction
Nothing captures the essence of comfort baking quite like a rustic cast iron apple crisp fresh from the oven. This beloved dessert combines tender, cinnamon-spiced apples with a buttery, golden topping that delivers satisfying crunch in every bite. Moreover, baking this classic treat in a cast iron skillet elevates both flavor and presentation, creating a stunning dessert that goes straight from oven to table. Furthermore, the rustic appeal of cast iron perfectly complements the homestyle nature of this timeless recipe.
The beauty of this dessert lies in its simplicity and versatility. Additionally, cast iron apple crisp requires no fancy equipment or complicated techniques, making it accessible for bakers of all skill levels. As a result, you can create an impressive dessert that looks and tastes like it came from a professional kitchen. Whether you’re hosting a family gathering or craving a cozy treat, this rustic cast iron apple crisp delivers warmth and satisfaction with every spoonful.
What Makes Cast Iron Perfect for Apple Crisp
Superior Heat Distribution
Cast iron cookware provides exceptional heat retention and even distribution throughout the baking process. Consequently, your apples cook uniformly while the topping achieves perfect golden-brown color. Unlike thinner materials, cast iron heats slowly but maintains consistent temperature, ensuring every portion of your dessert bakes evenly. This characteristic prevents hot spots that can burn the topping or leave apples undercooked.
Enhanced Caramelization
The steady heat from cast iron creates beautiful caramelization on the bottom layer of apples. Therefore, you get deep, complex flavors that develop as natural sugars in the fruit intensify during baking. Cast iron’s ability to hold high temperatures also means the butter in your filling can create a delicious, slightly crispy bottom layer. This textural contrast adds another dimension to the dessert experience.
Oven-to-Table Convenience
Furthermore, cast iron skillets transition seamlessly from stovetop to oven to dining table. This versatility means fewer dishes to wash and a more impressive presentation for your guests. The rustic appearance of a well-seasoned skillet enhances the homestyle appeal of apple crisp. Additionally, cast iron retains heat long after leaving the oven, keeping your dessert warm throughout serving.
Durability and Longevity
Cast iron cookware lasts for generations when properly maintained. Therefore, investing in a quality skillet means you’ll be making rustic cast iron apple crisp for years to come. The naturally non-stick surface that develops through seasoning makes cleanup surprisingly easy. Moreover, cast iron actually improves with use, developing better non-stick properties over time.
Choosing the Right Apples
Best Apple Varieties for Baking
Selecting the right apples is crucial for achieving the perfect texture and flavor balance in your rustic cast iron apple crisp. Consequently, using a combination of tart and sweet varieties creates the most complex and satisfying taste profile. Granny Smith apples remain a classic choice because they hold their shape during baking and provide bright tartness. Additionally, their firm texture prevents the filling from becoming mushy.
Honeycrisp apples bring natural sweetness and maintain excellent crispness even after extended baking. Similarly, Pink Lady apples offer balanced flavor with both sweet and tart notes, making them ideal for desserts. Furthermore, varieties like Gala, Fuji, Cortland, and Braeburn all perform well in baked applications. Therefore, mixing different apple types adds depth and interest to your finished dish.
Apples to Avoid
However, certain apple varieties break down too quickly during baking. Red Delicious apples, for instance, become mushy and lose their structure when exposed to heat. As a result, they create an unpleasant texture in your apple crisp. Instead, stick with firm, baking-specific varieties that maintain integrity throughout the cooking process.
Apple Preparation Tips
First, peel all apples to ensure a smooth, cohesive filling. Next, dice them into uniform pieces roughly half an inch thick so they cook evenly. Additionally, tossing the apples with lemon juice prevents browning and adds brightness to balance the sweetness. This preparation step takes only minutes but significantly impacts the final result.
Essential Ingredients for Rustic Apple Crisp
For the Apple Filling
The filling requires simple, wholesome ingredients that allow the natural apple flavor to shine. You’ll need approximately six to eight cups of diced apples, which typically comes from six to seven large apples. Additionally, brown sugar adds molasses notes and caramel undertones that complement the fruit beautifully. Furthermore, warming spices like cinnamon, nutmeg, ginger, and cloves create that signature comfort-food aroma.
Lemon juice and zest brighten the filling while preventing oxidation. Meanwhile, a small amount of cornstarch thickens the apple juices released during baking, preventing a watery dessert. Finally, melted butter enriches the filling and helps distribute the spices evenly.
For the Crisp Topping
The topping combines old-fashioned oats with flour to create the perfect crumbly texture. Consequently, the oats provide rustic appeal and satisfying crunch, while flour binds everything together. Brown sugar sweetens the topping and promotes golden-brown caramelization. Additionally, cold butter cut into small pieces creates those coveted crispy clusters.
A pinch of salt balances sweetness and enhances all the other flavors. Similarly, extra cinnamon sprinkled on top adds visual appeal and aromatic warmth. These straightforward ingredients come together to create a topping that’s both simple and spectacular.
Step-by-Step Preparation Guide
Preparing Your Cast Iron Skillet
Begin by preheating your oven to 350 degrees Fahrenheit. Meanwhile, generously butter your 10 to 12-inch cast iron skillet to prevent sticking. Some bakers prefer coating the bottom with brown sugar and butter for extra caramelization. This optional step creates a delicious, slightly sticky bottom layer that adds richness.
Making the Apple Filling
First, peel and dice your chosen apples into uniform half-inch pieces. Next, place them in a large mixing bowl and add brown sugar, lemon juice, lemon zest, and warm spices. Then, toss everything together with a spatula until the apples are evenly coated. Additionally, create a cornstarch slurry by mixing cornstarch with cold water, then fold it into the apple mixture.
If you’re using your cast iron skillet on the stovetop first, melt butter over medium-low heat. Subsequently, add brown sugar, cinnamon, and salt, whisking until combined. Pour this mixture over your prepared apples and toss well. Then, return the coated apples to the skillet and cook for approximately five minutes, stirring occasionally. This pre-cooking step helps soften the apples slightly and intensifies flavors.
Assembling the Dish
Pour the prepared apple filling into your buttered cast iron skillet, spreading it evenly across the bottom. Meanwhile, the apples should be mounded slightly in the center, as they’ll settle during baking. Next, distribute the crisp topping evenly over the entire surface of the apples. Additionally, press the topping lightly with your hands to help it adhere.
Finally, sprinkle extra cinnamon on top for enhanced flavor and visual appeal. This finishing touch adds professional polish to your rustic dessert.
Creating the Perfect Topping
Mixing Technique
In a large bowl, combine oats, flour, brown sugar, salt, and cinnamon. Then, add cold butter that has been cut into small cubes. Consequently, keeping the butter cold is essential for achieving the best texture. Next, use a pastry cutter, two forks, or your fingertips to work the butter into the dry ingredients.
Continue mixing until the butter pieces are pea-sized and the mixture resembles coarse crumbs. However, avoid over-mixing, as some small lumps of butter should remain visible throughout. These butter chunks melt during baking and create those irresistible crispy clusters.
Texture Considerations
The ideal topping has a crumbly consistency that holds together when pressed but falls apart easily. Therefore, if your mixture seems too dry, add a tiny bit more butter. Conversely, if it appears too wet, incorporate additional oats or flour. Additionally, chilling the prepared topping for 15 to 30 minutes before baking can improve the final texture.
Topping Variations
While traditional oat-based toppings are classic, you can customize your rustic cast iron apple crisp. For instance, adding chopped pecans or walnuts provides extra crunch and nutty flavor. Similarly, incorporating shredded coconut creates tropical notes that complement the apples beautifully. Furthermore, swapping some oats for graham cracker crumbs adds a different textural element.
Baking Tips for Golden Results
Oven Temperature and Timing
Bake your rustic cast iron apple crisp at 350 degrees Fahrenheit for optimal results. This moderate temperature allows the apples to soften completely while the topping browns gradually. Typically, baking takes 40 to 60 minutes depending on your skillet size and oven characteristics. Additionally, placing the skillet on a preheated baking sheet catches any drips and promotes even bottom heating.
Preventing Over-Browning
Cover your apple crisp loosely with aluminum foil for the first 45 minutes of baking. This protective layer prevents the topping from browning too quickly while the apples cook through. Then, remove the foil for the final 15 minutes to allow the topping to achieve golden-brown perfection. Consequently, this two-stage approach ensures both proper apple tenderness and crispy topping.
Checking for Doneness
Your rustic cast iron apple crisp is ready when the topping is deeply golden and the apple filling bubbles around the edges. Additionally, you should see steam rising from the center, indicating the apples are cooked through. Furthermore, the topping should feel firm and crispy when gently pressed. If any areas appear pale or soft, continue baking and check every five minutes.
Cooling Before Serving
Allow the apple crisp to cool for at least 30 minutes after removing it from the oven. This resting period lets the filling thicken and set, preventing a runny, soupy texture. Moreover, waiting a full hour produces even better results, as the filling becomes more cohesive. However, the dessert will still be wonderfully warm after this cooling time.
Serving Suggestions
Classic Accompaniments
Vanilla ice cream is the traditional pairing for warm rustic cast iron apple crisp. The cold, creamy ice cream melts slightly when it hits the hot dessert, creating a delicious contrast. Similarly, fresh whipped cream adds lightness and elegance to each serving. Furthermore, a drizzle of caramel sauce enhances the dessert’s sweetness and adds visual appeal.
Creative Serving Ideas
For breakfast or brunch, serve apple crisp with Greek yogurt and a drizzle of honey. Additionally, this combination provides protein and creates a more balanced meal. Similarly, pairing apple crisp with sharp cheddar cheese offers a sweet-savory contrast popular in traditional American cuisine. Furthermore, serving the dessert straight from the cast iron skillet creates a rustic, family-style presentation.
Portion Sizes
One 10 to 12-inch cast iron skillet yields approximately eight generous servings. However, this comfort dessert is rich, so smaller portions may suffice. Additionally, presenting the apple crisp at the table allows guests to serve themselves according to their preference.
Storage and Reheating Instructions
Refrigerator Storage
First, allow your rustic cast iron apple crisp to cool completely to room temperature. Then, cover the skillet tightly with plastic wrap or aluminum foil. Alternatively, transfer portions to airtight containers for individual servings. Store the dessert in the refrigerator for two to four days. However, note that the topping will soften slightly as moisture from the apples affects the texture.
Freezer Storage
For longer storage, apple crisp freezes beautifully for up to three months. First, cool the dessert completely and wrap it very tightly in plastic wrap followed by aluminum foil. Additionally, freezing individual portions in smaller containers makes thawing and reheating more convenient. Label containers with the date to track freshness.
Reheating Methods
The oven produces the best results for reheating apple crisp. First, preheat your oven to 350 degrees Fahrenheit. Then, place the apple crisp in an oven-safe container and heat for 20 to 30 minutes until warmed through. Additionally, if the topping browns too quickly, tent it with aluminum foil. This method restores the crispy topping texture and ensures even heating throughout.
For individual portions, microwave heating works in a pinch. However, this method will soften the topping rather than crisping it. Therefore, oven reheating is always preferable when time permits.
Common Mistakes to Avoid
Using the Wrong Apples
Choosing apples that break down during baking creates mushy, unappealing texture. Therefore, avoid soft varieties like Red Delicious and McIntosh. Instead, select firm baking apples that hold their shape and provide the right balance of sweet and tart flavors. Additionally, using a single apple variety produces one-dimensional flavor, so mixing types creates more complexity.
Cutting Apples Unevenly
When apple pieces vary significantly in size, some become mushy while others remain undercooked. Consequently, taking time to dice apples uniformly ensures even cooking throughout. Aim for pieces approximately half an inch thick for the best results.
Making the Topping Too Wet or Dry
Adding too much butter creates a greasy topping that doesn’t crisp properly. Conversely, insufficient butter yields a dry, sandy texture that lacks richness. Therefore, following the recipe measurements carefully produces the ideal crumbly consistency. Additionally, working with cold butter rather than melted or softened butter is crucial for proper texture.
Skipping the Cooling Period
Cutting into apple crisp immediately after removing it from the oven creates a soupy mess. The filling needs time to thicken and set as it cools. Therefore, patience during this step makes a significant difference in both texture and presentation.
Over-Baking or Under-Baking
Baking too long can burn the topping while drying out the apples. Meanwhile, insufficient baking leaves apples crunchy and the topping pale. Therefore, checking for visual cues like golden-brown color and bubbling filling helps determine proper doneness. Additionally, every oven varies slightly, so adjusting time based on your specific appliance may be necessary.
Frequently Asked Questions
What size cast iron skillet works best for apple crisp?
A 10 to 12-inch cast iron skillet is ideal for most apple crisp recipes. This size accommodates six to eight cups of diced apples with adequate topping coverage. However, smaller 8-inch skillets work for reduced recipes, while larger 14-inch pans can serve more guests.
Can I make rustic cast iron apple crisp ahead of time?
Yes, you can assemble the apple crisp several hours before baking. Simply prepare the filling and topping, store them separately in the refrigerator, then combine and bake when ready. Alternatively, bake the dessert completely and reheat before serving. This flexibility makes apple crisp perfect for entertaining.
Do I need to peel the apples?
Peeling apples is recommended for the smoothest, most cohesive texture. Apple skins can become tough and chewy during baking, detracting from the dessert’s appeal. However, leaving skins on adds fiber and saves preparation time if texture isn’t a primary concern.
How do I prevent my topping from getting soggy?
Using a cornstarch slurry in the filling absorbs excess apple juice and prevents sogginess. Additionally, covering the crisp with foil during the initial baking prevents steam from condensing on the topping. Furthermore, allowing the baked crisp to cool properly helps the filling set rather than remaining watery.
Can I use quick oats instead of old-fashioned oats?
Old-fashioned rolled oats provide better texture and structure in apple crisp topping. Quick oats are more processed and tend to become mushy rather than crispy during baking. Therefore, traditional rolled oats are strongly preferred for this recipe.
What makes this recipe rustic?
The rustic quality comes from the cast iron presentation, chunky apple pieces, and crumbly topping texture. Additionally, the unfussy preparation method and homestyle appeal contribute to its rustic character. This approach celebrates simple ingredients and traditional techniques rather than refined presentation.
Conclusion
This rustic cast iron apple crisp represents comfort baking at its finest, combining tender spiced apples with a buttery, golden topping that satisfies every craving. The cast iron skillet elevates this classic dessert through superior heat distribution, beautiful presentation, and convenient oven-to-table service. Furthermore, the straightforward preparation makes this recipe accessible for bakers of all experience levels.
By choosing the right apple varieties, creating the perfect crumbly topping, and following proper baking techniques, you’ll achieve professional-quality results every time. Additionally, this versatile dessert works beautifully for family dinners, holiday gatherings, or cozy weeknight treats. The combination of warm apples, crispy topping, and cold ice cream creates an unforgettable experience that keeps everyone coming back for seconds.
Print
Rustic Cast Iron Apple Crisp
Description
Rustic Cast Iron Apple Crisp
Servings: 6–8
Prep Time: 15 minutes
Cook Time: 35–40 minutes
Calories: ~420 per serving
Ingredients
Filling
-
6 large apples (Granny Smith, Honeycrisp, or a mix), peeled, cored, and sliced
-
¼ cup granulated sugar
-
¼ cup brown sugar
-
1 tsp cinnamon
-
½ tsp nutmeg
-
1 tsp vanilla extract
-
1 tbsp lemon juice
Topping
-
1 cup old-fashioned oats
-
½ cup all-purpose flour
-
½ cup brown sugar
-
½ tsp cinnamon
-
¼ tsp salt
-
½ cup unsalted butter, cold and cubed
-
½ cup chopped pecans or walnuts (optional)
Instructions
-
Preheat oven:
Preheat to 350°F (175°C). Grease a 10-inch cast iron skillet lightly with butter. -
Prepare filling:
In a large bowl, toss apples with granulated sugar, brown sugar, cinnamon, nutmeg, vanilla, and lemon juice. Transfer to the skillet. -
Make the topping:
In a bowl, combine oats, flour, brown sugar, cinnamon, and salt. Cut in butter until mixture resembles coarse crumbs. Stir in nuts if using. -
Assemble:
Sprinkle the topping evenly over the apples. -
Bake:
Bake for 35–40 minutes, until the apples are bubbly and topping is golden brown. -
Serve:
Let cool slightly. Serve warm with vanilla ice cream or whipped cream.