
Scallops with Salsa Verde: Your Ultimate Guide to a Restaurant-Quality Meal at Home
Alright, let’s talk about a dish that’s nothing short of a culinary magic trick. We’re combining the sweet, luxurious sear of a perfect scallop with the vibrant, zesty punch of a homemade salsa verde. Sounds fancy, right? Well, here’s the secret: it’s deceptively simple to pull off in your own kitchen. This isn’t about complicated techniques or a pantry full of obscure ingredients; instead, it’s about understanding a few key principles that transform simple elements into something extraordinary.
Throughout this guide, we’ll walk through every single step together. First, we’ll get to know our star players—the scallop and the sauce. Then, we’ll dive deep into crafting that incredible herb sauce from scratch, exploring its flavors and textures. After that, we’ll master the art of the perfect pan-seared scallop, avoiding all the common pitfalls. Finally, we’ll bring it all together to plate up a dish that will absolutely wow your family or guests. So, are you ready to create some magic? Let’s get started.
Introduction & The Core Components
Scallops with Salsa Verde: Your Ultimate Guide to a Restaurant-Quality Meal at Home
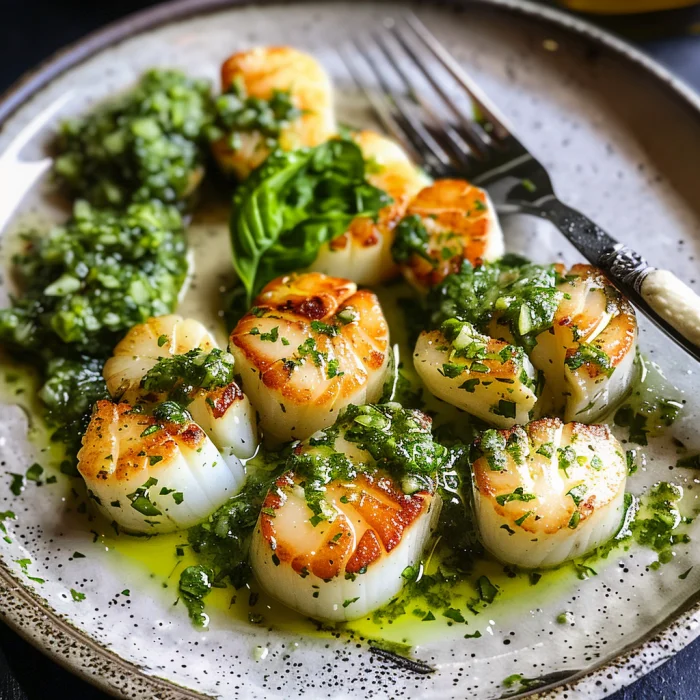
Imagine this: a plate arrives. On it, three plump, golden-brown seared scallops rest gracefully on a bold, emerald-green swipe of sauce. You cut one open—it’s tender, almost creamy, and sweetly oceanic. Then you get a bite with that sauce: suddenly, there’s a brilliant burst of fresh parsley, the salty tang of capers, a whisper of garlic, and the bright kick of lemon. This, my friend, is the unparalleled harmony of scallops with salsa verde. It’s a classic pairing for a spectacularly good reason. The rich, delicate scallopprovides the perfect, unassuming canvas for the loud, confident, and herbaceous salsa verde to shine. Surprisingly enough, however, achieving this gourmet seafood recipe at home is well within your reach. You don’t need a chef’s hat; you just need to know a few insider secrets.
Why This Classic Pairing is a Culinary Triumph
What makes this combination so phenomenally successful? Ultimately, it all boils down to balance. A perfectly cooked scallop offers a subtle sweetness and a luxurious, buttery texture that simply melts in your mouth. Conversely, a well-made salsa verde is anything but subtle. It’s a vibrant, acidic, and powerfully aromatic herb sauce that wakes up your entire palate. When combined, they create a perfect forkful of contrasting yet complementary flavors and textures. The dish feels indulgent and light all at once—a true mark of brilliant, restaurant-quality cooking. Best of all, this isn’t a difficult quick dinner recipe; in fact, it comes together in minutes, making it the ultimate impressive appetizer or main course for a special weeknight.
Understanding Your Key Ingredients
Before we fire up the stove, let’s get familiar with our two headliners. Understanding what you’re working with is, without a doubt, the first and most crucial step to success.
The Scallop: A Jewel from the Sea
First and foremost, not all scallops are created equal. You’ll primarily encounter two types: large sea scallops and tiny bay scallops. For this dish, you absolutely want the large sea scallops. Their substantial size allows you to develop that gorgeous, caramelized crust while keeping the interior tender, making them ideal for pan-searing.
The Critical Choice: “Dry” vs. “Wet” Scallops
Now, pay attention because this is the single most important tip for cooking scallops: you must ask for “dry” scallops. So, what’s the difference? Well, many scallops are treated with a solution of water and sodium tripolyphosphate (STP). These are called “wet” scallops. This treatment makes them absorb water, which increases their weight (and price) and sadly, ruins their ability to sear properly. When you try to cook them, they’ll stew in their own leaked liquid instead of browning.
Dry scallops, on the other hand, are untreated. They are natural, pure, and haven’t been pumped full of water. How can you tell them apart? Dry scallops will have a fleshier, more ivory or pinkish-toned appearance and a natural, fresh sea aroma. Wet scallops often look very white, glossy, and sit in a milky liquid. Always, and I mean always, ask your fishmonger for “dry-packed” or “diver” scallops. Trust me, this one choice makes all the difference in the world.
Salsa Verde: Italy’s Vibrant “Green Sauce”
Let’s clear something up right away: the salsa verde we’re making is Italian, not Mexican. This isn’t a spicy tomatillo sauce; instead, it’s a uncooked, emulsified sauce made from a lively bunch of herbs, capers, anchovies, and oil. Its name literally means “green sauce,” and its flavor profile is explosively bright, tangy, and salty. It cuts through richness like a dream, which is precisely why it’s such a phenomenal partner for fatty fish, roasted meats, and of course, our sweet scallops. Once you master this basic salsa verde recipe, you’ll find yourself putting it on everything.
Mastering the Salsa Verde
Crafting the Perfect Salsa Verde from Scratch
Think of salsa verde less as a strict recipe and more as a flavorful formula you can adapt. Essentially, you’re building layers of flavor that will all come together in a beautiful, chunky emulsion.
Deconstructing the Sauce: A Flavor Breakdown
Every single ingredient plays a specific role. Let’s break it down, component by component.
The Herb Base: Parsley is Just the Beginning
Without a doubt, flat-leaf (Italian) parsley is the undisputed star of the show. Its fresh, clean, and slightly peppery flavor forms the foundation. However, don’t be afraid to get creative! Adding a few sprigs of other soft herbs can create a more complex profile. For instance, a few teaspoons of fresh tarragon adds a lovely anise note, while chives contribute a mild oniony sharpness. Mint or basil can also work wonders in small amounts, introducing a surprising and delightful twist.
The Salty & Umami Elements: Capers and Anchovies
This is where the magic really starts to happen. Briny capers provide a sharp, salty punch that is absolutely essential. If you can find salt-packed capers, just rinse them well—they offer a purer, less vinegary flavor than the brined kind. Next up, anchovies. Now, before you turn away, hear me out! They don’t make the sauce taste fishy; instead, they dissolve into the background, providing an incredible depth of savory umami that makes the entire sauce taste richer and more rounded.
The Acid Component: Balancing with Vinegar and Lemon
Acid is the engine that drives this sauce, cutting through the oil and herbs to make everything taste bright and alive. Typically, a good red or white wine vinegar is used. However, the real game-changer is fresh lemon juice and, crucially, its zest. The zest contains potent citrus oils that perfume the entire sauce with an unmistakable freshness you just can’t get from a bottle.
Bringing it All Together: Quality Oil and Aromatics
Finally, you need a great oil to bind it all together and some aromatics for a little kick. A high-quality, extra-virgin olive oil is non-negotiable—its fruity, peppery notes are the soul of the sauce. A small clove of garlic (minced very finely or grated) and a tablespoon of finely chopped shallot add a pungent backbone that ties every other flavor together perfectly.
Step-by-Step: Two Methods for Salsa Verde
You’ve got two fantastic paths to salsa verde success: the traditional way for texture purists, and a quick way for those in a hurry.
The Traditional Chop by Hand Method
Grab your sharpest chef’s knife and a large cutting board. Honestly, this method gives you the most control over the final texture. Simply pile all your herbs and other ingredients on the board and start chopping. Rock your knife back and forth through the pile until everything is finely minced but not pasty. Then, transfer it to a bowl and stir in the olive oil and lemon juice. This method creates a rustic, vibrant sauce with distinct bits of flavor in every bite.
The Quick Pulse Blender/Food Processor Method
Short on time? No problem! A food processor or blender is your best friend. However, a word of caution: you must pulse, not puree! Pulse the herbs, capers, anchovies, and garlic just a few times until they are coarsely chopped. Then, add your liquids and pulse once or twice more just to combine. Over-processing will oxidize the herbs and turn your vibrant green sauce into a murky, brownish sludge. Nobody wants that!
Pro Tips for a Standout Salsa Verde
-
Let it Rest: After you make the sauce, let it sit for at least 20-30 minutes at room temperature. This allows the flavors to meld and mellow beautifully, especially the raw garlic and shallot.
-
Adjust Consistency: If your sauce seems too thick, simply loosen it with another tablespoon of olive oil or even a teaspoon of water.
-
Taste and Adjust: Right before serving, always taste your sauce. Does it need more acid? Add a squeeze of lemon. More salt? Maybe another pinch of sea salt. You are the boss of your sauce!
Mastering the Scallops
The Art of Cooking Perfect Scallops
Now, for the main event. Cooking scallops can feel intimidating, but I promise it’s a straightforward process if you follow these steps religiously. The goal? A crisp, golden-brown crust that gives way to a tender, barely opaque center.
Prep is Everything: How to Properly Prepare Your Scallops
Believe it or not, the actual cooking is the easy part. The real work happens in the prep.
The Crucial Step of Drying
This is the golden rule, the commandment of searing scallops: they must be completely and utterly dry. Any moisture on the surface will instantly steam the scallop instead of searing it. Therefore, once you’ve taken your dry scallops out of the fridge, place them on a stack of paper towels. Gently pat the tops dry with another paper towel. Seriously, be ruthless here. Pat them until the paper towel comes away completely dry. This is the single most important step for achieving that gorgeous good sear.
To Season Now or Later?
You should only season your scallops immediately before they hit the pan. If you salt them too early, the salt will draw out moisture, undoing all your diligent drying work. So, right before cooking, season both sides generously with kosher salt and freshly ground black pepper.
The Step-by-Step Guide to a Perfect Sear
Ready for action? Let’s cook.
Choosing Your Pan: Why Heavy-Bottomed is Best
For a perfect, even sear, you need a pan that holds heat exceptionally well. A heavy-bottomed stainless steel skillet or a well-seasoned cast-iron pan is ideal. Non-stick pans often don’t get hot enough to create a proper crust and won’t give you those lovely browned bits (the “fond”) in the pan, which are so full of flavor.
Heating the Oil: Getting the Temperature Just Right
Place your pan over medium-high heat and let it get properly hot. This takes a minute or two. Then, add a high-smoke point oil like avocado or grapeseed oil. You can add a small pat of butter for flavor, but wait until the end as butter burns easily. To test if the oil is hot enough, flick a tiny drop of water into the pan—if it sizzles and dances, you’re good to go.
The Cook: Don’t Crowd, Don’t Touch, Don’t Overcook
Carefully place your dried and seasoned scallops in the hot oil, making sure they aren’t touching each other. Crowding the pan will drop the temperature and cause them to steam. Now, the hardest part: walk away! Do not touch them for at least 1.5 to 2 minutes. You’ll know it’s time to flip when the edges look opaque and a deep golden-brown crust has formed about halfway up the side of the scallop.
Slip a thin spatula underneath and flip them with confidence. They should release easily if a proper crust has formed. Cook on the second side for only 1 to 1.5 minutes—they cook faster on this side. The goal is an internal temperature of around 115-120°F (46-49°C) for a medium doneness—translucent and tender in the very center.
Common Mistakes and How to Avoid Them
-
Mistake 1: Using wet scallops. This is the ultimate sin. They will never brown properly.
-
Mistake 2: Moving them too soon. Let the crust form! If you try to move them and they stick, they’re not ready.
-
Mistake 3: Overcooking. This is the fastest way to get rubbery scallops. They continue to cook after being removed from the pan, so err on the side of underdone.
Bringing It All Together & Beyond
Plating and Presentation: Creating a Stunning Dish
You’ve mastered both components; now let’s make it look as good as it tastes. Presentation is the final flourish that elevates a home-cooked meal to a restaurant-quality experience.
How to Plate Scallops with Salsa Verde
For a modern, elegant look, spoon a generous swoosh or pool of the salsa verde onto the center of each plate. Carefully place your beautifully seared scallops on top of or slightly overlapping the sauce. Finally, drizzle a little extra sauce over the top of the scallops themselves. This not only looks professional but ensures every single bite includes the sauce.
Garnish with a final sprinkle of fresh herb leaves (like parsley or chive blossoms), a twist of black pepper, or a tiny pinch of flaky sea salt like Maldon for a little textural crunch.
What to Serve with Scallops and Salsa Verde: Building a Complete Meal
While this dish is a star on its own, a few well-chosen sides can turn it into a memorable feast. You want sides that complement without overpowering the main event.
Perfect Pairings: Sides that Complement without Overpowering
-
Creamy Textures: A soft bed of creamy parmesan polenta or a simple risotto (like a lemon risotto) is a match made in heaven. The creamy base soaks up the extra salsa verde beautifully.
-
Light Carbs: Simple angel hair pasta or linguine tossed in a little butter and lemon zest makes for a fantastic, light accompaniment.
-
Fresh Salads: A simple arugula salad with a lemon vinaigrette, a shaved fennel and citrus salad, or a classic tomato and basil salad all provide a fresh, acidic counterpoint to the rich scallops.
-
Simple Vegetables: Sautéed asparagus, roasted cherry tomatoes, grilled zucchini, or simply steamed green beans are all excellent, healthy choices that round out the meal.
FAQs and Conclusion
Frequently Asked Questions (FAQs)
Can I make salsa verde ahead of time?
Absolutely! In fact, it often tastes better after the flavors have had time to mingle. You can store it in an airtight container in the refrigerator for 2-3 days. The color may darken slightly due to the herbs oxidizing, but the flavor will still be fantastic. Just let it come to room temperature and give it a good stir before serving.
Why did my scallops stick to the pan?
This usually happens for one of three reasons: the pan wasn’t hot enough before adding the scallops, the scallops weren’t patted completely dry, or you tried to move them too early. Remember: a hot pan, dry scallops, and patience are the keys to a stick-free sear.
How can I tell if scallops are cooked through?
The best method is by touch and sight. A perfectly cooked scallop will be firm but still slightly yielding to the touch (like the fleshy part of your palm when you press your middle finger and thumb together). Visually, the sides will be opaque, and the very center can be slightly translucent. For precision, use an instant-read thermometer; 115-120°F (46-49°C) is perfect.
What can I use instead of anchovies for a vegetarian version?
For a vegetarian umami boost, you can substitute the anchovies with a teaspoon of white miso paste or a dash of tamari or soy sauce. It will provide that same deep, savory quality without any fish.
Can I use frozen scallops?
Yes, frozen scallops are a great option, especially if you don’t have access to a good fishmonger. The key is to thaw them slowly and properly. Place them in the refrigerator on a plate overnight. Then, follow the same crucial step: pat them extremely dry with paper towels before seasoning and cooking.
Conclusion: Your Gourmet Dinner Awaits
And there you have it! You’re now armed with all the knowledge you need to create a truly spectacular dish of scallops with salsa verde. It’s a recipe that proves you don’t need complicated techniques to create something extraordinary—just quality ingredients, a bit of know-how, and the confidence to give it a try. So, head to your fish market, grab some dry scallops and a bunch of fresh herbs, and get ready to impress. Your own restaurant-quality meal is just a few steps away.
The Printable Recipe Card
Scallops with Salsa Verde Recipe
Prep Time: 15 minutes | Cook Time: 6 minutes | Total Time: 21 minutes | Serves: 2 as a main, 4 as an appetizer
For the Salsa Verde:
-
1 large bunch flat-leaf parsley, stems removed (about 2 packed cups)
-
2 tbsp capers, rinsed and drained
-
3 anchovy fillets
-
1 small garlic clove, minced
-
1 tbsp shallot, finely minced
-
Zest and juice of 1 lemon
-
1 tbsp red wine vinegar
-
½ cup extra-virgin olive oil
-
Salt and freshly ground black pepper to taste
For the Scallops:
-
12 large “dry” sea scallops (about 1 lb)
-
1 tbsp avocado oil or grapeseed oil
-
Salt and freshly ground black pepper
Instructions:
-
Make the Salsa Verde: Finely chop the parsley, capers, anchovies, garlic, and shallot together on a large cutting board until well combined. Transfer to a bowl.
-
Stir in the lemon zest, lemon juice, and red wine vinegar. Gradually whisk in the olive oil. Season with salt and pepper to taste. Set aside to let the flavors meld.
-
Prepare the Scallops: Place scallops on a thick layer of paper towels. Pat them thoroughly dry on all sides. Season both sides generously with salt and pepper just before cooking.
-
Cook the Scallops: Heat the avocado oil in a large stainless steel or cast-iron skillet over medium-high heat until shimmering and very hot.
-
Carefully add the scallops to the hot pan, ensuring they are not touching. Sear, without moving, for 1.5 – 2 minutes, until a deep golden-brown crust forms.
-
Flip the scallops and cook for another 1 – 1.5 minutes on the second side, until just cooked through and firm to the touch.
-
To Serve: Immediately remove scallops from the pan. Spoon a pool of salsa verde onto plates, top with the warm scallops, and drizzle with a little more sauce. Serve immediately.
Notes:
-
Scallop Quality: Using “dry” scallops is critical for achieving a good sear.
-
Sauce Consistency: If your salsa verde is too thick, thin it with a teaspoon of water or more olive oil.
-
Make-Ahead: Salsa verde can be made up to 3 days in advance and stored in the fridge.
Scallops with Salsa Verde
Description
Scallops with Salsa Verde
Ingredients
For the Scallops
-
12 large sea scallops, patted dry
-
Salt & black pepper, to taste
-
2 tbsp olive oil
-
1 tbsp butter
For the Salsa Verde
-
1 cup fresh parsley leaves
-
1/2 cup fresh cilantro leaves
-
2 tbsp capers, drained
-
1 garlic clove
-
1/4 cup olive oil
-
1 tbsp lemon juice
-
Salt & pepper, to taste
Instructions
-
Make salsa verde: In a blender or food processor, combine parsley, cilantro, capers, garlic, olive oil, lemon juice, salt, and pepper. Blend until smooth. Adjust seasoning if needed. Set aside.
-
Prepare scallops: Pat scallops completely dry to ensure a good sear. Season with salt and pepper.
-
Sear scallops: Heat olive oil and butter in a skillet over medium-high heat. Add scallops, making sure not to overcrowd the pan. Sear 2–3 minutes per side until golden brown and just opaque in the center.
-
Serve: Plate scallops and spoon salsa verde over the top. Serve immediately with a side of roasted vegetables, risotto, or crusty bread.