
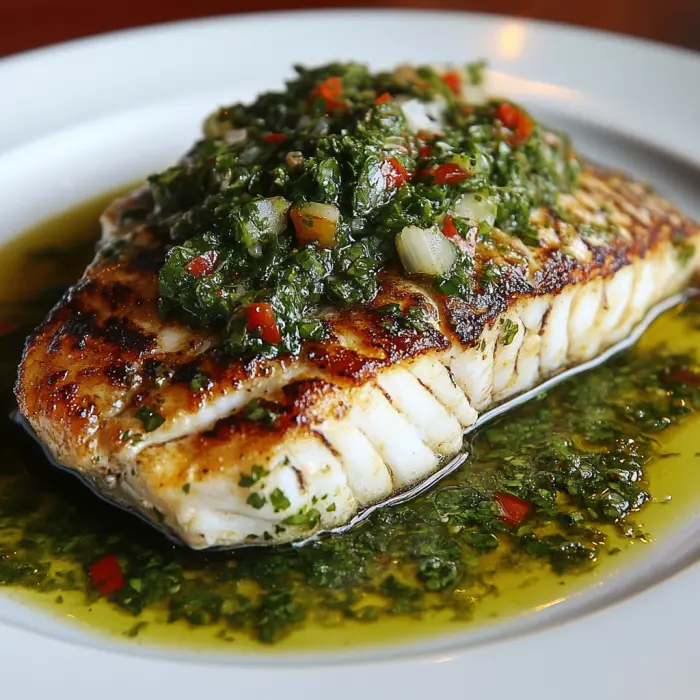
The Ultimate Guide to Perfect Grilled Sea Bass with Chimichurri
Picture this, will you? The sun is dipping low, and the air is filled with the irresistible, smoky scent of the grill. Meanwhile, on a plate inside, a vibrant, herbaceous sauce is waiting—a sauce that’s practically buzzing with fresh, zesty energy. Now, imagine bringing those two worlds together. That, right there, is the magic of grilled sea bass with chimichurri.
This dish isn’t just a meal; it’s a full-on experience. On one hand, you have the grilled sea bass—incredibly elegant, with its flawlessly crisp skin and tender, flaky flesh that just melts in your mouth. On the other hand, you have the bold, rustic charm of the chimichurri sauce, a tangy and garlicky herb blend that wakes up every single taste bud. It’s a stunning combination of simplicity and sophistication, and honestly, it’s far easier to pull off than you might think.
This guide is your ultimate roadmap. We’re going to walk through every single step together, from picking the perfect fish at the market to mastering the grill like a true pro. So, get ready to create a restaurant-quality masterpiece right in your own backyard.
Why Sea Bass is a Grilling Superstar
Alright, let’s talk about the star of the show: the sea bass. Seriously, not all fish are created equal when it comes to throwing them on a hot grill. Some fall apart, some dry out, and some just can’t handle the heat. Sea bass, however, is an absolute champion for a few brilliant reasons.
The Perfect Texture and Flavor Profile
First and foremost, its flesh is firm and holds together beautifully over those fiery grates, preventing a disastrous flake-apart situation. Yet, once you take a bite, it effortlessly separates into those gorgeous, moist flakes we all dream about. Furthermore, its flavor profile is mildly sweet and incredibly delicate. Consequently, it acts as the perfect canvas; it doesn’t overpower other ingredients but instead, gracefully carries the bold, punchy flavors of the chimichurri sauce. Moreover, it has a naturally high oil content, which is basically its built-in insurance policy against drying out, guaranteeing a succulent result every single time.
A Note on Sustainability and Types of Sea Bass
Now, here’s a crucial bit of info—not all fish labeled “sea bass” are the same! Actually, this is where a little knowledge makes you a smarter, more responsible cook. Typically, you’ll find two main types:
-
European Sea Bass (often called Branzino or Loup de Mer): This is your go-to choice for this recipe. It’s a smaller, thinner fish, often cooked whole, but its fillets are absolutely perfect for grilling. Most importantly, it is generally considered a better sustainable seafood choice.
-
Chilean Sea Bass (which is actually Patagonian Toothfish): This fish is a different beast altogether—richer, thicker, and far oilier. While delicious, it comes with significant sustainability concerns and a much higher price tag. For our purposes today, the European variety is the clear winner.
What if you can’t find sea bass? Don’t sweat it! Other firm white fish like halibut, mahi-mahi, or snapper will work wonderfully as substitutes and still stand up to that glorious sauce.
The Soul of the Dish: Crafting the Perfect Chimichurri Sauce
Forget everything you think you know about herb sauces; chimichurri is in a league of its own. This isn’t a delicate, creamy condiment—it’s a vibrant, bold, and unapologetically zesty explosion of flavor that originated in the heart of Argentinean cuisine. Honestly, it’s the undisputed soul of this entire dish. While the sea bass provides a subtle, elegant base, the chimichurri is the lively personality that makes every single bite unforgettable. It’s a sauce that somehow manages to be both refreshing and deeply savory all at once.
Chimichurri Ingredients Deep Dive
Making an authentic chimichurri sauce isn’t complicated, but its magic relies entirely on the quality and balance of its components. Let’s break down this dream team of ingredients.
The Fresh Herb Foundation: Parsley and Oregano
First and foremost, you absolutely must use fresh herbs. Dried herbs simply will not work here; they’ll give your sauce a sad, dusty flavor. The base is built on a huge amount of fresh flat-leaf parsley. Why flat-leaf? Well, it boasts a much more robust and less bitter flavor than its curly cousin. Alongside the parsley, fresh oregano introduces a subtle, earthy complexity that is utterly essential. Remember, this sauce is a celebration of freshness, so don’t be shy with the herbs!
The Aromatic Alliums: Garlic and Shallot
Next up, the aromatics. A true chimichurri packs a serious garlicky punch. We’re talking about a generous amount of fresh garlic, finely minced to distribute its pungent joy in every spoonful. Additionally, a shallot (or a small red onion) is often added for a layer of sharp, sweet depth that rounds out the garlic’s intensity perfectly. If you’re wary of raw garlic’s bite, make sure to mince it super fine—almost into a paste—which mellows it out slightly.
The Liquid Elements: Oil and Acid
This is where the sauce comes together. A high-quality extra virgin olive oil is non-negotiable; it provides the lush, smooth body that carries all the other flavors. Then, for balance, you need acid. Traditionally, red wine vinegar is used, delivering a sharp, tangy kick that cuts through the richness of the oil and the grilled fish. For a slightly different twist, some folks use fresh lime juice, which adds a bright, citrusy note.
The Flavor Enhancers: Salt, Pepper, and Red Pepper Flakes
Finally, the supporting cast. Kosher salt and freshly cracked black pepper are essential to season and elevate all the ingredients. Then, a pinch of red pepper flakes (or a finely chopped fresh chili) introduces a gentle, warm heat that lingers pleasantly in the background. It’s not about making the sauce spicy, but rather about adding a layer of warmth.
Step-by-Step: How to Make Authentic Chimichurri Sauce
Alright, let’s get our hands dirty! Making chimichurri is incredibly easy, but there’s one golden rule.
The Traditional Chop-and-Mix Method
Contrary to popular belief, your food processor is not your friend here. Pulse it, and you’ll end up with a bitter, over-processed puree that resembles pesto. Instead, the authentic texture is achieved by hand-chopping. Yes, it takes a few extra minutes, but the result is a rustic sauce with distinct flecks of herbs and a perfect, coarse texture that clings beautifully to the fish. Simply pile all your herbs, garlic, and shallot on a cutting board and chop them finely until they reach your desired consistency. Then, just transfer everything to a bowl and whisk in the oil, vinegar, and seasonings.
The Resting Period is Non-Negotiable
Here’s the biggest secret: you cannot serve this sauce immediately. Patience is key! Once mixed, you must let your chimichurri rest at room temperature for at least 30 minutes. Better yet, let it sit in the fridge for a few hours. This waiting period is not just a suggestion; it’s critical. During this time, the flavors meld, mellow, and mature. The sharp edges of the garlic and vinegar soften, and the herbs infuse the oil, creating a harmonious and deeply flavorful sauce that is well worth the wait.
Preparing and Grilling the Sea Bass to Perfection
Now, for the main event: the fish. Handling a beautiful piece of sea bass might seem intimidating, but I promise, with a few pro tips, you’ll grill it with unwavering confidence. The goal is simple: achieve that restaurant-quality, crispy skin while keeping the interior impossibly moist and flaky. It’s all about preparation and technique.
Selecting and Prepping Your Sea Bass Fillets
Buying Guide: What to Look For
First things first, you need to buy good fish. When you’re at the counter, look for fillets that are bright, glossy, and smell fresh and clean, like the ocean—never fishy or ammonia-like. The flesh should be firm to the touch and should spring back when pressed gently. For this grilled sea bass recipe, I highly recommend getting skin-on fillets. That skin is your ticket to incredible texture and flavor; it gets wonderfully crisp and protects the delicate flesh from drying out over the direct heat of the grill.
Essential Pre-Grill Preparation
Believe it or not, one of the most important steps happens before the fish even touches the grill. Once you’re home, pat those fillets completely dry with paper towels. I mean, really dry them. This is the single most crucial step for getting that skin crispy instead of steaming it. Next, let the fillets sit on the counter for about 15-20 minutes to come to room temperature; a cold fish on a hot grill will cook unevenly. Finally, take a very sharp knife and make a few shallow, diagonal slashes through the skin. This scoring prevents the skin from curling up dramatically as it cooks and allows the heat to render the fat more evenly.
Mastering the Grill: Techniques for Flaky, Moist Fish
Fire and Heat: Direct vs. Indirect Grilling
Don’t just throw the fish over raging flames and hope for the best! To cook it through without burning the skin, you need to use a two-zone fire. On a charcoal grill, pile the coals on one side. On a gas grill, turn the burners on high on one side and leave the other off. This setup gives you a searing zone (direct heat) and a gentle cooking zone (indirect heat). You want your grill grates to be screaming hot—around 400°F (200°C)—so preheat that grill for a good 10-15 minutes with the lid closed.
The Grilling Process: A Minute-by-Minute Guide
Now, for the main act. First, vigorously scrub your hot grates clean with a grill brush. Then, oil the grates thoroughly by gripping a folded paper towel with tongs, dipping it in a neutral oil (like canola or avocado), and rubbing it over the grates. This prevents sticking. Carefully place your fillets skin-side down on the direct heat side of the grill at a slight angle for those picture-perfect grill marks. Now, here is the ultimate test of willpower: DO NOT TOUCH IT. Do not poke it. Do not try to move it. Let it cook for about 70-80% of the total cooking time on that one side. For a typical 1-inch thick fillet, this is about 3-4 minutes. You’ll know it’s ready to flip when the edges look opaque and the skin releases easily from the grates without sticking. If it fights you, it’s not ready yet! Then, gently flip the fillets and move them to the indirect heat side of the grill to finish cooking for another 1-2 minutes, until just done.
How to Tell When Your Sea Bass is Perfectly Cooked
The best way to know for sure? Use an instant-read thermometer. The FDA recommends an internal temperature of 145°F, but for optimal moistness and flakiness, I recommend pulling it off the grill at around 135-140°F (57-60°C); the residual heat will carry it the rest of the way. If you don’t have a thermometer, use the “flake test.” Gently poke the thickest part of the fillet with a fork and twist slightly. The fish should flake easily but still look slightly translucent in the very center. Remember, it will continue to cook after you take it off the grill!
Pro Tips and Common Mistakes to Avoid
-
Don’t Crowd the Grill: Give each fillet plenty of space. Overcrowding lowers the grill temperature and causes the fish to steam.
-
Don’t Overcook: This is the cardinal sin of cooking fish. Sea bass is best when it’s just cooked through. Overcooked fish becomes tough and dry.
-
Let it Rest: Just like a steak, let your grilled fish rest for 5 minutes after it comes off the grill. This allows the juices to redistribute throughout the fillet.
Serving, Pairing, and FAQs
The hard part is over! You’ve crafted the perfect sauce and grilled the fish to flaky perfection. Now, it’s time to bring it all together and create a memorable meal.
Plating and Serving Your Grilled Sea Bass Masterpiece
Presentation matters, even for a casual weeknight dinner. To show off your hard work, place a fillet on each plate skin-side up, showcasing that gorgeous, crispy skin. Then, generously spoon that vibrant green chimichurri sauce over the top, allowing some to pool around the base. Alternatively, you can serve the sauce on the side in a small bowl for dipping. Either way, the contrast of the golden-brown fish against the bright green sauce is simply stunning.
The Perfect Accompaniments: What to Serve With Grilled Sea Bass
This dish is so versatile; it pairs wonderfully with a huge variety of sides. Here are some ideas to build your perfect plate:
Starches:
-
Cilantro-Lime Rice: The citrus notes complement the chimichurri beautifully.
-
Quinoa Salad: A light, protein-packed base that soaks up the extra sauce.
-
Roasted Baby Potatoes: Crispy on the outside, fluffy on the inside—a classic and comforting choice.
-
Crusty Bread: Absolutely essential for mopping up every last drop of that incredible sauce left on your plate.
Vegetables:
-
Grilled Asparagus or Zucchini: Toss them in oil, salt, and pepper and throw them on the grill alongside the fish for a complete summer grilling meal.
-
Simple Arugula Salad: A peppery arugula salad with a light lemon vinaigrette provides a fresh, bitter counterpoint to the rich fish and sauce.
-
Charred Corn: The sweetness of corn is a fantastic match for the tangy, herbal sauce.
-
Roasted Cherry Tomatoes: Their burst of sweetness and acidity enhances the overall dish.
Frequently Asked Questions (FAQs)
Can I make chimichurri sauce ahead of time?
Absolutely! In fact, it’s encouraged. Making it a few hours, or even a day, in advance allows the flavors to develop and meld together even more. Just store it in an airtight container in the refrigerator. Let it come to room temperature for about 20 minutes before serving for the best flavor and texture.
Can I use dried herbs instead of fresh for the chimichurri?
I really don’t recommend it. The sauce relies entirely on the bright, fresh flavor of the herbs. Dried herbs will taste dusty, bitter, and lack the vibrant color and vitality that defines a great chimichurri sauce. Fresh is non-negotiable for authenticity.
My fish always sticks to the grill grates. How can I prevent this?
Sticking is usually caused by three things: a dirty grill, insufficiently oiled grates, or fish that isn’t ready to be flipped. Ensure your grates are clean, well-oiled, and properly preheated. Most importantly, ensure your fish skin is patted completely dry and wait patiently until it releases naturally from the grates before you even think about moving it.
Can I cook this recipe indoors if I don’t have a grill?
You sure can! A well-seasoned cast-iron skillet or a heavy grill pan is your best friend here. Get it screaming hot over medium-high heat, add a thin layer of oil, and place your dried, room-temperature fillets in skin-side down. Press down gently for the first 10 seconds to ensure full contact. Then, follow the same cooking process: mostly on the skin side until crisp, then a quick flip to finish. You can also broil it in the oven on a sheet pan for a hands-off approach.
Grilled Sea Bass with Chimichurri
Description
🌿 Grilled Sea Bass with Chimichurri
Ingredients:
For the Fish:
-
4 sea bass fillets (skin-on, about 6 oz each)
-
2 tbsp olive oil
-
1 tsp sea salt
-
½ tsp black pepper
-
1 tsp smoked paprika (optional, for extra flavor)
For the Chimichurri:
-
1 cup fresh parsley, finely chopped
-
2 tbsp fresh oregano, finely chopped (or 1 tsp dried)
-
4 garlic cloves, minced
-
½ cup olive oil
-
2 tbsp red wine vinegar (or lemon juice)
-
½ tsp crushed red pepper flakes (adjust to taste)
-
Salt and pepper, to taste
Instructions:
-
Prepare the Chimichurri:
-
In a bowl, combine parsley, oregano, and garlic.
-
Stir in olive oil, vinegar, red pepper flakes, salt, and black pepper.
-
Let it sit for at least 20 minutes so the flavors meld (can be made a day ahead).
-
-
Season the Fish:
-
Pat the sea bass dry. Rub with olive oil, salt, pepper, and paprika.
-
-
Grill the Sea Bass:
-
Preheat grill to medium-high heat.
-
Place fillets skin-side down first. Grill for 4–5 minutes per side, depending on thickness, until the flesh flakes easily with a fork.
-
-
Serve:
-
Transfer fish to a platter and spoon chimichurri generously over the top.
-
Serve with lemon wedges and extra chimichurri on the side.
-