
Introduction & Overview
Why Spinach Stuffed Chicken Breast is a Dinner Table Hero
Let’s be honest, weeknight dinners can feel like a real chore. You’re constantly battling the clock, rummaging through the pantry, and trying to find that magical recipe that’s both impressively delicious and surprisingly simple to pull off. Well, what if I told you there’s a dish that effortlessly bridges that gap? A culinary superstar that’s elegant enough for date night yet straightforward enough for a busy Wednesday? Enter spinach stuffed chicken breast, the undisputed hero of the dinner table.
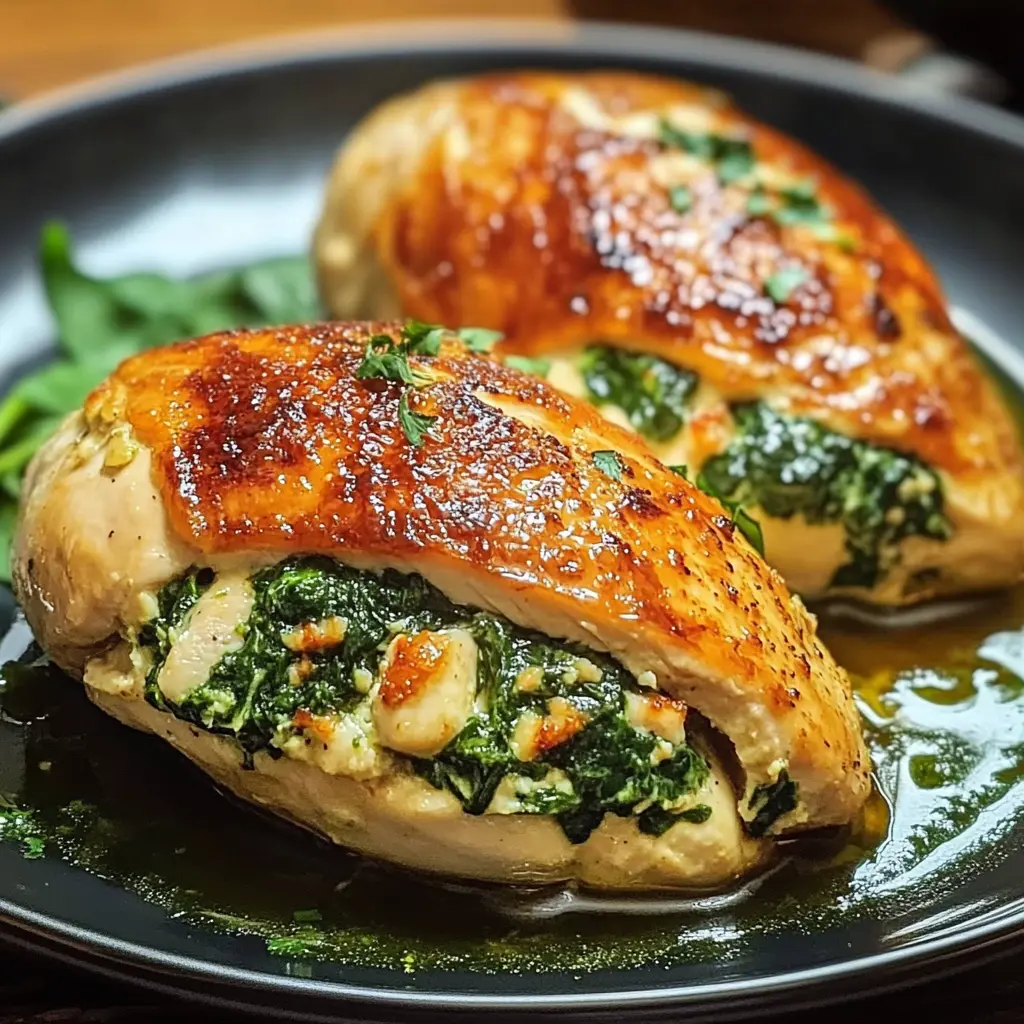
This isn’t just another boring chicken recipe; far from it, actually. Imagine this: a tender, juicy chicken breast, pounded thin and lovingly wrapped around a luxurious, creamy filling of savory spinach and melted cheese. Each bite is a perfect harmony of flavors and textures—the lean, satisfying protein of the chicken giving way to the warm, earthy, and cheesy heart within. It’s a meal that feels indulgent and fancy but, believe it or not, is well within your grasp.
Ultimately, this guide is your one-stop resource for mastering this incredible dish. We’re going to walk through everything, from selecting the perfect ingredients to mastering the art of rolling and sealing. Furthermore, we’ll explore foolproof cooking methods, explore delicious variations, and answer all your burning questions. So, roll up your sleeves—you’re about to create a meal that will have everyone asking for seconds.
The Foundation: Understanding the Dish & Key Ingredients
Deconstructing Deliciousness: What is Spinach Stuffed Chicken Breast?
Alright, before we dive into the how, let’s talk about the what. Essentially, this dish is a beautiful piece of culinary engineering. At its core, it involves taking a chicken breast, flattening it to create a canvas, and then spreading a flavorful filling over it. After that, you simply roll it up, secure it, and cook it to golden-brown perfection. The result? A stunning chicken roulade that looks professional but is deceptively easy.
But why does this specific combination work so well? Honestly, it’s a match made in heaven! Firstly, the mild flavor of the chicken acts as a perfect backdrop, allowing the filling to truly shine. Meanwhile, the spinach brings an earthy, slightly mineral depth that is absolutely irresistible. Of course, the cheese provides a glorious, gooey richness that binds everything together. Finally, garlic and herbs punch up the flavor, creating a symphony in every single bite.
Selecting Your Stars: A Guide to Key Ingredients
Using high-quality ingredients is the secret handshake to a truly unforgettable meal. Here’s how to choose your all-star team.
Choosing the Right Chicken Breast
For the best results, you’ll want large, plump, and uniformly sized chicken breasts. Why? Because they are much easier to pound into an even thickness without tearing. While thin-cut cutlets are convenient, pounding them yourself gives you more control. Always look for breasts that are pale pink and firm to the touch. If you’re curious about labels, understanding chicken packaging labels can help you make an informed choice.
Spinach: Fresh vs. Frozen
This is the million-dollar question, and honestly, both options are winners—they just require slightly different prep.
-
Frozen Spinach: The convenience champion! It’s already blanched, chopped, and ready to go. However—and this is a big however—you must thaw it completely and then squeeze out every last drop of water. Seriously, wring it out like you’re trying to get the last bit of toothpaste from the tube. A dry filling is a successful filling.
-
Fresh Spinach: Provides a lovely texture and vibrant green color. You’ll need to wilt about 4-5 cups of it in a pan first, let it cool, and then—you guessed it—squeeze it thoroughly.
The Cheese Melting Pot
The cheese is what makes the filling irresistibly creamy. You can mix and match based on your mood:
-
Cream Cheese: The ultimate base for a creamy spinach chicken filling; it provides unmatched richness and helps bind everything.
-
Mozzarella: Famous for its epic, stretchy meltiness.
-
Feta Cheese: Crumbles of feta will add a fantastic tangy, salty punch.
-
Parmesan: Grated Parmesan contributes a sharp, salty, umami depth that enhances all the other flavors.
The Core Recipe & Cooking Methods
The Classic Recipe: Creamy Spinach and Mozzarella Stuffed Chicken Breast
Ready to get cooking? This stuffed chicken breast recipe is your foolproof foundation.
Equipment You’ll Need
-
Meat mallet or heavy rolling pin
-
Sharp knife and cutting board
-
Skillet (oven-safe is best)
-
Mixing bowls
-
Toothpicks or kitchen twine
Step-by-Step Instructions
Step 1: Preparing the Chicken
First, place a chicken breast between two sheets of plastic wrap. Gently, but firmly, pound it from the center outward until it’s about ¼-inch thick. An even thickness is absolutely crucial for even cooking; otherwise, you’ll have a thin edge that’s overcooked and a thick part that’s underdone. Season both sides generously with salt and pepper.
Step 2: Crafting the Perfect Spinach Filling
In a bowl, combine your thoroughly squeezed spinach, 4 oz of softened cream cheese, ½ cup of shredded mozzarella, ¼ cup of grated Parmesan, two minced garlic cloves, and a pinch of salt and pepper. Mix it until it’s completely combined. Honestly, this mixture is so good you could eat it with a spoon!
Step 3: The Art of Stuffing and Rolling
Spoon a generous amount of the filling onto the center of the pounded chicken. Spread it out, leaving a one-inch border around the edges. Carefully, lift one side of the chicken and roll it over the filling, tucking it in as you go. Continue rolling tightly until you have a neat log. Finally, secure the seam with 2-3 toothpicks to prevent a filling leaking disaster.
Step 4: Searing for Golden Perfection
Now, heat a tablespoon of oil in your oven-safe skillet over medium-high heat. Carefully place the chicken rolls seam-side down. Don’t move them! Sear for 2-3 minutes per side, or until you achieve a beautiful golden-brown crust. This step is non-negotiable for building deep flavor.
Step 5: Baking to Juicy Doneness
Transfer the entire skillet to a preheated 375°F (190°C) oven. Bake for 15-20 minutes. How do you know it’s done? The only way to be sure is to use an instant-read thermometer. The internal temperature for chicken must reach 165°F (74°C) in the thickest part. Once it does, remove it from the oven and let it rest for 5-10 minutes. This allows the juices to redistribute, ensuring your masterpiece is juicy chicken breast and not dry.
Mastering the Methods: Pan-Searing, Baking, and Air Frying
The Skillet-to-Oven Method (The Standard)
This is the gold standard for a reason. Searing first creates a gorgeous crust (the Maillard reaction, for you science fans), and then finishing in the oven gently cooks the inside through without burning the outside. It’s the best of both worlds!
Baking Only Method
Short on time or just want to minimize dishes? You can bake them straight through. Simply place the secured rolls in a baking dish, drizzle with oil, and bake at 375°F (190°C) for 25-30 minutes. The crust won’t be as crispy, but it’s still wonderfully tasty.
Air Fryer Spinach Stuffed Chicken Breast
For a quicker, crispier result, your air fryer is a fantastic tool. Lightly spray the rolls with oil and air fry at 375°F (190°C) for about 15-18 minutes, turning halfway through. Just ensure they’re sealed tightly to protect that precious filling.
Grilling Method
Feeling adventurous? You can grill these! However, use indirect heat to avoid flare-ups from dripping cheese and to ensure the inside cooks before the outside chars.
Elevating Your Dish: Variations, Tips & Troubleshooting
Beyond the Basic: Delicious Variations to Try
Once you’ve mastered the classic, the world is your oyster! Here are some mouthwatering twists:
Sun-Dried Tomato and Feta
Swap the mozzarella for crumbled feta and add ¼ cup of chopped sun-dried tomatoes to the filling. This Mediterranean-inspired version is tangy, salty, and utterly delicious.
Bacon, Cheddar, and Jalapeño
For a smoky, spicy kick, mix in ½ cup of shredded cheddar, ¼ cup of cooked crumbled bacon, and a tablespoon of finely diced jalapeño. It’s a flavor explosion!
Artichoke and Parmesan
Replace the spinach with well-chopped, marinated artichoke hearts and use all Parmesan in the filling. It’s incredibly elegant and perfect for impressing guests.
Prosciutto-Wrapped Stuffed Chicken
For a truly stunning presentation, wrap each secured chicken roll with a slice or two of prosciutto before searing. The salty, crisp exterior is absolutely to die for.
Pro Tips for Guaranteed Success
-
The Squeeze is Key: I can’t stress this enough. Your frozen spinach must be bone-dry. Use a clean kitchen towel or your hands to wring out every last drop of moisture. A wet filling is a soggy, leaking filling.
-
Even Thickness for Even Cooking: Taking the time to properly pound the chicken is the single biggest factor in preventing dry, overcooked edges and a raw center.
-
Don’t Overstuff: It’s tempting to load it up, but about 3 tablespoons of filling per breast is plenty. Overfilling is the primary cause of leaks during cooking.
-
Rest Before Slicing: I know it’s hard to wait, but let the chicken rest for a solid 5-10 minutes after baking. This allows the muscle fibers to relax and reabsorb all those delicious juices.
Troubleshooting Common Issues
My filling is leaking out!
This is usually caused by overstuffing, not securing the seam well enough, or not searing the seam-side down first. Make sure your toothpicks are secure and you sear the roll long enough to create a seal.
The chicken is dry.
The most likely culprit is overcooking. This is why a meat thermometer is your best friend. Chicken is safe at 165°F (74°C), so pull it out of the oven right when it hits that temp. Also, ensure you’ve pounded it evenly.
The outside is burning before the inside is cooked.
Your heat is too high! If searing, make sure your skillet is at medium-high, not high. If baking, ensure your oven is at the correct temperature. The skillet-to-oven method is specifically designed to prevent this issue.
Serving, Pairing & Storing
Serving Suggestions: What to Serve with Stuffed Chicken Breast
This protein-packed meal is a complete star, but it needs a great supporting cast.
Starches
-
Creamy garlic mashed potatoes are a classic, comforting pairing.
-
Simple roasted baby potatoes or a wild rice pilaf work beautifully.
-
For a lighter option, try angel hair pasta with a light lemon butter sauce or a bed of fluffy quinoa.
Vegetables
-
The bright, crisp notes of steamed asparagus or roasted broccoli complement the rich chicken perfectly.
-
A simple arugula salad with a lemon vinaigrette provides a refreshing contrast.
-
Glazed carrots or roasted Brussels sprouts are also fantastic choices.
Sauces
Don’t forget the pan drippings! After removing the chicken from the skillet, you can make a simple pan sauce by deglazing with a little chicken broth and lemon juice, then swirling in a pat of butter.
Storing and Reheating Leftovers
Proper Storage
Allow any leftovers to cool completely before storing them in an airtight container in the refrigerator. They’ll keep well for up to 3-4 days.
How to Reheat
To preserve texture, avoid the microwave. Instead, reheat gently in a 325°F (160°C) oven or air fryer until warmed through. This will help keep the chicken from becoming rubbery.
FAQs
Frequently Asked Questions (FAQs)
Can I make spinach stuffed chicken breast ahead of time?
Absolutely! You can assemble the rolls completely, secure them with toothpicks, and store them covered in the refrigerator for up to 8 hours before you plan to cook them. This makes it a fantastic make-ahead stuffed chicken option for easy entertaining.
What is the best way to keep the chicken breast from drying out?
Using a digital meat thermometer to avoid overcooking is the number one rule. Additionally, pounding the breast to an even thickness ensures it cooks uniformly. Finally, letting it rest after baking allows the juices to settle back into the meat.
Can I use fresh spinach instead of frozen?
Of course! You will need to wilt it down first. Sauté about 4-5 cups of fresh spinach in a pan until it has completely wilted. Let it cool, and then—just like with frozen—squeeze out all the excess liquid until it’s very dry.
How do I know when the stuffed chicken is done?
The only way to know for sure is to check the internal temperature. Insert an instant-read thermometer into the thickest part of the chicken meat (avoid hitting the filling) and ensure it reads 165°F (74°C). According to the official USDA guidelines for safe chicken handling, this is the safe temperature for consuming poultry. The exterior should be golden brown, and the juices should run clear.
Print
Spinach Stuffed Chicken Breast
Description
🌿 Spinach Stuffed Chicken Breast
Ingredients:
-
4 boneless, skinless chicken breasts
-
2 tbsp olive oil
-
2 cloves garlic, minced
-
3 cups fresh spinach
-
4 oz cream cheese, softened
-
½ cup shredded mozzarella cheese
-
¼ cup grated Parmesan cheese
-
1 tsp Italian seasoning
-
½ tsp paprika
-
½ tsp salt
-
½ tsp black pepper
-
Toothpicks, for sealing
Instructions:
-
Prepare the spinach filling:
-
Heat 1 tbsp olive oil in a skillet. Add garlic and sauté until fragrant.
-
Add spinach and cook until wilted.
-
Remove from heat and stir in cream cheese, mozzarella, and Parmesan until creamy.
-
-
Prepare the chicken:
-
Preheat oven to 375°F (190°C).
-
Cut a pocket into each chicken breast (do not cut all the way through).
-
Season chicken with salt, pepper, paprika, and Italian seasoning.
-
-
Stuff the chicken:
-
Spoon spinach mixture evenly into each chicken breast pocket.
-
Secure with toothpicks if needed.
-
-
Cook the chicken:
-
Heat remaining olive oil in a skillet. Sear chicken 2–3 minutes per side until golden.
-
Transfer to a baking dish and bake 20–25 minutes, until chicken reaches 165°F internally.
-
-
Serve:
-
Remove toothpicks, let rest for 5 minutes, then serve hot.
-