
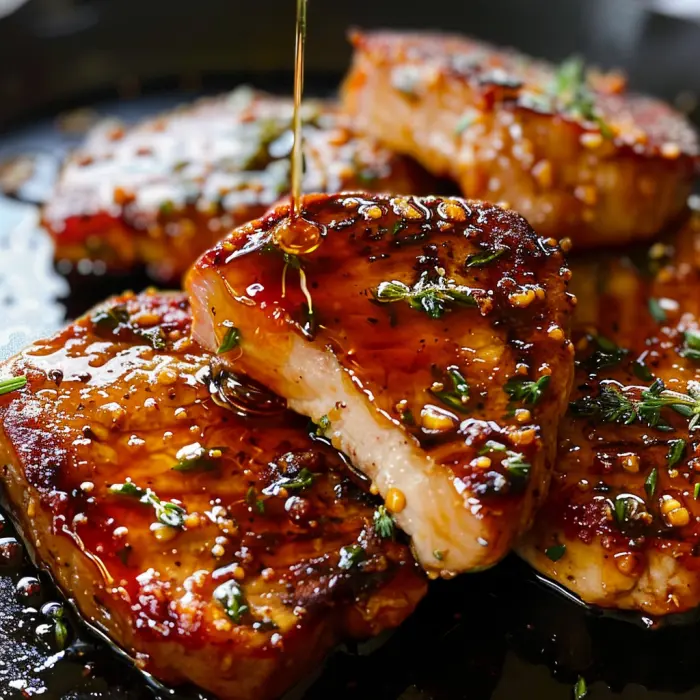
Introduction & The Allure of the Dish
Ah, the humble pork chop. For far too many of us, this simple cut of meat conjures up memories of dry, tough, and frankly, disappointing dinners. You know the ones—where you find yourself desperately chewing, wondering where it all went wrong. Well, fret no more! What if I told you that a truly spectacular, juicy, and flavor-packed meal is not only possible but also incredibly easy to achieve? In fact, it’s just thirty minutes away.
Enter the hero of our story: the Easy Honey Garlic Pork Chop. This dish is an absolute game-changer, transforming those dreaded weeknight dinners into a celebration of flavor. Imagine this: perfectly seared chops, boasting a gorgeous golden crust, smothered in a sticky, sweet, and savory glaze that’s downright irresistible. The magic lies in the sublime combination of rich honey, pungent garlic, and salty soy, which, incidentally, caramelizes into a sauce that you’ll want to eat by the spoonful.
Consequently, this article is so much more than a simple list of ingredients and steps. Without a doubt, it’s your ultimate guide to dinnertime victory. We’re going to dive deep into the secrets of selecting the right chop, mastering the sear, and whipping up that legendary homemade sauce. Furthermore, we’ll tackle troubleshooting, explore delicious variations, and answer all your burning questions. So, get ready to banish boring pork chops forever and create a new family favorite that’s sure to earn a permanent spot in your recipe rotation. Trust me, your taste buds will thank you.
Understanding Your Ingredients & Tools
The Blueprint for Success: Ingredients and Equipment
Let’s get down to brass tacks, shall we? Incredibly, the journey from bland to grand hinges on a handful of simple, pantry staples. However, understanding the role each one plays is your first step toward mastery. After all, knowledge is power, especially in the kitchen!
Deconstructing the Easy Honey Garlic Sauce
Honestly, the sauce is the undisputed star of this show. It’s a symphony of just a few notes that creates a perfect harmony.
The Sweetness: Honey and Its Potential Substitutes
At its heart, honey provides that unmistakable, floral sweetness. Moreover, it’s the key to that gorgeous, caramelized glaze we’re after. Don’t have honey? No problem! You can easily substitute it with pure maple syrup for a deeper flavor or even packed brown sugar for a more caramel-like taste.
The Savory Punch: Soy Sauce and Garlic
Now, for the balance! Soy sauce is the umami powerhouse, providing the essential salty, savory depth that keeps the sweetness in check. For a gluten-free version, tamari or coconut aminos work beautifully. And then there’s the garlic—please, for the love of flavor, use fresh cloves! That pungent, aromatic kick is absolutely non-negotiable for an authentic taste.
The Supporting Cast: Butter, Vinegar, and Spices
Finally, a pat of butter swirled in at the end adds a luxurious richness and gloss to the sauce. A splash of vinegar (apple cider or rice wine) introduces a subtle acidity that cuts through the richness and brightens the entire dish. A pinch of black pepper or red pepper flakes, meanwhile, adds a welcome layer of complexity and heat.
Choosing the Right Pork Chop: A Buyer’s Guide
Walking into the meat section can be confusing. Suddenly, you’re faced with a wall of options. Fear not! Here’s the lowdown.
Boneless vs. Bone-In: The Great Debate
This choice is a classic trade-off. Boneless pork chops are undoubtedly quicker and easier to cook evenly, making them the ideal candidate for a speedy weeknight dinner. On the other hand, bone-in chops tend to be more flavorful and forgivingly juicy, as the bone acts as an insulator against the heat. For beginners, boneless is a fantastic starting point.
Thickness is Key: Why Thin Chops Can Fail
Listen closely: this might be the most important tip. Avoid thin-cut chops! Those sad, floppy, half-inch thick cuts are practically destined for dryness because they overcook in the blink of an eye. Instead, aim for thick-cut pork chops that are about *1-inch thick*. This gives you a generous window to achieve a perfect sear on the outside without turning the inside into shoe leather.
The Art of the Brine (Optional but Recommended)
Want a foolproof insurance policy against dryness? Meet the brine. Soaking your chops in a simple saltwater solution (about 1 tablespoon of salt per cup of water) for even just 15-30 minutes works wonders. The meat absorbs the liquid, resulting in chops that stay incredibly juicy throughout the cooking process. It’s a simple step for a monumental payoff.
Essential Kitchen Tools You’ll Need
You don’t need anything fancy here. Essentially, a few basics will get the job done perfectly:
-
A heavy-bottomed skillet (cast iron is king for the perfect sear, but stainless steel works too).
-
A good pair of tongs for flipping with ease.
-
A small whisk or fork for combining your sauce.
-
The ultimate secret weapon: a digital meat thermometer. This is the only way to guarantee perfect doneness every single time.
The Step-by-Step Cooking Guide
Crafting Your Easy Honey Garlic Pork Chops: A Step-by-Step Masterclass
Alright, folks! It’s showtime. Now that our ingredients are prepped and our tools are ready, let’s transform these simple components into a masterpiece. First things first, get everything measured and within arm’s reach. This “mise en place” approach makes the cooking process smooth and stress-free.
Step 1: Preparing the Pork Chops for Perfection
To Pat Dry or Not to Pat Dry? (Spoiler: Yes!)
Grab those paper towels! This step is non-negotiable. You must pat the pork chops dry thoroughly. Why? Because moisture is the enemy of a beautiful, brown sear. By removing the surface moisture, you ensure the chops will caramelize instead of steam, giving you that restaurant-quality crust.
Seasoning Simply and Effectively
Next, season both sides of the chops generously with kosher salt and freshly ground black pepper. Don’t be shy here; this foundational seasoning makes all the difference. If you brined your chops, you can go a little lighter on the salt.
Step 2: The Art of the Sear: Building Flavor
Heating Your Pan Correctly
Place your heavy skillet over medium-high heat and let it get properly hot. To test it, flick a few drops of water into the pan; if they sizzle and evaporate immediately, you’re good to go. Then, add a high-smoke-point oil like avocado or vegetable oil, swirling to coat the bottom.
Searing to Golden-Brown Perfection
Carefully lay the chops in the hot pan. You should hear a satisfying sizzle—that’s the sound of flavor being created! Now, here’s the hard part: resist the urge to move them! Let them cook undisturbed for 3-4 minutes to develop that gorgeous, golden-brown crust. Peek underneath; if it’s nicely browned, flip them over to sear the other side.
Step 3: Whisking Up the Magical Honey Garlic Sauce
While the chops are working their magic in the pan, quickly whisk together the sauce. In a small bowl, combine the honey, soy sauce, minced garlic, and a splash of vinegar. That’s it! In mere seconds, your transformative elixir is ready.
Step 4: Simmering and Glazing: Where the Magic Happens
Deglazing the Pan: Don’t Waste the Flavor!
Once the chops are seared on both sides (they don’t need to be cooked through yet), remove them to a plate. Then, pour that amazing sauce right into the hot pan. It will bubble and sizzle furiously—this is a good thing! As you whisk, you’ll loosen all those delicious, browned bits stuck to the pan. Those bits are packed with flavor, a chef’s treasure called “fond.”
Creating a Sticky, Caramelized Glaze
Let the sauce simmer for a minute or two until it slightly reduces. Then, return the pork chops to the skillet, along with any accumulated juices. Spoon the sauce over the chops continuously for another 2-3 minutes. The sauce will thicken, become glossy, and cling to the meat in the most beautiful way.
Step 5: The Most Important Step: Resting Your Meat
Finally, transfer the glazed chops to a clean plate. Crucially, you must let them rest for at least 5 minutes. This allows the muscle fibers to relax and reabsorb all their juices. If you slice into them immediately, all those precious fluids will run straight onto the cutting board, leaving you with a dry chop. Patience is a virtue that pays delicious dividends!

Mastering the Method & Troubleshooting
Pro Tips and Troubleshooting for Flawless Pork Chops
Even with a fantastic recipe, sometimes things can go slightly sideways. But don’t worry! Here’s how to troubleshoot like a pro and ensure your dish is a roaring success every single time.
How to Know When Your Pork Chops Are Perfectly Cooked
Why Guess When You Can Measure? The Meat Thermometer
This is the single best investment you can make for your kitchen confidence. Guessing is for game shows, not for dinner! Insert the thermometer into the thickest part of the chop, avoiding the bone if there is one. The magic number is 145°F (63°C). This is the USDA recommended safe internal temperature for pork, resulting in juicy, slightly pink, and perfectly safe meat.
The Finger Test (Visual Guide)
If you’re without a thermometer, you can use the touch test. Gently press the center of the chop with your finger. If it feels firm and springs back readily, it’s likely done. If it feels soft and squishy, it needs more time. However, this method takes practice, so a thermometer is always more reliable.
Avoiding Common Pitfalls: Dry Chops and Broken Sauce
The Dreaded Overcook: How to Avoid It
This is public enemy number one. The primary causes are chops that are too thin, a pan that’s too hot, or simply cooking for too long. Remember, the carry-over cooking during the rest period will raise the temperature another 5 degrees or so. Therefore, always remove the meat from the heat just before it hits your target temp.
Saving a Sauce That’s Too Thin or Too Thick
Is your sauce not clinging to the chops? Create a quick cornstarch slurry by mixing a teaspoon of cornstarch with a tablespoon of cold water. Whisk this into the simmering sauce and it will thicken up in no time. Conversely, if your sauce becomes too thick, simply whisk in a splash of water or broth to loosen it up.
Preventing Burnt Garlic
Burnt garlic tastes bitter and can ruin the entire dish. The key is to add it at the right time. We add the fresh garlic to the sauce after the chops have been seared and removed from the pan. This way, it only cooks for a few minutes in the simmering liquid, which is just enough time to mellow its bite without burning it.
Variations, Serving, and Storage
Making It Your Own: Variations and Serving Suggestions
The beauty of this foundational recipe is its incredible versatility. Once you’ve mastered the classic, feel free to get creative and make it your own!
Delicious Variations on the Classic Recipe
-
Spicy Version: Love heat? Add a tablespoon of sriracha, a teaspoon of chili garlic paste, or a pinch of red pepper flakes to the sauce mixture.
-
Ginger-Honey Garlic: Add a tablespoon of freshly grated ginger to the sauce for a bright, zesty kick that pairs wonderfully with the other flavors.
-
Baked Honey Garlic Pork Chops: For a hands-off approach, simply sear the chops as directed, then transfer them to a baking dish. Pour the sauce over top and bake at 375°F (190°C) for 10-15 minutes, or until cooked through.
The Perfect Plate: What to Serve With Honey Garlic Pork Chops
This family-friendly dish plays well with others! The rich, sticky sauce begs for something to soak it all up.
-
Classic Comfort: Creamy mashed potatoes or fluffy jasmine rice are classic, foolproof choices.
-
Healthy & Fresh: A simple side of steamed or roasted vegetables like broccoli, green beans, or carrots balances the meal beautifully.
-
Light & Crisp: A simple green salad with a light vinaigrette provides a refreshing contrast to the savory-sweet chops.
-
Don’t Waste a Drop: Serve with a slice of crusty bread to mop up every last bit of that incredible glaze.
Storing and Reheating Your Leftovers
Got leftovers? Lucky you! Store them in an airtight container in the refrigerator for up to 3 days. To reheat, gently warm them in a covered skillet over low heat with a tiny splash of water to keep the meat moist. You can also use the microwave, but heat them in short bursts to avoid overcooking.
FAQs
Frequently Asked Questions (FAQs) About Honey Garlic Pork Chops
Can I use bone-in pork chops for this recipe?
Absolutely! Bone-in pork chops work wonderfully in this recipe. Just remember that they may require an additional 2-3 minutes of cooking per side due to the insulating nature of the bone. As always, trust your meat thermometer to tell you when they’ve reached the safe internal temperature of 145°F (63°C).
What can I use instead of soy sauce to make this gluten-free?
This is an easy swap! To make gluten-free pork chops, simply replace the soy sauce with an equal amount of tamari (which is traditionally gluten-free) or coconut aminos. Both options provide that essential salty, umami flavor without any gluten. Always check the labels to be sure!
How can I prevent my honey garlic sauce from burning?
The high sugar content in honey means it can caramelize and then burn quickly if the heat is too high. The key is to reduce the heat to medium once you add the sauce to the pan. You want it to simmer gently and reduce, not boil aggressively. For more tips on handling sweet glazes, resources like the National Honey Board’s guide to different honey varieties can be helpful.
Can I marinate the pork chops in the honey garlic sauce?
You can, but I recommend caution. Marinating for too long (more than 1-2 hours) can actually start to break down the texture of the meat because of the acid in the soy sauce/vinegar, resulting in a mushy exterior. A quick brine for moisture, followed by a simple salt and pepper seasoning before searing, is generally a more effective method for achieving juicy pork chops. For best practices, always follow proper food handling and preparation for fresh meat.

Easy Honey Garlic Pork Chops
Description
Easy Honey Garlic Pork Chops
Ingredients (4 servings)
-
4 boneless pork chops (about 1-inch thick)
-
2 tbsp olive oil (or butter)
-
Salt and black pepper, to taste
-
3 cloves garlic, minced
-
¼ cup honey
-
3 tbsp soy sauce
-
2 tbsp apple cider vinegar (or lemon juice)
-
½ tsp red pepper flakes (optional, for heat)
-
Chopped parsley or green onions (for garnish)
Instructions
-
Season chops:
Pat pork chops dry, then season both sides with salt and pepper. -
Sear:
Heat olive oil (or butter) in a skillet over medium-high heat. Sear pork chops 3–4 minutes per side until golden brown and cooked through (145°F / 63°C internal temp). Remove to a plate. -
Make the sauce:
In the same skillet, add garlic and sauté 30 seconds until fragrant. Stir in honey, soy sauce, and vinegar. Simmer 1–2 minutes until slightly thickened. -
Glaze:
Return pork chops to the skillet, spooning sauce over the top. Let them simmer in the sauce for 1–2 minutes so they’re nicely coated. -
Serve:
Garnish with parsley or green onions. Serve hot with rice, mashed potatoes, or roasted veggies.