
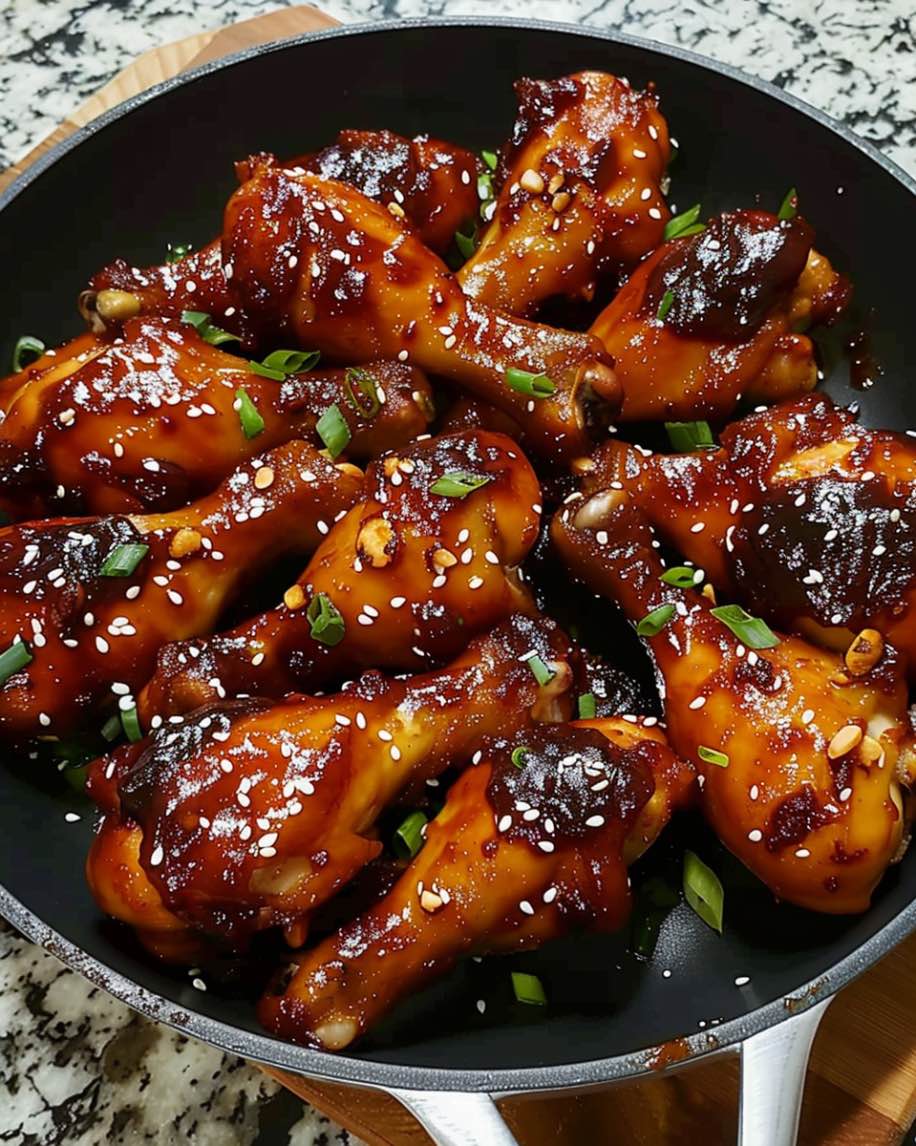
Easy Sticky Chicken Drumsticks
Introduction
Easy Sticky Chicken Drumsticks are the ultimate crowd-pleaser for busy weeknights and special gatherings alike. Moreover, these tender, juicy drumsticks feature a sweet and savory glaze that caramelizes beautifully in the oven. Additionally, this recipe requires minimal prep time and uses simple pantry ingredients. Whether you’re feeding picky eaters or impressing dinner guests, these sticky chicken drumsticks deliver restaurant-quality flavor at home. Furthermore, the hands-off cooking method makes them perfect for multitasking. Best of all, they’re completely family-friendly .
Why You’ll Love These Sticky Chicken Drumsticks
These easy sticky chicken drumsticks offer numerous advantages for home cooks. First, they require only 10 minutes of active prep time. The rest happens in the oven while you handle other tasks. Second, drumsticks remain incredibly budget-friendly compared to other chicken cuts. They also provide rich, dark meat flavor that stays moist during cooking.
Additionally, the sticky glaze creates an irresistible caramelized coating. This glaze penetrates deep into the meat, ensuring flavor in every bite. Furthermore, this recipe scales easily for any crowd size. Whether you’re cooking for two or twenty, the method remains the same. Most importantly, these drumsticks appeal to all age groups. Kids love the finger-food format, while adults appreciate the complex flavor profile.
Perfect for Any Occasion
These versatile drumsticks work wonderfully for various occasions. They shine at casual family dinners on busy weeknights. Meanwhile, they also make excellent party appetizers when cut smaller. Picnics and potlucks benefit from their portable, mess-free nature. Additionally, game day spreads become more exciting with these sticky favorites. The drumsticks even work well for meal prep since they reheat beautifully.
Essential Ingredients for Perfect Results
Creating exceptional sticky chicken drumsticks starts with quality ingredients. Fortunately, most items are pantry staples you likely already have. Let’s explore each component and its role in the recipe.
Main Ingredients
Chicken Drumsticks: Choose fresh or properly thawed drumsticks. Look for pieces that are roughly similar in size for even cooking. Aim for 8-10 medium drumsticks, which typically serves 4 people. Pat them completely dry before cooking to ensure proper browning.
Honey: This natural sweetener forms the base of your sticky glaze. Honey provides both sweetness and the characteristic stickiness. Use pure honey rather than processed alternatives for best results.
Soy Sauce: Low-sodium soy sauce adds depth and umami flavor. It also provides the savory balance to the sweet honey. Additionally, soy sauce helps create the beautiful caramelized color.
Brown Sugar: Packed brown sugar intensifies the sweetness and stickiness. It also contributes to the glaze’s rich, molasses-like undertones. Light or dark brown sugar both work well.
Garlic: Fresh minced garlic adds aromatic depth to the glaze. Use 3-4 cloves for noticeable flavor without overwhelming the dish. Alternatively, garlic powder works in a pinch.
Additional Flavor Enhancers
Fresh Ginger: Grated fresh ginger adds warmth and complexity. It cuts through the sweetness with its subtle spiciness. Use about one tablespoon of freshly grated ginger.
Rice Vinegar: This mild vinegar adds brightness and balances the sweet elements. It also helps tenderize the chicken slightly. Apple cider vinegar serves as an excellent substitute.
Sesame Oil: A small amount of toasted sesame oil adds nutty depth. Use it sparingly since the flavor is quite strong. Just one teaspoon makes a noticeable difference.
Red Pepper Flakes: Optional crushed red pepper adds gentle heat. Start with 1/4 teaspoon and adjust to taste. Omit entirely for child-friendly versions.
Cornstarch: This thickening agent creates the perfect glaze consistency. It helps the sauce cling beautifully to the chicken. Mix it with cold water before adding to prevent clumping.
Kitchen Tools You’ll Need
Having the right equipment makes this recipe even easier. Fortunately, you won’t need any specialized tools. Here’s what to gather before starting:
Baking Sheet: A rimmed baking sheet prevents glaze from dripping into your oven. Use one with at least 1-inch sides. Alternatively, a 9×13-inch baking dish works perfectly.
Wire Rack: Placing a wire rack inside your baking sheet elevates the drumsticks. This allows heat circulation and prevents soggy bottoms. However, you can skip this step if necessary.
Mixing Bowl: A medium bowl for combining glaze ingredients is essential. Choose one with a pouring spout for easier application.
Basting Brush: A silicone basting brush helps apply glaze evenly. It’s heat-resistant and easy to clean. In a pinch, a spoon works for drizzling.
Whisk: Use a small whisk to combine glaze ingredients thoroughly. This ensures no lumps remain in your sauce.
Aluminum Foil: Foil prevents over-browning during the initial cooking phase. It also makes cleanup significantly easier afterward.
Instant-Read Thermometer: This ensures your chicken reaches safe internal temperature. Drumsticks should register 175-180°F for optimal texture.
Step-by-Step Cooking Instructions
Follow these detailed instructions for perfectly sticky chicken drumsticks every time. Each step builds toward the final delicious result.
Preparation Phase
Begin by preheating your oven to 400°F (200°C). Meanwhile, line your baking sheet with aluminum foil for easy cleanup. If using a wire rack, place it inside the prepared sheet.
Next, pat the chicken drumsticks completely dry using paper towels. This crucial step ensures proper browning and glaze adhesion. Additionally, remove any excess skin or loose pieces. Arrange the drumsticks on your prepared baking sheet with space between each piece. Season lightly with salt and black pepper on all sides.
Making the Sticky Glaze
While the oven preheats, prepare your flavorful glaze. In a medium mixing bowl, combine 1/2 cup honey with 1/3 cup soy sauce. Add 3 tablespoons brown sugar and whisk until sugar dissolves completely. Then, incorporate 3 cloves minced garlic and 1 tablespoon grated fresh ginger.
Next, add 2 tablespoons rice vinegar and 1 teaspoon sesame oil. Whisk everything together until well combined. The mixture should be smooth and pourable. Set aside 1/4 cup of this glaze in a small bowl for later basting. This reserved portion stays uncontaminated by raw chicken.
In a separate small bowl, mix 1 tablespoon cornstarch with 2 tablespoons cold water. Stir until completely smooth without any lumps. Set this slurry aside for thickening the glaze later.
Initial Baking
Place the seasoned drumsticks in the preheated oven. Bake uncovered for 20 minutes to start the cooking process. During this time, the skin begins rendering its fat. The chicken also starts developing its base flavor.
After 20 minutes, carefully remove the baking sheet from the oven. Using your basting brush, generously coat each drumstick with the prepared glaze. Make sure to cover all surfaces for maximum flavor. Return the pan to the oven immediately.
Creating the Perfect Glaze
Continue baking for another 15 minutes at the same temperature. Meanwhile, prepare your thickened glaze for the final coating. Pour the remaining glaze (not the reserved portion) into a small saucepan. Heat over medium heat until it begins simmering gently.
Stir the cornstarch slurry once more, then slowly pour it into the simmering glaze. Whisk constantly to prevent lumps from forming. The glaze will thicken noticeably within 1-2 minutes. Once thickened, remove from heat and set aside.
Final Glazing and Caramelization
Remove the drumsticks from the oven once more after the 15-minute mark. Brush them generously with the thickened glaze you just prepared. Coat each piece thoroughly for that signature sticky appearance. The thicker glaze adheres better at this stage.
Return the pan to the oven and increase temperature to 425°F (220°C). Bake for an additional 10-15 minutes. Watch carefully during this phase to prevent burning. The glaze should caramelize and turn deep amber. Baste once more with reserved glaze halfway through if desired.
Checking for Doneness
Insert an instant-read thermometer into the thickest part of a drumstick. Avoid touching the bone, which gives false readings. The internal temperature should reach 175-180°F. At this temperature, the meat pulls away from the bone easily.
Additionally, the juices should run clear when pierced. The skin appears deeply caramelized and glossy. If needed, continue baking in 5-minute increments until done.
Resting Period
Once fully cooked, remove the drumsticks from the oven immediately. Let them rest on the baking sheet for 5 minutes. This resting period allows juices to redistribute throughout the meat. Meanwhile, the glaze sets slightly for better texture.
Transfer the sticky chicken drumsticks to a serving platter. Drizzle any remaining pan glaze over the top. Garnish with sesame seeds and sliced green onions if desired. Serve immediately while hot and sticky.
Pro Tips for Maximum Stickiness
Achieving perfectly sticky chicken drumsticks requires attention to detail. These expert tips ensure success every time.
Temperature Control
Starting at 400°F allows the chicken to cook through evenly. Then, increasing to 425°F caramelizes the glaze without burning. Never rush this process with higher initial temperatures. Consistent oven temperature prevents uneven cooking and burnt spots.
Glaze Consistency Matters
The glaze should coat the back of a spoon when properly thickened. If too thin, add more cornstarch slurry gradually. Conversely, if too thick, thin with water one teaspoon at a time. Proper consistency ensures the glaze clings without sliding off.
Multiple Basting Sessions
Each basting layer adds more flavor and stickiness. Apply thin coats rather than one thick layer. This technique builds up gradually for better adhesion. Additionally, it prevents the glaze from pooling and burning.
Don’t Overcrowd
Leave space between drumsticks for proper air circulation. Crowded pans create steam rather than caramelization. This results in less crispy skin and weaker glaze adhesion. Use two pans if necessary for larger batches.
Pat Dry Thoroughly
Moisture on the chicken surface prevents proper browning. Dry drumsticks develop better color and texture. This step also helps the glaze stick more effectively. Take extra time during this preparation phase.
Use Fresh Ingredients
Fresh garlic and ginger provide superior flavor to dried alternatives. They also contribute to the glaze’s aromatic quality. Similarly, pure honey tastes better than corn syrup-based products.
Monitor Closely During Final Minutes
The line between caramelized and burnt is thin. Stay nearby during the high-heat phase. Check frequently to catch the perfect moment. Set a timer for every 5 minutes during this crucial stage.
Flavor Variations to Try
Once you master the basic recipe, experiment with these delicious variations. Each offers unique flavor profiles while maintaining that signature stickiness.
Asian-Inspired Sticky Drumsticks
Add 2 teaspoons of five-spice powder to your base glaze. Include extra grated ginger for more warmth. Finish with toasted sesame seeds and cilantro. This variation emphasizes traditional Asian flavors beautifully.
Honey-Mustard Sticky Chicken
Replace half the honey with Dijon mustard. The tanginess balances the sweetness perfectly. Add a pinch of paprika for subtle smokiness. This version appeals to mustard lovers.
Spicy Sticky Drumsticks
Double the red pepper flakes for noticeable heat. Additionally, add 1-2 teaspoons of sriracha sauce. Include a touch of cayenne pepper for extra kick. Kids might prefer the mild version instead.
Sweet and Tangy Version
Increase rice vinegar to 3 tablespoons. Add 2 tablespoons of pineapple juice to the glaze. The fruit juice provides tropical sweetness and tang. Garnish with crushed pineapple if desired.
Garlic Lover’s Sticky Chicken
Triple the garlic amount for intense flavor. Add garlic powder in addition to fresh garlic. Include roasted garlic cloves as garnish. This variation celebrates garlic’s aromatic qualities.
Orange-Ginger Sticky Drumsticks
Replace honey with equal parts honey and orange marmalade. Add extra fresh ginger and orange zest. The citrus notes brighten the overall flavor profile. Garnish with orange segments for presentation.
Korean-Style Gochujang Glaze
Add 2 tablespoons of gochujang (Korean red pepper paste). Reduce brown sugar slightly to balance the spice. Include more sesame oil for authentic flavor. This version delivers complex, spicy-sweet notes.
Side Dish Pairings
Easy sticky chicken drumsticks pair wonderfully with various side dishes. Choose complementary flavors and textures for balanced meals.
Rice-Based Sides
Steamed White Rice: Plain rice soaks up excess glaze beautifully. It provides a neutral base for the bold chicken flavors. Additionally, rice stretches the meal for larger groups.
Fried Rice: Vegetable fried rice adds textural variety. The savory rice complements the sweet drumsticks. Include egg, peas, and carrots for complete nutrition.
Coconut Rice: Creamy coconut rice offers tropical flair. The subtle sweetness harmonizes with the sticky glaze. Jasmine rice works best for this preparation.
Vegetable Sides
Roasted Broccoli: Charred broccoli florets provide healthy contrast. Season with garlic and lemon for brightness. The crispy texture balances the tender chicken.
Asian Slaw: Crunchy cabbage slaw adds freshness and crunch. Dress with rice vinegar and sesame oil. Include carrots, bell peppers, and green onions.
Stir-Fried Green Beans: Quick-cooked green beans maintain their snap. Season with garlic and ginger to match the drumsticks. Add almonds for extra crunch.
Cucumber Salad: Cool cucumber salad cuts through the rich glaze. Dress with rice vinegar, sugar, and sesame seeds. This refreshing side cleanses the palate.
Starch Options
Roasted Potatoes: Crispy roasted potatoes offer comfort food appeal. Season with rosemary and garlic. The hearty side satisfies larger appetites.
Sweet Potato Wedges: Baked sweet potato wedges add natural sweetness. They complement the sticky glaze perfectly. Season simply with salt and pepper.
Egg Noodles: Buttered egg noodles provide simple, satisfying starch. They soak up sauce without competing for attention. Toss with fresh herbs before serving.
Fresh Salads
Mixed Green Salad: Light mixed greens balance the rich chicken. Dress with ginger-sesame vinaigrette. Include mandarin oranges for sweetness.
Edamame Salad: Protein-rich edamame adds nutritional value. Combine with corn, tomatoes, and cilantro. Dress with lime juice and olive oil.
Check out our guide on [perfect side dish pairings] for more inspiration.
Storage and Reheating Guidelines
Proper storage ensures your sticky chicken drumsticks remain delicious for days. Follow these guidelines for food safety and quality maintenance.
Refrigerator Storage
Allow drumsticks to cool completely before storing. Transfer to an airtight container within two hours of cooking. Store in the refrigerator for up to 4 days maximum. Keep the glaze separate if possible to prevent sogginess.
Place parchment paper between layers when stacking drumsticks. This prevents them from sticking together. Label the container with the date for tracking freshness.
Freezer Storage
Frozen sticky chicken drumsticks maintain quality for up to 3 months. Wrap individual drumsticks in plastic wrap first. Then place wrapped pieces in freezer-safe bags. Remove as much air as possible to prevent freezer burn.
Freeze the glaze separately in ice cube trays. Once frozen, transfer glaze cubes to freezer bags. This allows you to thaw only what you need.
Reheating Methods
Oven Method: This method best preserves texture and crispiness. Preheat oven to 350°F (175°C). Place drumsticks on a baking sheet. Cover loosely with foil to prevent drying. Heat for 15-20 minutes until warmed through. Remove foil for the last 5 minutes to re-crisp the skin.
Microwave Method: The quickest option, though less ideal for texture. Place drumsticks on a microwave-safe plate. Cover with a damp paper towel. Heat on medium power in 1-minute intervals. Rotate drumsticks between intervals for even heating. Total time typically runs 3-4 minutes.
Air Fryer Method: This method restores crispiness beautifully. Preheat air fryer to 350°F. Arrange drumsticks in a single layer. Heat for 8-10 minutes, shaking halfway through. The result rivals freshly made drumsticks.
Stovetop Method: Use a covered skillet with a splash of water. Heat over medium-low for 10-12 minutes. Turn occasionally for even warming. This method prevents drying while maintaining moisture.
Quality Indicators
Properly stored drumsticks should smell fresh and appetizing. Discard any chicken with off odors or slimy texture. Additionally, watch for discoloration or mold growth. When in doubt, throw it out.
Nutritional Information
Understanding the nutritional content helps with meal planning. Here’s approximate nutrition per drumstick (without skin):
Calories: 180-200 calories
Protein: 15-18g
Fat: 8-10g
Saturated Fat: 2-3g
Carbohydrates: 12-15g
Sugar: 10-12g
Sodium: 400-500mg
Cholesterol: 75-85mg
Nutritional Benefits
Chicken drumsticks provide excellent protein for muscle maintenance. They also contain essential B vitamins for energy metabolism. Additionally, dark meat offers more iron than white meat. Zinc supports immune function and wound healing.
The skin contains most of the fat content. Removing it reduces calories significantly. However, skin-on drumsticks offer better flavor and moisture. Balance your choice based on dietary goals.
Making It Lighter
Reduce honey to 1/3 cup for fewer carbohydrates. Use low-sodium soy sauce to cut sodium content. Remove skin before eating to reduce fat intake. These modifications create a lighter version.
Alternatively, increase the vegetable sides in your meal. This naturally reduces the portion size of chicken needed. Balance and moderation remain key to healthy eating.
Frequently Asked Questions
Can I make easy sticky chicken drumsticks ahead of time?
Yes, prepare the glaze up to 2 days in advance. Store it covered in the refrigerator. You can also season the drumsticks the night before. However, avoid glazing until ready to bake. The glaze can make the skin soggy if applied too early. For best results, bake fresh and serve immediately.
How do I prevent the glaze from burning?
Start at a lower temperature (400°F) for initial cooking. Only increase heat for the final caramelization phase. Additionally, watch closely during the last 10-15 minutes. If browning too quickly, tent loosely with foil. Proper monitoring prevents burning while achieving stickiness.
Can I use boneless chicken instead of drumsticks?
Absolutely, though cooking time will decrease significantly. Boneless thighs work particularly well with this recipe. Reduce total cooking time to 25-30 minutes. Check internal temperature reaches 165°F for boneless cuts. The glaze adheres equally well to boneless pieces.
What if I don’t have fresh ginger?
Ground ginger powder serves as a suitable substitute. Use 1 teaspoon of ground ginger per tablespoon of fresh. Keep in mind the flavor will be slightly different. Fresh ginger provides brighter, more vibrant notes. However, dried ginger still delivers delicious results.
How can I make the drumsticks extra crispy?
Pat the chicken extremely dry before seasoning. Use a wire rack for air circulation underneath. Additionally, broil for 2-3 minutes at the very end. Watch constantly during broiling to prevent burning. The high heat crisps the glaze beautifully.
Can I grill these sticky chicken drumsticks instead?
Yes, grilling adds wonderful smoky flavor. Preheat grill to medium-high heat (around 400°F). Grill drumsticks for 25-30 minutes, turning frequently. Brush with glaze during the last 10 minutes only. The sugar content can burn over direct heat.
Is there a dairy-free version?
This recipe is naturally dairy-free already. All ingredients used are plant-based or meat-based. Therefore, it suits dairy-free and lactose-intolerant diets perfectly. No modifications needed for dairy restrictions.
How do I know when the chicken is fully cooked?
The most reliable method uses an instant-read thermometer. Insert it into the thickest part without touching bone. The temperature should read 175-180°F for drumsticks. Additionally, juices should run clear when pierced. The meat should pull away from the bone easily.
Conclusion
Easy sticky chicken drumsticks deliver exceptional flavor with minimal effort. This foolproof recipe produces tender, juicy chicken with irresistible caramelized glaze. Furthermore, the simple ingredients and straightforward method make it accessible for cooks of all skill levels. Whether you’re planning a family dinner or entertaining guests, these drumsticks always impress.
The versatile nature of this recipe allows for endless customization. Adjust spice levels, try different glazes, or experiment with cooking methods. Additionally, the drumsticks pair wonderfully with countless side dishes. Most importantly, they store and reheat beautifully for convenient meal prep.
Remember to pat your chicken dry thoroughly before cooking. Apply multiple thin layers of glaze rather than one thick coat. Monitor closely during the final high-heat phase for perfect caramelization. These simple tips ensure success every single time.
Ready to experience the magic of easy sticky chicken drumsticks? Gather your ingredients and preheat that oven today.
Easy Sticky Chicken Drumsticks
Description
Easy Sticky Chicken Drumsticks
Ingredients:
-
8–10 chicken drumsticks
-
2 tablespoons olive oil
-
Salt & black pepper, to taste
For the Sticky Sauce:
-
¼ cup soy sauce
-
¼ cup honey (or maple syrup)
-
2 tablespoons hoisin sauce
-
2 cloves garlic, minced
-
1 teaspoon fresh ginger, grated
-
1 teaspoon sriracha or chili paste (optional, for heat)
-
1 teaspoon sesame oil
Optional Garnish:
-
Sesame seeds
-
Sliced green onions
Instructions:
-
Preheat Oven
-
Preheat oven to 400°F (200°C). Line a baking sheet with foil or parchment paper.
-
-
Prepare Chicken
-
Pat drumsticks dry with paper towels.
-
Season lightly with salt and pepper and drizzle with olive oil.
-
-
Make the Sauce
-
In a small bowl, whisk together soy sauce, honey, hoisin, garlic, ginger, sriracha, and sesame oil.
-
-
Bake Chicken
-
Place drumsticks on the baking sheet. Brush generously with half of the sticky sauce.
-
Bake for 25 minutes, then turn the drumsticks and brush with remaining sauce.
-
Bake another 15–20 minutes, until chicken is cooked through (internal temp 165°F / 74°C) and glaze is caramelized.
-
-
Serve
-
Sprinkle with sesame seeds and sliced green onions.
-
Serve with rice, steamed vegetables, or a fresh salad.
-