
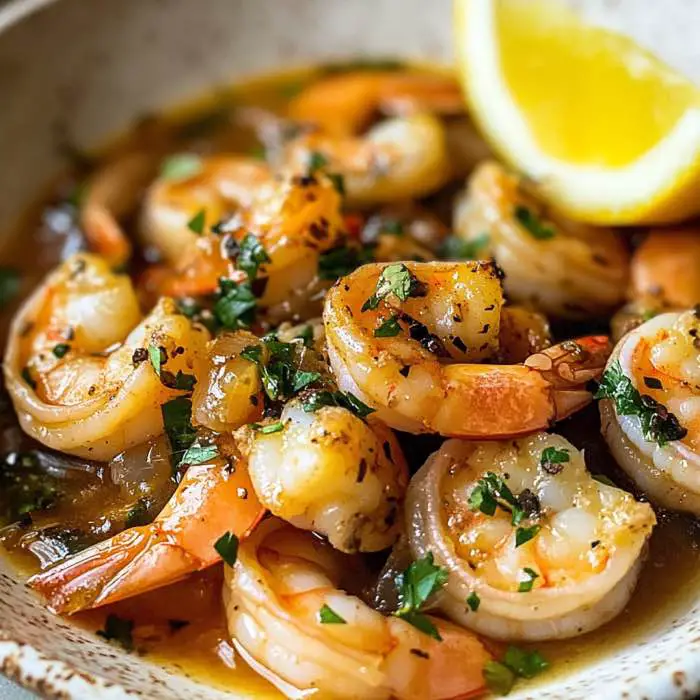
Drunken Shrimp Recipe: Bold Asian Flavors in 20 Minutes
This Drunken Shrimp Recipe delivers restaurant-quality results with bold Asian flavors, tender shrimp, and a savory sauce that comes together in just 20 minutes. Perfect for busy weeknights or impressive dinner parties, this dish features succulent shrimp stir-fried with aromatic garlic, fresh ginger, and a symphony of Asian-inspired seasonings. Furthermore, this recipe requires minimal ingredients and simple cooking techniques that anyone can master.
What Is Drunken Shrimp
Drunken shrimp represents a beloved category of Asian cuisine characterized by intensely flavorful, aromatic ingredients that create an unforgettable taste experience. This dish typically features large, succulent shrimp stir-fried with bold seasonings including fresh ginger, garlic, and a medley of savory sauces. The name refers to the intoxicating aroma and flavor profile that fills your kitchen during cooking.
Asian cuisine traditions emphasize balancing sweet, savory, spicy, and tangy elements in a single dish. Moreover, this cooking style celebrates quick, high-heat methods that preserve the natural sweetness and tender texture of seafood. The result is a restaurant-quality meal that takes less time than ordering takeout.
The Origins of Bold Asian Shrimp Dishes
Asian culinary traditions have perfected the art of cooking shrimp for centuries, developing techniques that enhance natural flavors without overwhelming delicate seafood. Traditional methods involve marinating proteins in aromatic mixtures before quick-cooking over high heat. Additionally, the use of fresh aromatics like ginger and garlic provides both flavor and potential health benefits.
Why This Recipe Works
This Drunken Shrimp Recipe succeeds because it combines time-tested cooking principles with accessible ingredients. The quick stir-fry method creates a beautiful sear on the shrimp while keeping the interior juicy and tender. Meanwhile, the sauce ingredients marry together during cooking to create complex, layered flavors.
High-heat cooking is essential for achieving that characteristic restaurant-style texture and flavor. The shrimp develop a slight caramelization on the outside while remaining succulent inside. Furthermore, the cooking process takes only minutes, which prevents the shrimp from becoming rubbery or overcooked.
The Science Behind Perfect Shrimp
Shrimp proteins cook quickly at high temperatures, transforming from translucent to opaque in just 2-3 minutes per side. This rapid cooking preserves moisture and creates the ideal texture that seafood lovers crave. Consequently, monitoring cooking time carefully ensures perfect results every time.
Ingredients You Need
For the Shrimp
-
1 pound large shrimp, peeled and deveined (16-20 count per pound)
-
2 tablespoons vegetable or canola oil
-
Salt and black pepper to taste
For the Aromatic Base
-
4 cloves garlic, minced
-
2 tablespoons fresh ginger, grated or finely minced
-
3 green onions, white and green parts separated and sliced
-
1-2 red chilies, sliced (adjust to taste)
For the Sauce
-
3 tablespoons low-sodium soy sauce
-
2 tablespoons oyster sauce
-
1 tablespoon sesame oil
-
1 tablespoon rice vinegar
-
1 tablespoon honey or brown sugar
-
½ teaspoon red pepper flakes (optional)
-
1 teaspoon cornstarch mixed with 1 tablespoon water
Optional Garnishes
-
Toasted sesame seeds
-
Fresh cilantro or parsley
-
Extra sliced green onions
Step-by-Step Instructions
Preparing the Ingredients
First, ensure all ingredients are measured and ready before beginning to cook. This preparation method, known as mise en place, makes the cooking process smooth and stress-free. Pat the shrimp completely dry with paper towels to help them achieve a beautiful sear.
Next, combine all sauce ingredients except the cornstarch slurry in a small bowl. Whisk thoroughly to dissolve the sugar and ensure even distribution of flavors. Set aside until needed during the cooking process.
Cooking the Shrimp
Heat a large skillet or wok over medium-high heat until very hot. Add the vegetable oil and swirl to coat the entire cooking surface. Meanwhile, season the shrimp with salt and black pepper on both sides.
Place the shrimp in a single layer in the hot pan, working in batches if necessary to avoid overcrowding. Cook undisturbed for 1-2 minutes until the bottom develops a golden-brown color. Flip each shrimp and cook for another 1-2 minutes until pink and just cooked through.
Building the Sauce
Remove the cooked shrimp to a clean plate and set aside. In the same pan, add a touch more oil if needed. Add the white parts of the green onions, minced garlic, grated ginger, and sliced chilies.
Stir-fry the aromatics for 30-60 seconds until fragrant but not browned. The kitchen will fill with an incredible aroma at this stage. Then, pour in the prepared sauce mixture and bring to a simmer.
Finishing the Dish
Allow the sauce to bubble for 2-3 minutes to develop the flavors. Add the cornstarch slurry and stir continuously as the sauce thickens to a glossy consistency. This should take only 30-60 seconds.
Return the cooked shrimp to the pan along with the green parts of the green onions. Toss everything together to coat the shrimp evenly in the sauce. Cook for just 1-2 minutes more to warm the shrimp through and meld the flavors.
Cooking Tips for Perfect Shrimp
Selecting Quality Shrimp
Choose fresh or high-quality frozen shrimp for the best results. Look for shrimp that smell fresh and ocean-like without any ammonia odor. If using frozen shrimp, thaw them completely in the refrigerator overnight before cooking.
Larger shrimp work best for this recipe as they’re easier to cook without overdoing them. The 16-20 count per pound size provides substantial, satisfying bites. Additionally, remove the shells and devein the shrimp before starting the recipe.
Temperature Control
High heat is crucial for achieving that characteristic sear and preventing the shrimp from steaming. Your pan should be hot enough that the shrimp sizzle immediately when they hit the surface. However, if the garlic and ginger begin to burn, reduce the heat slightly during the aromatic stage.
A high-quality wok or large skillet distributes heat evenly and provides enough surface area for proper searing. Moreover, avoid moving the shrimp too frequently during the initial sear.
Timing Is Everything
Shrimp cook incredibly quickly, typically requiring only 2-4 minutes total. They’re done when they turn pink and opaque throughout with a slight firmness to the touch. Overcooking results in tough, rubbery texture that no sauce can fix.
Remove the shrimp from heat as soon as they’re just cooked through, as they’ll continue cooking slightly from residual heat. Check out our guide on [insert link] for more seafood cooking techniques. Furthermore, having all ingredients prepped before starting ensures you can focus on timing.
Serving Suggestions
Traditional Accompaniments
Serve this Drunken Shrimp Recipe over fluffy steamed white rice or brown rice for a complete meal. The rice soaks up the delicious sauce beautifully, ensuring no flavor goes to waste. Alternatively, serve with rice noodles or lo mein for a different texture experience.
Fresh steamed vegetables like broccoli, snap peas, or bok choy make excellent side dishes. These additions provide color, nutrition, and complementary flavors without overwhelming the star of the show. Moreover, consider serving with crispy spring rolls or pot stickers as appetizers.
Presentation Ideas
Garnish generously with toasted sesame seeds, fresh cilantro, and extra sliced green onions. These finishing touches add visual appeal and fresh flavors that brighten the dish. Additionally, serve with lime or lemon wedges on the side for guests who enjoy extra acidity.
For family-style dining, present the shrimp in a large serving bowl over rice with vegetables arranged around the edges. The colorful presentation makes the meal feel special and restaurant-worthy. Furthermore, provide small bowls of extra chili sauce for those who prefer more heat.
Nutritional Benefits
Protein Powerhouse
Shrimp provides exceptional nutritional value with approximately 20 grams of protein per 3-ounce serving. This represents about 40 percent of the recommended daily protein intake. Moreover, shrimp contains all essential amino acids needed for muscle maintenance and repair.
Low in calories but high in protein, shrimp supports weight management goals effectively. A typical serving contains only 84 calories while providing substantial satiety. Therefore, this dish makes an excellent choice for those monitoring caloric intake.
Essential Nutrients
Shrimp delivers impressive amounts of minerals including zinc, magnesium, iodine, and phosphorus. These minerals support immune function, bone health, and thyroid regulation. Additionally, shrimp contains selenium, a powerful antioxidant that protects cells from damage.
The omega-3 fatty acids in shrimp promote heart health and may reduce inflammation throughout the body. Studies suggest that regular seafood consumption supports cardiovascular function and healthy lipid profiles. Furthermore, shrimp provides vitamin B12, essential for brain health and nervous system function.
Health-Promoting Aromatics
Garlic and ginger offer their own impressive health benefits beyond flavor. Ginger possesses anti-inflammatory properties and may support digestive health. Similarly, garlic has been associated with immune system support and cardiovascular benefits.
Common Mistakes to Avoid
Overcooking the Shrimp
The most frequent error when preparing shrimp is cooking them too long. Overcooked shrimp become tough, rubbery, and lose their natural sweetness. Watch carefully for the color change from translucent to opaque pink as your visual cue.
Remove shrimp from heat immediately when they just turn opaque throughout. Remember that carryover cooking continues for 30-60 seconds after removing from heat. Therefore, slightly undercooking is better than overcooking.
Crowding the Pan
Placing too many shrimp in the pan at once creates steam instead of a proper sear. This results in shrimp that are pale, rubbery, and lack the characteristic golden-brown exterior. Cook in batches if necessary to maintain proper spacing.
Each shrimp should have space around it to allow proper heat circulation. The extra few minutes required for batch cooking makes a dramatic difference in the final result. Additionally, a crowded pan lowers the overall temperature, further preventing proper searing.
Using Low Heat
Timid heat prevents the development of complex flavors and proper texture. The pan must be very hot before adding the shrimp to achieve restaurant-quality results. However, balance is key – excessive heat burns the delicate aromatics like garlic and ginger.
Recipe Variations
Spicy Version
For heat lovers, increase the red pepper flakes to 1-2 teaspoons. Add fresh Thai bird chilies or serrano peppers for extra kick. Moreover, incorporate a tablespoon of gochujang or Sriracha into the sauce for Korean-inspired heat.
Some prefer mixing chili oil directly into the finished dish for adjustable heat levels. This allows each diner to customize their spice level. Additionally, garnish with thinly sliced red chilies for visual appeal and flavor.
Sweet and Savory
Increase the honey to 2 tablespoons for a sweeter flavor profile that appeals to diverse palates. Add a tablespoon of hoisin sauce for deeper, more complex sweetness. Furthermore, a splash of pineapple juice creates tropical notes that complement the shrimp beautifully.
Some cooks add diced bell peppers and pineapple chunks during the final cooking stage. These additions create a sweet-savory balance reminiscent of popular Asian takeout dishes. Moreover, garnishing with cashews or peanuts adds pleasant textural contrast.
Vegetable-Loaded
Transform this dish into a complete one-pan meal by adding vegetables during cooking. Snap peas, broccoli florets, and sliced bell peppers work particularly well. Add harder vegetables like broccoli first, then follow with quicker-cooking options like snow peas.
Mushrooms, baby corn, and water chestnuts provide additional texture and Asian authenticity. Cook vegetables to crisp-tender stage to maintain their natural colors and nutrients. Additionally, this variation increases the nutritional value while stretching the recipe to serve more people.
Storage and Reheating
Refrigeration Guidelines
Store leftover Drunken Shrimp Recipe in an airtight container in the refrigerator for up to 2 days. Allow the dish to cool to room temperature before refrigerating to prevent condensation. Separate the rice from the shrimp if possible, as this prevents the rice from absorbing too much sauce.
Shrimp quality deteriorates quickly, so consume leftovers within the recommended timeframe. The texture may change slightly upon reheating, but the flavors remain delicious. Furthermore, proper storage prevents bacterial growth and maintains food safety.
Reheating Methods
Reheat gently in a skillet over medium heat with a splash of water or broth to prevent drying. Stir frequently and heat just until warmed through, approximately 2-3 minutes. Avoid overheating, as this further cooks the shrimp and can make them rubbery.
Microwave reheating works in a pinch but may compromise texture slightly. Use 50% power in 30-second intervals, stirring between each session. Cover the container with a damp paper towel to maintain moisture during microwave reheating.
Frequently Asked Questions
Can I Use Frozen Shrimp for This Drunken Shrimp Recipe?
Yes, frozen shrimp work perfectly well for this recipe. Thaw them completely in the refrigerator overnight or use the quick-thaw method under cold running water. Pat dry thoroughly with paper towels before cooking to achieve the best sear.
How Do I Know When Shrimp Are Fully Cooked?
Properly cooked shrimp turn pink and opaque throughout with a slight firmness when gently pressed. The shape changes from relatively straight to a loose “C” shape. If shrimp curl tightly into an “O” shape, they’re overcooked.
What Size Shrimp Works Best?
Large shrimp (16-20 count per pound) or jumbo shrimp (13-15 count) work best for this recipe. These sizes are easier to cook properly without overdoing them. Smaller shrimp cook so quickly that timing becomes difficult.
Can I Make This Dish Ahead of Time?
This Drunken Shrimp Recipe tastes best when served immediately after cooking. However, you can prepare all ingredients in advance and store them separately in the refrigerator. The actual cooking takes only 15-20 minutes, making it practical for weeknight meals.
What Can I Substitute for Oyster Sauce?
If oyster sauce isn’t available, substitute with hoisin sauce or additional soy sauce plus a pinch of sugar. Mushroom-based vegetarian oyster sauce provides similar umami flavors. Additionally, a combination of soy sauce and Worcestershire sauce approximates the savory depth.
Conclusion
This Drunken Shrimp Recipe delivers bold Asian flavors with minimal effort and maximum impact. The combination of aromatic ginger, garlic, and savory sauce creates an irresistible dish that rivals your favorite restaurant. Moreover, the quick cooking time makes this recipe perfect for busy weeknights when you crave something special.
The health benefits of shrimp combined with nutrient-rich aromatics make this dish both delicious and nutritious. Whether you’re cooking for family or entertaining guests, this recipe impresses every time. Try this Drunken Shrimp Recipe tonight and discover how easy it is to create restaurant-quality Asian cuisine at home.
Print
Drunken Shrimp Recipe
Description
Drunken Shrimp
Ingredients:
-
1 lb large shrimp, peeled and deveined
-
3 tablespoons butter
-
3 cloves garlic, minced
-
½ teaspoon red pepper flakes (optional for heat)
-
½ cup beer (lager or pale ale works best)
-
1 tablespoon lemon juice
-
2 tablespoons fresh parsley, chopped
-
Salt and black pepper, to taste
-
Crusty bread, for serving
Instructions:
-
Prep the shrimp:
Pat shrimp dry and season lightly with salt and pepper. -
Cook the garlic:
In a large skillet, melt butter over medium heat.
Add garlic and red pepper flakes; sauté 30 seconds until fragrant. -
Add shrimp:
Add shrimp to the skillet in a single layer. Cook 1–2 minutes per side until just pink. -
Deglaze with beer:
Pour in beer and lemon juice. Let simmer 2–3 minutes until sauce slightly reduces and shrimp are coated. -
Finish & serve:
Sprinkle fresh parsley over shrimp. Serve immediately with crusty bread to soak up all the garlicky beer sauce.