
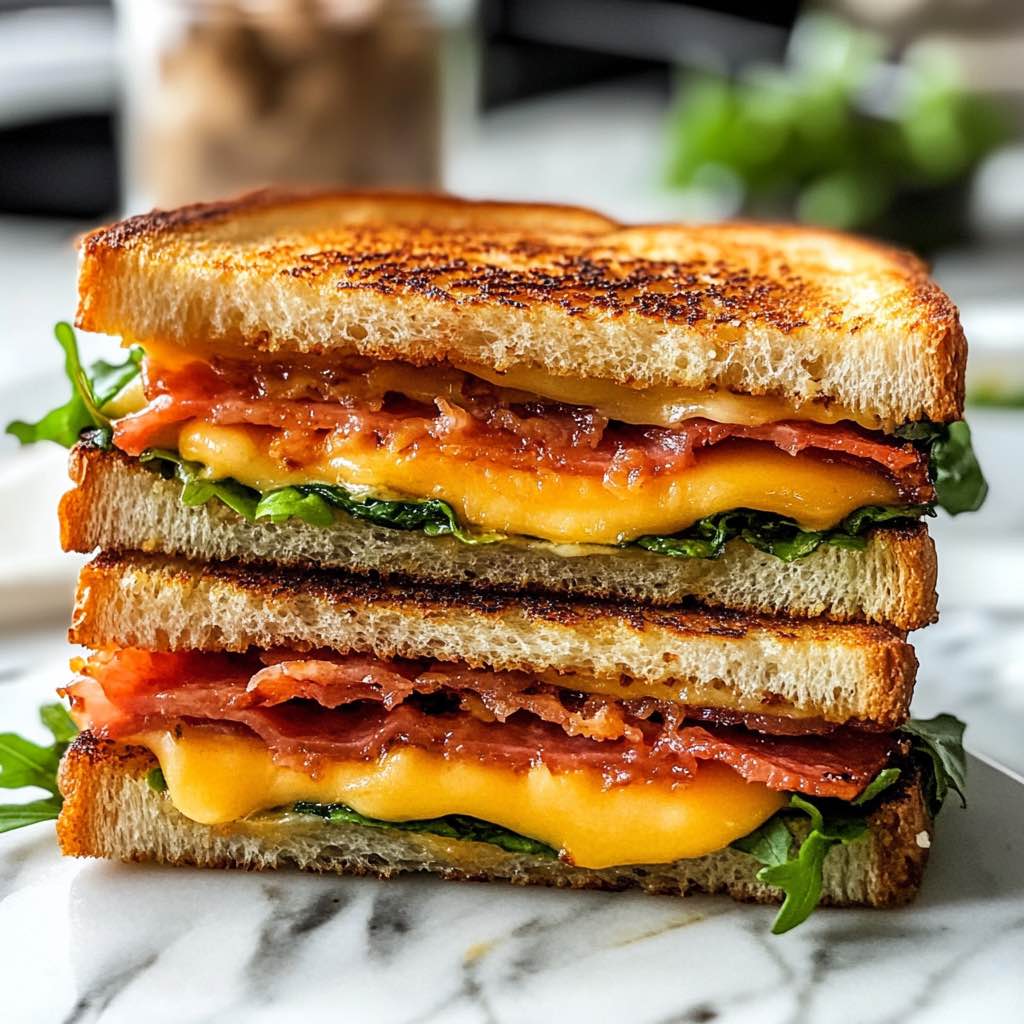
BLT Grilled Cheese Sandwich: The Ultimate Guide to a Classic Comfort Food Fusion
The BLT Grilled Cheese Sandwich combines two iconic comfort foods into one irresistible creation that delivers crispy bacon, fresh tomatoes, crunchy lettuce, and melted cheese between buttery, golden bread. This sandwich masterpiece has become a favorite among home cooks seeking an elevated twist on traditional favorites. The fusion brings together the savory elements of a classic BLT with the gooey, satisfying qualities of a perfectly grilled cheese.
What Makes a BLT Grilled Cheese Special
The BLT Grilled Cheese stands out as a brilliant fusion that captures the best qualities of two beloved sandwiches. Traditional grilled cheese offers buttery, crispy bread with melted cheese, while a classic BLT provides smoky bacon, juicy tomatoes, and fresh lettuce. When combined, these elements create a sandwich with multiple textures and flavors that work in perfect harmony.
This hybrid sandwich gained popularity because it addresses a common desire for something more substantial than a basic grilled cheese. The addition of bacon provides protein and a savory, smoky flavor, while tomatoes add acidity and freshness that cuts through the richness of the cheese. The lettuce contributes a satisfying crunch and freshness that makes each bite more interesting.
History and Origins
The BLT Legacy
The BLT sandwich has a rich history dating back to the early 1900s. While bacon, lettuce, and tomato have existed for many years, the first documented recipe appeared in the 1903 Good Housekeeping Everyday Cook Book. The sandwich likely evolved from club sandwiches served in train car dining culture during the mid-to-late 19th century.
The BLT became widely popular after World War II when supermarket expansion made its ingredients available year-round. By 1958, Hellmann’s Mayonnaise advertised their product as traditional for bacon, lettuce, and tomato sandwiches. According to a 2019 YouGov poll, the BLT ranks as the fifth-most popular sandwich in the United States.
Grilled Cheese Evolution
Grilled cheese sandwiches became popular during the Great Depression when they were called “cheese dreams”. During World War II, mess halls served toasted American cheese sandwiches to soldiers. The combination of affordable bread and processed cheese made this sandwich accessible to many families.
The Fusion
The BLT Grilled Cheese emerged as creative cooks began experimenting with classic sandwiches in the late 1990s and early 2000s. This period saw increased interest in gourmet bacon products and artisan sandwich creations. The fusion sandwich became popular in home kitchens and restaurants as people sought new ways to elevate comfort food classics.
Essential Ingredients Breakdown
Core Components
A proper BLT Grilled Cheese requires quality ingredients that each play a specific role. The foundation includes bread, butter, cheese, bacon, lettuce, tomato, and optional condiments. Each component contributes to the overall taste and texture profile.
The balance between ingredients matters significantly. Too much cheese can overpower the other flavors, while too little fails to provide the signature gooey texture. The right proportions ensure every bite includes all the essential elements.
Choosing the Perfect Bread
Bread Types
Sourdough stands out as an excellent choice because it offers more flavor than standard white bread while maintaining the right structure for piling on ingredients. The slight tanginess of sourdough complements the richness of cheese and bacon beautifully. Texas toast works wonderfully because its thickness (about 3/4 to 1 inch) provides substance without making the sandwich too heavy.
Whole grain bread adds nutritional value and a nutty flavor that pairs well with smoky bacon. White sandwich bread remains a classic option that many people prefer for its neutral taste and soft texture. Avoid using bread that’s too thin, as it can become soggy and fall apart.
Bread Preparation
The key to perfect bread texture involves buttering the outside generously. While the amount may seem excessive, it’s essential for achieving that golden, crispy exterior. Spread softened butter evenly across the entire surface to ensure uniform browning.
Some cooks prefer brushing melted butter on the bread for more even distribution. Room temperature butter spreads more easily and creates a better coating than cold butter. The buttered side should face down in the pan for optimal crisping.
Best Cheeses for Your Sandwich
Cheese Selection
Medium sharp cheddar provides excellent flavor that stands up to the bacon and other ingredients without overwhelming them. This cheese melts smoothly and offers a classic grilled cheese taste. American cheese delivers unmatched gooeyness and creates those satisfying cheese pulls.
Shredded cheese melts more easily and evenly than slices because it has more surface area. A blend of cheeses creates complex flavors and ideal texture. Gouda, Havarti, Monterey Jack, and fontina all work beautifully in this sandwich.
Swiss cheese adds a mild, nutty flavor and melts into lacy patterns that look appealing. Pepper jack contributes a spicy kick that complements the bacon’s smokiness. Mozzarella creates excellent stretch and mild flavor.
Cheese Layering
Place cheese on both sides of the filling for maximum meltiness. Start with a layer of shredded cheese on the bottom slice of bread, add the bacon and tomatoes, then top with more cheese before adding the second bread slice. This technique ensures the cheese acts as glue holding all ingredients together.
The cheese should cover the entire bread surface to prevent any dry spots. Use approximately 2 ounces or 1/2 cup of shredded cheese per sandwich for ideal coverage. More cheese isn’t always better, as excessive amounts can make the sandwich greasy.
Bacon Selection and Preparation
Bacon Types
Classic standard-cut bacon works perfectly when cooked until crispy. The bacon should be crispy enough to provide crunch but not so hard that it shatters. Thick-cut bacon offers more substantial bites and smokier flavor.
Turkey bacon serves as an excellent alternative for those who don’t eat pork. Cherrywood smoked bacon provides exceptional flavor with its subtle sweetness. The bacon type you choose significantly impacts the overall sandwich taste.
Cooking Methods
Baking bacon in the oven at 400 degrees Fahrenheit creates less mess and more consistent results than pan-frying. Line a baking sheet with parchment paper and bake for approximately 25 minutes. This method allows you to cook multiple strips at once.
Pan-frying remains a quick option for smaller batches. Cook the bacon over medium heat until it reaches your desired crispness. Drain excess grease on paper towels before adding to your sandwich. Properly cooked bacon should be crispy but not burnt.
Amount Per Sandwich
Use enough bacon to create one complete layer so you get some in every bite. Typically, 4 to 6 slices per sandwich works well, depending on bread size. The bacon should cover most of the bread surface without excessive overlap.
Fresh Produce Tips
Lettuce Selection
Choose lettuce varieties on the crispy end of the spectrum for best results. Butterhead lettuce (including Boston and Bibb varieties) provides mild flavor and pleasant crunch. Romaine lettuce offers sturdy leaves that hold up well in sandwiches.
Iceberg lettuce delivers maximum crispness and refreshing quality. The lettuce adds important textural contrast to the creamy cheese and crispy bread. Wash and thoroughly dry lettuce leaves before using to prevent sogginess.
Tomato Choices
Select tomatoes categorized as slicing tomatoes, which are big, meaty, and perfect for sandwiches. Beefsteak, Brandywine, and Mortgage Lifter varieties work exceptionally well. These large tomatoes provide substantial slices that cover the bread.
Choose ripe, in-season tomatoes whenever possible for maximum flavor. Avoid plum tomatoes, which are better suited for sauces. During winter months when fresh tomatoes lack flavor, consider using sun-dried tomatoes or tomato jam as alternatives.
Preparation Tips
Slice tomatoes about 1/4 inch thick for ideal coverage without making the sandwich too wet. Pat tomato slices dry with paper towels to remove excess moisture. This step prevents the bread from becoming soggy during cooking.
Add the lettuce after cooking the sandwich rather than grilling it. Lettuce wilts when exposed to heat, losing its fresh crunch. Adding fresh lettuce as the final step ensures it stays crisp and cool.
Step-by-Step Cooking Instructions
Preparation Phase
Gather all ingredients before starting to ensure smooth assembly. Cook the bacon first using your preferred method and set aside to cool slightly. Slice tomatoes and pat them dry with paper towels. Prepare lettuce by washing and thoroughly drying the leaves.
Bring butter to room temperature for easier spreading. Shred your cheese if using block cheese rather than pre-shredded. Have all components within easy reach for efficient sandwich building.
Assembly Process
Start by buttering one side of each bread slice generously. The buttered sides will face outward and touch the cooking surface. Place one bread slice buttered-side down on your work surface.
Layer shredded cheese evenly across the bread, covering the entire surface. Add your cooked bacon strips in a single layer. Place tomato slices on top of the bacon. Add another layer of shredded cheese over the tomatoes.
Top with the second bread slice, buttered-side facing up. Press down gently to help everything stick together. The sandwich is now ready for cooking.
Cooking Technique
Heat a large skillet or griddle over medium-low heat. Place the assembled sandwich in the pan. Cook slowly to allow the cheese time to melt while the bread becomes golden and crispy.
Place another heavy pan on top of the sandwich to press it down. This technique helps blend the ingredients and ensures even cooking. Cook for approximately 3 to 4 minutes until the bottom is golden brown.
Carefully flip the sandwich using a spatula. Cook the second side for another 3 to 4 minutes until golden and the cheese has fully melted. The total cooking time should be around 6 to 8 minutes.
Final Steps
Remove the sandwich from heat and let it rest for one minute. This brief resting period allows the cheese to set slightly. Open the sandwich carefully and add fresh lettuce leaves.
Add any desired condiments like mayonnaise or special sauces. Cut the sandwich diagonally for easier handling and appealing presentation. Serve immediately while the bread is crispy and the cheese is melty.
Pro Tips for Perfect Results
Temperature Control
Keeping your heat on low or medium-low is crucial for perfect results. High heat burns the bread before the cheese melts. Patient cooking allows the cheese to become gooey while the bread develops a golden crust.
If your bread is browning too quickly, reduce the heat. The cooking process should be gradual and controlled. Medium-low heat typically works best for most stovetops.
Pressing Methods
Using a heavy pan or sandwich press creates a compact sandwich with well-integrated ingredients. Press down firmly but not so hard that ingredients squeeze out the sides. The pressing technique also speeds up cooking by increasing contact with the hot surface.
Some cooks prefer using a panini press for consistent results. Others use a bacon press or weighted pot. Any heavy, flat object works for pressing.
Preventing Sogginess
Pat tomatoes dry thoroughly before adding them to the sandwich. Excess moisture causes soggy bread and dilutes flavors. Consider placing cheese directly against both bread slices to create a moisture barrier.
Toast both sides of the bread before assembly if you want extra insurance against sogginess. Pre-toasting creates a protective layer. Add wet ingredients like tomatoes just before serving when possible.
Achieving Even Melting
Shredded cheese melts more evenly than sliced cheese. The smaller pieces melt faster and more uniformly. Distribute cheese evenly across the entire bread surface for consistent coverage.
Remove cheese from the refrigerator 15 minutes before cooking. Room temperature cheese melts more quickly and smoothly. Layer cheese both under and over the fillings for maximum meltiness.

Popular Variations and Add-Ons
Sauce Options
Mayonnaise adds creamy richness and moisture to the sandwich. Spread it on the inside of the bread before adding other ingredients. Some recipes use mayo on the outside instead of butter for a different flavor profile.
Chipotle mayo brings smoky heat that complements the bacon. Mix mayonnaise with chopped chipotle peppers in adobo sauce. This spicy variation adds complexity and excitement.
Sun-dried tomato pesto contributes concentrated tomato flavor and herbal notes. Special sauces made with mayo, sriracha, Worcestershire, and honey create complex flavor profiles. Guacamole adds creamy texture and fresh avocado taste.
Additional Ingredients
Sliced red onions provide sharp, tangy flavor that cuts through the richness. Use thin slices to avoid overwhelming other ingredients. Caramelized onions offer sweet, savory depth.
Adding lunch meat like turkey or ham makes the sandwich more substantial. This turns the sandwich into a heartier meal. Fried eggs transform it into a breakfast option.
Pickles add tangy crunch and acidity. Avocado slices contribute creamy texture and healthy fats. Fresh basil or arugula provides herbal notes.
Bread Alternatives
Using different bread types changes the entire sandwich character. Whole wheat bread adds nuttiness and fiber. Rye bread contributes distinctive flavor. Ciabatta offers rustic texture and large air pockets.
Gluten-free bread accommodates dietary restrictions without sacrificing satisfaction. Focaccia provides herb-infused flavor and substantial texture. English muffins create smaller, portioned sandwiches.
Nutritional Information
Calorie Content
A typical BLT Grilled Cheese contains approximately 400 to 500 calories depending on ingredients used. The bread contributes about 150 to 200 calories. Cheese adds roughly 100 to 200 calories depending on type and amount.
Bacon provides approximately 40 to 50 calories per slice. Using 4 slices adds 160 to 200 calories. Butter used for grilling contributes about 100 calories.
Macronutrients
The sandwich provides substantial protein from cheese, bacon, and bread. A typical serving contains 13 to 25 grams of protein. This makes it a satisfying meal that keeps you full.
Fat content ranges from 17 to 32 grams per sandwich. Much of this comes from cheese and bacon. Carbohydrates typically total 28 to 40 grams, primarily from bread.
Vitamins and Minerals
The sandwich serves as an excellent calcium source, providing 15 to 28 percent of daily value. Calcium supports bone health and various bodily functions. Cheese contributes most of the calcium content.
Tomatoes provide vitamin C, potassium, folate, and vitamin K. They also contain lycopene, a beneficial antioxidant. Lettuce adds fiber and provides calcium and potassium.
Vitamin A content reaches about 24 to 25 percent of daily value. The sandwich also provides iron, phosphorus, and B vitamins. These nutrients support various body functions.
Health Considerations
The sandwich contains high amounts of saturated fat and sodium. A single serving may provide 85 percent of daily saturated fat limits. Sodium content can reach 500 to 800 milligrams.
To make the sandwich healthier, use whole grain bread for added fiber. Choose reduced-fat cheese to lower calorie and fat content. Turkey bacon contains less fat than pork bacon.
Adding more vegetables increases nutrient density without many calories. Using less butter reduces fat content while maintaining flavor. Consider the sandwich an occasional indulgence rather than an everyday meal.
Storage and Reheating Methods
Storing Leftovers
Allow leftover sandwiches to cool to room temperature before storing. Wrap the sandwich in waxed paper or parchment paper to prevent it from getting soggy. Place wrapped sandwiches in an airtight container.
Store in the refrigerator for up to 2 days. The bread may lose some crispness during storage. The cheese will solidify when cold.
Freezing Instructions
BLT Grilled Cheese can be frozen for meal prep convenience. Prepare sandwiches as normal but avoid adding lettuce before freezing. Wrap each sandwich tightly in parchment paper.
Place wrapped sandwiches in a freezer-safe bag or airtight container. Remove as much air as possible to prevent freezer burn. Properly stored frozen sandwiches last up to 3 months when vacuum-sealed or 6 weeks in regular freezer bags.
Avoid freezing sandwiches with water-heavy vegetables or mayonnaise as these don’t freeze well. Add fresh lettuce and condiments after reheating.
Reheating Methods
Reheating in a pan produces the best results. Place the sandwich in a skillet over medium-low heat. Cook for 2 to 3 minutes per side until heated through and crispy.
Frozen sandwiches can go directly from freezer to pan without thawing. This saves time and maintains texture. Cook frozen sandwiches slightly longer than refrigerated ones.
Toaster ovens work well for reheating. Set to 350 degrees Fahrenheit and heat for 5 to 10 minutes. This method requires less attention than stovetop reheating.
Air fryers provide quick, crispy results. Preheat to 350 degrees Fahrenheit. Cook for 5 to 8 minutes, checking frequently.
Common Mistakes to Avoid
Temperature Errors
Using heat that’s too high is the most common mistake. This burns the bread before the cheese melts. Always cook over medium-low heat for best results.
Not preheating the pan causes uneven cooking. Allow the pan to heat for 2 to 3 minutes before adding the sandwich. A properly heated surface ensures even browning.
Ingredient Issues
Adding too much filling makes the sandwich difficult to flip and messy to eat. Stick to one layer of each ingredient. Overstuffed sandwiches don’t hold together well.
Using cold cheese straight from the refrigerator extends cooking time. Room temperature cheese melts faster and more evenly. Take cheese out 15 minutes before cooking.
Adding lettuce before cooking causes it to wilt. Lettuce should always be added fresh after cooking. This preserves its crisp texture.
Technique Problems
Flipping the sandwich too early prevents proper browning. Wait until the first side is golden before turning. Resist the urge to flip multiple times.
Not pressing the sandwich allows ingredients to shift and separate. Use a heavy pan or press to keep everything together. Pressing also improves cooking efficiency.
Cutting the sandwich immediately after cooking allows all the melted cheese to run out. Let it rest for one minute before cutting. This brief pause helps the cheese set slightly.
Serving Suggestions
Side Dishes
Potato chips are the classic accompaniment to BLT Grilled Cheese. The salty crunch complements the rich sandwich perfectly. Kettle-cooked chips provide extra texture.
Fresh fruit offers a refreshing contrast to the savory sandwich. Apple slices, grapes, or berries work well. The fruit’s natural sweetness balances the salty bacon.
Soup makes an excellent pairing, especially tomato soup. The combination of grilled cheese and soup is beloved for good reason. Chicken noodle or vegetable soup also work wonderfully.
A simple green salad adds freshness and vegetables to the meal. Use a light vinaigrette dressing. The salad provides nutritional balance.
Beverage Pairings
Iced tea serves as a refreshing complement to this rich sandwich. The tannins in tea cut through the fatty cheese and bacon. Both sweetened and unsweetened versions work well.
Lemonade provides tartness that balances the savory flavors. The acidity cleanses the palate between bites. Homemade lemonade tastes especially good.
Sparkling water with lemon or lime offers hydration without adding calories. The bubbles refresh your mouth. Flavored sparkling waters add variety.
Iced coffee works surprisingly well, especially for breakfast versions. The coffee’s bitterness complements the sandwich’s richness. Cold brew is particularly smooth and enjoyable.
Presentation Tips
Cut the sandwich diagonally for classic diner-style presentation. This cut makes the sandwich easier to handle. It also looks more appealing on the plate.
Serve immediately while the bread is crispy and the cheese is melted. The contrast between hot and cold elements makes this sandwich special. Don’t let it sit before serving.
Use a colorful plate to make the sandwich pop visually. Garnish with a pickle spear or cherry tomatoes. Add a small handful of chips alongside.
Frequently Asked Questions
Can I make BLT Grilled Cheese ahead of time?
Yes, you can prepare the sandwiches ahead and freeze them for up to 3 months. Assemble completely except for lettuce, wrap tightly in parchment paper, and freeze. Reheat directly from frozen in a pan or oven. Add fresh lettuce after reheating for best texture.
What cheese works best for BLT Grilled Cheese?
Medium sharp cheddar provides excellent flavor that complements the bacon without overpowering it. American cheese offers superior meltiness and creates satisfying cheese pulls. Many people enjoy combining multiple cheeses like cheddar and gouda for complex flavor. Shredded cheese melts more evenly than sliced cheese.
Should I add lettuce before or after cooking?
Always add lettuce after cooking the sandwich. Cooking wilts the lettuce and destroys its crisp texture. Fresh, cold lettuce provides important textural contrast against the hot, melty cheese. Add it as the final step before serving.
How do I prevent the bread from burning?
Use medium-low heat and cook slowly. High heat burns the exterior before the cheese melts. Cook for 3 to 4 minutes per side, watching carefully. If the bread browns too quickly, reduce the heat immediately.
Can I use turkey bacon instead of pork bacon?
Yes, turkey bacon works perfectly as a substitute. It provides similar flavor and texture while containing less fat. Cook turkey bacon until crispy using your preferred method. The sandwich tastes delicious with turkey bacon.
What’s the best way to reheat leftover BLT Grilled Cheese?
Reheating in a pan over medium-low heat produces the best results. Cook for 2 to 3 minutes per side until the bread crisps up and the cheese melts again. A toaster oven set to 350 degrees Fahrenheit also works well. Avoid microwaving, which makes the bread soggy.
Conclusion
The BLT Grilled Cheese Sandwich represents the perfect fusion of two classic comfort foods that delivers on every level. This satisfying creation combines crispy bacon, fresh vegetables, melted cheese, and buttery toasted bread into one exceptional sandwich. By selecting quality ingredients, using proper cooking techniques, and following the tips outlined in this guide, anyone can create restaurant-quality BLT Grilled Cheese at home.
The versatility of this sandwich allows endless customization to suit personal preferences. Whether enjoying it for lunch, dinner, or a special brunch, the BLT Grilled Cheese never disappoints. Master the basic technique and then experiment with different cheeses, breads, and add-ons to make it your own.

BLT Grilled Cheese Sandwich
Description
BLT Grilled Cheese Sandwich
Ingredients
-
8 slices of bread (sourdough or white works best)
-
4 tablespoons butter, softened
-
8 slices cooked bacon
-
1–2 medium tomatoes, sliced
-
4 leaves of romaine or iceberg lettuce
-
1 cup shredded cheddar cheese (or mix with mozzarella for extra melt)
-
Optional: mayonnaise or avocado spread
🔪 Instructions
1. Prep the Sandwich
-
Butter one side of each bread slice.
-
Layer cheese, bacon, tomato, and lettuce between two slices of bread, buttered side out.
-
Optional: Spread a thin layer of mayo or mashed avocado on the inside for extra creaminess.
2. Grill the Sandwich
-
Heat a skillet over medium heat.
-
Place sandwich in skillet and cook for 3–4 minutes per side, pressing slightly, until the bread is golden and crispy and the cheese is melted.
-
Cover with a lid for 1–2 minutes if needed to help melt the cheese evenly.
3. Serve Hot
-
Slice diagonally for that classic cheesy, bacon-studded “money shot”.
-
Serve with potato chips, fries, or a pickle on the side.
Pro Tip
For extra crunch, sprinkle a little Parmesan cheese on the outside of the bread before grilling. It melts into a golden crust that takes your BLT grilled cheese to the next level