
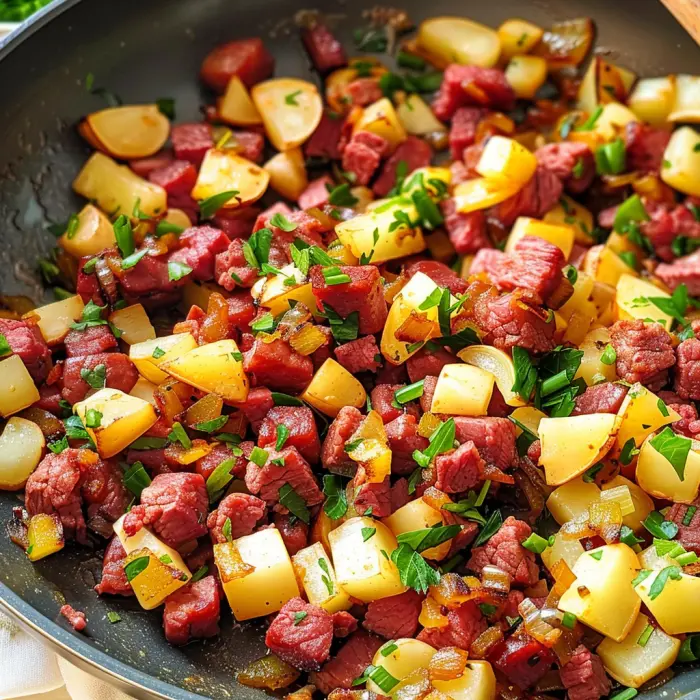
The Ultimate Guide to Corned Beef Hash: History, Recipes, and Tips
Ah, corned beef hash. Just the mention of it can conjure up a symphony of delightful sensations: the hearty sizzle from a well-seasoned cast-iron skillet, the inviting aroma of savory beef and onions filling the kitchen, and that glorious first bite of crispy potatoes and tender, salty meat. It is, without a doubt, a cornerstone of comfort food. However, this beloved dish is so much more than just a clever way to use up holiday leftovers; it’s a culinary artifact with a rich, cross-continental story simmering in every bite.
This ultimate guide will serve up everything you could possibly want to know. We’ll dig into its surprising and humble history, unravel the secrets to achieving that perfect crispy texture, and explore creative twists that will make this classic feel brand new. So, grab a fork—you’re about to become a corned beef hash expert.
Introduction and Deep Dive into History
Introduction: More Than Just a Leftover Meal
Let’s be honest, sometimes the best part of a big meal is the fantastic next-day creation it inspires. In fact, corned beef hash is the undisputed champion of this delicious form of recycling. Fundamentally, it’s a simple, hearty dish of chopped corned beef, potatoes, and onions, all pan-fried together until gloriously crispy and golden brown. It’s a staple on diner menus from coast to coast, a mandatory St. Patrick’s Day tradition, and the ultimate breakfast of champions for anyone needing a stick-to-your-ribs start to their day.
Yet, to dismiss it as mere leftovers is to miss the point entirely. This dish is a testament to practicality and flavor, a perfect example of how simple ingredients, when treated with care, can become something truly extraordinary. Consequently, our journey will explore its fascinating origins, provide you with a foolproof classic recipe, and unlock all the chef-approved secrets for making the absolute best hash of your life.
A Humble History: The Origins of Corned Beef Hash
To truly appreciate a dish, it often helps to understand where it came from. Surprisingly, the story of corned beef hash is a tale of migration, adaptation, and culinary ingenuity.
The Etymology of “Hash”
First things first, let’s talk about that name. The term “hash” derives directly from the French verb “hacher,” which simply means “to chop.” This, of course, is the absolute cornerstone of the preparation method. Essentially, you are taking various cooked ingredients, dicing them up into small pieces, and then frying them together into a cohesive, delicious whole. It’s a straightforward name for a straightforward, yet brilliant, concept.
A Dish of Necessity and Economy
Now, let’s travel back in time. Historically, hash emerged not in fancy restaurants but in the humble homes of everyday people. It was born from a powerful need: the imperative to prevent food waste. In the 18th and 19th centuries, nothing edible was ever thrown away if it could be helped. Consequently, yesterday’s roasted meat and boiled potatoes were thoughtfully chopped up, repurposed, and transformed into today’s hearty and affordable meal. This made it a particular favorite among working-class families on both sides of the Atlantic who needed a filling, economical, and tasty way to feed their households.
The Irish-American Connection (A Crucial Distinction)
Here’s where the history gets really interesting, and where a very common misconception needs clearing up. While we strongly associate corned beef with Ireland today, largely due to American St. Patrick’s Day celebrations, it was not a common staple for the everyday person in Ireland itself.
In fact, the Irish were more known for their pork and bacon. So, how did this switch happen? The answer lies with the waves of Irish immigrants who arrived in American cities like New York and Boston in the 19th century. Upon arrival, they found themselves living alongside other immigrant communities, including Jewish butchers from Eastern Europe. These butchers were renowned for their expertly cured meats, particularly a form of brined brisket that was very similar to what they knew as “bacon” back home—it was just made from beef instead of pork.
This brined beef was also remarkably inexpensive. Therefore, the Irish immigrants began purchasing it from Jewish delicatessens, using it as a substitute in their traditional recipes. This beautiful cultural fusion, this delicious exchange between two immigrant communities, is the true birthplace of the iconic Irish-American corned beef hash we know and love today. For a deeper dive into this fascinating history, you can read about the fascinating history of corned beef in America.
The Rise of the Diners and Canned Hash
As the 20th century rolled in, hash cemented its place in the American culinary landscape. It became an absolute non-negotiable on the menus of classic diners, the perfect greasy-spoon companion to a couple of sunny-side-up eggs and a side of toast. Furthermore, the post-war boom in convenience foods led to the invention of canned hash. Brands like Hormel and Mary Kitchen made it possible to have a hot, meaty meal ready in minutes, simply by heating up a can. While quite different in texture from the homemade version, this canned product introduced the flavor of hash to millions and secured its status as a comfort food legend.
The Core Components and Classic Recipe
Deconstructing the Dish: The Key Ingredients of Great Hash
Alright, enough history—let’s get down to the nitty-gritty! Making an incredible homemade corned beef hash isn’t rocket science, but paying attention to each component will elevate your dish from good to mind-blowing. Let’s break it down.
The Star: Corned Beef
Obviously, this is the headliner. Now, you’ve got two main paths here, each with its own merits.
-
Leftover Homemade Corned Beef: The undisputed champion. If you’ve boiled a brisket with spices for St. Patrick’s Day, this is your golden ticket. It’s typically more flavorful, tender, and you control the salt level. For the best texture, chop it into small, bite-sized pieces or shred it roughly with your fingers.
-
Store-Bought Deli Corned Beef: A fantastic and incredibly convenient shortcut. Honestly, it works wonderfully! Just ask your deli counter to slice it thick (about 1/2 inch) so you can then cube it yourself. This prevents it from vanishing into the hash and gives you those lovely, distinct chunks of meat.
The Foundation: Potatoes
This is where the great debate begins. The potato you choose dramatically affects the final texture.
-
Russet Potatoes: These are the classic choice for a reason. Their high starch content makes them fluffy on the inside and gives them a fantastic ability to crisp up on the outside. The key, however, is to par-boil them first; otherwise, they’ll never cook through in time.
-
Yukon Gold Potatoes: Personally, my favorite. They offer a beautiful middle ground—waxy enough to hold their shape but starchy enough to get a bit crispy and creamy. They also have a buttery flavor that complements the beef perfectly.
-
Red Potatoes: These waxy spuds are excellent if you prefer firm, distinct potato chunks in your hash. They hold their shape very well through cooking.
Pro Tip: No matter which you choose, make sure they are pre-cooked (boiled, roasted, or steamed) and cooled. This is the non-negotiable secret to crispy hash and not a steamed, starchy mess.
The Aromatics: Onions and Beyond
The humble onion is non-negotiable. Its sweet, savory flavor is the backbone of the dish. Yellow or white onions are perfect, diced small so they melt into the mixture. Feeling adventurous? By all means, add a minced clove of garlic towards the end of sautéing the onions, or dice up some bell pepper for a touch of color and sweetness.
The Binding Agent: Fat and Seasoning
This is the glue and the flavor booster. You need a good fat to conduct heat and encourage browning.
-
Butter: Provides unmatched flavor. For a real treat, use half butter and half oil to prevent burning.
-
Rendered Beef Fat: If you made your own corned beef, you likely have a layer of fat on top of the chilled cooking liquid. Use this! It’s pure flavor gold.
-
Vegetable Oil: A reliable, neutral option with a high smoke point.
Seasoning Warning: Go easy on the salt! Remember, corned beef is already very salty. Always taste before adding any extra. Instead, lean on a generous amount of black pepper and maybe a pinch of paprika or some fresh herbs like thyme or parsley added at the very end.
The Definitive Classic Stovetop Corned Beef Hash Recipe
Ready to put it all together? This easy corned beef hash recipe is your new weekend breakfast bible.
Ingredients List
-
2 cups cooked corned beef, chopped into 1/2-inch pieces
-
3 cups cooked Yukon Gold potatoes, diced into 1/2-inch cubes (cooled)
-
1 medium yellow onion, finely diced
-
3 tablespoons butter or vegetable oil
-
1/4 teaspoon black pepper (plus more to taste)
-
Fresh parsley, chopped (for garnish)
Step-by-Step Instructions
-
Prep is Key: First, ensure all your ingredients are prepped and within arm’s reach. This dish comes together quickly, so having everything ready is crucial.
-
Sauté the Aromatics: Next, melt the butter or heat the oil in a large, heavy-bottomed skillet (cast-iron is truly ideal here) over medium heat. Add the diced onion and cook, stirring occasionally, for about 5-7 minutes until they become soft and translucent.
-
Combine and Press: Now, add the chopped corned beef and diced potatoes to the skillet. Gently toss everything together with the onions, spreading the mixture into an even layer across the bottom of the pan. Here’s the secret: press it all down firmly with your spatula!
-
The Waiting Game (Don’t Stir!): This is the hardest part—walk away! Well, not really, but you must resist the urge to stir. Let it cook undisturbed for a solid 5-7 minutes. This allows a fantastic, golden-brown crust to form on the bottom.
-
Flip and Repeat: Finally, use your spatula to flip sections of the hash over. Press down firmly again and cook for another 5-7 minutes until everything is heated through and as crispy as you like it.
-
Serve Immediately: Season with a good crack of black pepper, garnish with fresh parsley, and serve right away while it’s hot and crispy!
Chef’s Tip: For an even more guaranteed crisp, try the lid trick. After the first flip, cover the skillet with a lid for 2-3 minutes to steam and heat the interior thoroughly. Then, remove the lid for the last few minutes of cooking to re-crisp the bottom.

Variations, Cooking Methods, and Serving
Beyond the Basics: Creative Corned Beef Hash Variations
Once you’ve mastered the classic, the world is your oyster! Corned beef hash is an incredibly adaptable canvas for your culinary creativity.
Regional Twists
-
New England Hash: A classic variation that often includes diced cooked beets right in the mix. They add a wonderful earthy sweetness and turn the entire hash a beautiful reddish-pink color.
-
Southern Style: Kick it up with a dash of hot sauce or a pinch of cayenne pepper in the mix. Serve it alongside a pile of creamy cheese grits for the ultimate comfort food mash-up.
Global Inspirations
-
Irish Hash: Honor those roots by adding a handful of finely shredded cabbage or kale during the last few minutes of cooking. It’s a delicious nod to the classic corned beef and cabbage.
-
Spicy Southwest Hash: Transform your hash by adding diced poblano peppers, a handful of corn (fresh or frozen), and a sprinkle of cumin with the onions. Top it with a fried egg, sliced avocado, and a dollop of sour cream.
Gourmet Upgrades
-
The Benedict Hash: Forget the English muffin! Serve a generous scoop of hash in a bowl, top with two poached eggs, and drown it all in a rich, lemony hollandaise sauce. You can thank me later.
-
Hash Cakes: Take your cooled hash mixture, form it into patties, and lightly coat them in panko breadcrumbs. Pan-fry these patties in a little oil until they are golden brown and extra-crispy on both sides. Perfect for a handheld breakfast!
How to Cook Hash: Stovetop, Oven, and Grill Methods
While the stovetop is king, you have options depending on your needs and tools.
Cast-Iron Skillet Mastery (The Best Method)
As outlined in the recipe, a heavy cast-iron skillet is the perfect tool. It retains and distributes heat evenly, creating consistent browning and that unbeatable crust we crave. It’s a worthwhile investment for any hash enthusiast.
The Baked Hash Shortcut
Need to feed a crowd for brunch? Baking your hash is the way to go. Simply preheat your oven to 400°F (200°C). Mix all your ingredients in a bowl, then spread the mixture evenly into a greased baking dish or sheet pan. Press it down firmly and bake for 20-30 minutes, or until the top is crispy and golden. No stirring required!
The Outdoor Option: Griddle and Grill
For that smoky, outdoor flavor, you can absolutely make hash on a flat-top griddle or even in a grill basket over medium-high heat. The method is the same: spread, press, and don’t move it! This is a fantastic way to keep the heat out of the kitchen on a summer morning.
How to Serve and Enjoy Corned Beef Hash
Your perfectly crispy hash is ready—now what? The pairing possibilities are nearly endless.
The Perfect Pairing: Eggs
This is the timeless duo. A runny-yolked egg is practically a required sauce for hash.
-
Fried: Sunny-side up or over-easy, so the yolk can run into the hash.
-
Poached: A elegant, clean option that delivers the same yolk-y goodness.
-
Scrambled: For those who prefer their eggs well-contained and fluffy.
Breakfast and Brunch Sides
-
Toast: Buttery, toasted rye bread or sourdough is perfect for mopping up every last bit.
-
Fresh Fruit: A bright, fresh fruit salad or some orange slices helps cut through the richness of the meal.
Beyond Breakfast
Don’t pigeonhole this dish! It makes for a phenomenal, satisfying lunch or a simple dinner. Serve it with a light, acidic side salad to balance the plate. You can even use it as a incredibly flavorful filling for breakfast burritos or an omelet. Ultimately, it’s a versatile star.
FAQs Section
Frequently Asked Questions About Corned Beef Hash
Q: What is the best way to get my hash crispy?
A: The absolute key is patience and minimal stirring. Use a well-heated, heavy skillet (like cast-iron), press the hash down firmly into an even layer, and let it cook for several minutes without touching it. This allows a proper crust to form. Using pre-cooked, cooled potatoes is also a critical step.
Q: Can I use raw potatoes in corned beef hash?
A: It’s highly not recommended. Unfortunately, raw potatoes won’t cook through in the time it takes for the onions and beef to brown properly. They’ll either burn or steam, resulting in a gummy, unpleasant texture. Always use pre-cooked potatoes for the best results.
Q: How long does leftover corned beef hash last in the fridge?
A: Properly stored in an airtight container, cooked corned beef hash will last for 3 to 4 days in the refrigerator. For the best results, reheat it in a skillet over medium heat to restore its crispiness. The microwave will make it soft and steamy.
Q: What’s the difference between canned hash and homemade hash?
A: They are worlds apart! Canned hash is a convenience product where the ingredients are ground into a very uniform, soft mixture and contain preservatives. Homemade corned beef hash, on the other hand, features distinct, recognizable chunks of meat and potato, allows you to control the seasoning and quality of ingredients, and delivers a superior texture with crispy edges and a tender interior. Making it from scratch is also a great way to support USDA’s tips on reducing food waste. For the best cooking results, using one of the best cast-iron skillets for cooking is highly recommended.

Corned Beef Hash
Description
Corned Beef Hash
Ingredients (4 servings)
-
2 tbsp butter (or oil)
-
1 medium onion, finely chopped
-
3 cups cooked corned beef, diced (leftovers work perfectly)
-
3 cups cooked potatoes, diced (boiled, roasted, or leftover)
-
1 clove garlic, minced (optional)
-
Salt and black pepper, to taste
-
1 tbsp fresh parsley, chopped (optional)
-
Fried eggs, for serving (optional but highly recommended)
Instructions
-
Cook onion:
In a large skillet, melt butter over medium heat. Add onion and cook 4–5 minutes until softened. Add garlic if using, cook 1 minute more. -
Add potatoes & corned beef:
Stir in diced potatoes and corned beef. Spread mixture evenly in the skillet. -
Crisp it up:
Press down lightly with a spatula. Cook undisturbed for 4–5 minutes until bottom is crispy and golden. Stir, then press down again. Repeat until desired crispiness. -
Season & finish:
Taste and season with salt and black pepper. Sprinkle parsley on top if desired. -
Serve:
Top with fried or poached eggs and serve hot.