
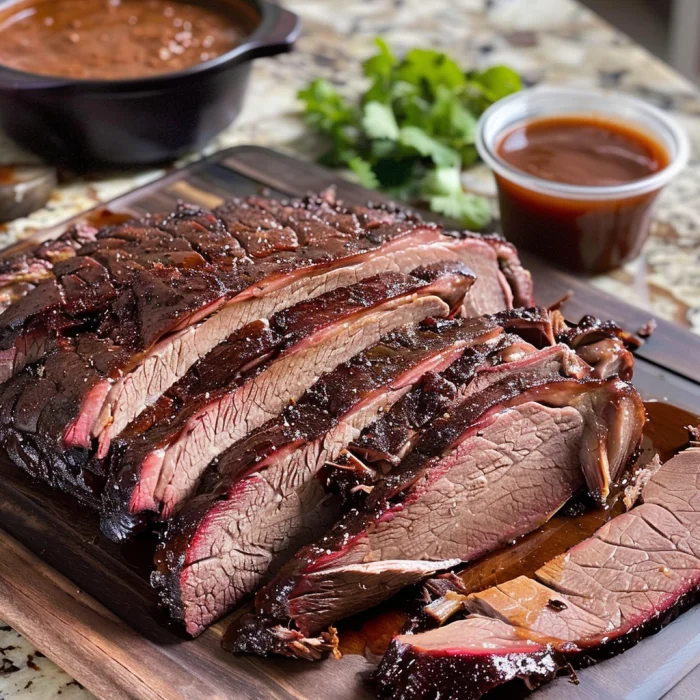
The Ultimate Guide to Smoked Brisket: Mastering the Art of Low and Slow
Ah, smoked brisket. Just the phrase itself conjures up images of hazy blue smoke, a crusty black bark, and that impossibly tender, juicy interior that simply melts in your mouth. For many, it is the holy grail of barbecue—a true test of a pitmaster’s patience and skill. Frankly, it can seem like a daunting mountain to climb. Where do you even begin? Well, fear not! This comprehensive guide is your trusted map, leading you from a nervous novice to a confident brisket hero. We’ll unravel the mysteries of the cut, the fire, and the timing, transforming this intimidating endeavor into an incredibly rewarding journey. So, grab your apron, and let’s get started.
Why Smoked Brisket is the King of BBQ
In the world of barbecue, every region has its champion. Nonetheless, Texas-style smoked brisketstands alone, reigning as the undisputed king for a reason. It isn’t just a meal; it’s a masterpiece built on patience and respect for the craft. Unlike quicker-cooking ribs or chicken, a brisket demands your attention for hours on end, slowly transforming a tough cut of meat into something sublimely tender through the magic of low heat and smoke. Consequently, the reward is unparalleled: a profound sense of accomplishment and, of course, a feast that brings people together. The rich, smoky aroma, the complex flavor from a simple rub, and the perfect pull of each slice—this is an experience that keeps enthusiasts coming back for more, time and time again.
Understanding the Cut: Anatomy of a Beef Brisket
Before you even think about firing up the smoker, you absolutely must understand what you’re working with. Essentially, a full packer brisket is one large cut from the cow’s breast section, and it’s actually made up of two distinct muscles that overlap. Knowing this anatomy is, without a doubt, the most critical first step to success.
The Point Cut vs. The Flat Cut
These two muscles are the yin and yang of your brisket, and they behave very differently during the cook.
The Flat Cut is the leaner, thinner, and more uniform part of the brisket. It’s what you most commonly see pre-packaged in supermarkets because it slices into beautiful, photogenic slices. However, because of its low fat content, it has a tendency to dry out if overcooked. Therefore, your goal with the flat is to cook it just enough to become tender without losing all its moisture.
Sitting atop the flat is the Point Cut (also called the deckle). This is the thicker, fatty, and intensely marbled muscle. It’s irregularly shaped and is essentially your insurance policy against dryness. The point is incredibly forgiving and packed with flavor, thanks to its high fat content. Ultimately, this is the section you chop up to make those delicious burnt ends.
The Importance of the Fat Cap
One side of the brisket is covered in a thick layer of hard fat—the fat cap. Now, you might be tempted to trim it all off; resist that urge! This fat is not the enemy. During the long, slow cooking process, this cap slowly renders and bastes the meat continuously from the outside, keeping it incredibly moist and flavorful. Conversely, you don’t want to leave it all on, as it can prevent smoke penetration and result in a greasy final product. The secret lies in trimming it to an ideal balance, which we’ll cover next.
(External Link incorporated: To understand why marbling is so crucial, you can refer to the USDA Beef Grading Standards, which explain the difference in fat content between Prime, Choice, and Select grades.)
Preparation and The Cook
Selecting the Perfect Brisket: What to Look For
Alright, so you’re ready to choose your champion. Walking into a store and facing a wall of briskets can be overwhelming, but honestly, a few simple tips will make you a pro. First and foremost, think about grade. USDA Prime is the gold standard, boasting the highest marbling—those little white flecks of intramuscular fat that guarantee a juicy result. Choice is an excellent, more common, and often more affordable option that will still yield fantastic results. Select, however, is quite lean and less forgiving for beginners; it’s best to avoid it for this long cook.
Now, let’s talk size. A full packer brisket (which includes both the point and flat) is what you want. Look for one in the 12- to 15-pound range. Why so big? Well, after trimming, you’ll lose a few pounds, and this size ensures you have enough meat to feed a crowd and that it will withstand the long cooking time without drying out. Finally, give it a quick inspection. The flat should be relatively thick and feel firm yet pliable. A little bend is a good sign of freshness!
The Art of Trimming: Setting Yourself Up for Success
This step separates the novices from the pros. Trimming isn’t just about removing fat; it’s about aerodynamics and even cooking. You’ll need a sharp boning or fillet knife—a dull blade is a safety hazard here. Your mission is twofold: remove the hard, inedible fat and shape the brisket so heat and smoke flow over it evenly.
Place the brisket fat-side down on your cutting board. First, locate the hard deckle fat between the point and flat; carefully remove as much of this as you can—it won’t render. Next, flip it over and attack the fat cap. You want to leave about a ¼-inch layer of uniform white fat. Slice off any large, hard chunks. Now, for the magic trick: round off the sharp corners and thin edges of the flat. These areas burn incredibly easily, so by creating a smooth, oval shape, you ensure every part of the brisket cooks at the same rate.
Brisket Rubs and Flavor Profiles
The bark—that dark, flavorful, crusty exterior—is where the flavor lives, and it starts with your rub. Now, you can go down a rabbit hole of complex recipes, but sometimes, simplicity reigns supreme.
The Simple Texas Style: Salt and Pepper Heaven
Don’t underestimate the power of this classic combo. A 50/50 mix by volume of coarse black pepperand kosher salt (often called Dalmatian rub) is the cornerstone of Central Texas barbecue. Why does it work so well? Fundamentally, it creates a spectacular bark without overpowering the natural, beautiful flavor of the beef. The pepper provides a robust, earthy spice, while the salt enhances the meat’s inherent savoriness. It’s a testament to the philosophy that if you start with a great cut of meat, you don’t need to hide it.
Getting Creative with Rubs and Injections
Feeling adventurous? By all means, experiment! Adding garlic powder, onion powder, and a bit of paprika can build a more complex flavor base. A touch of cayenne can add a subtle kick. Some pitmasters swear by injections to guarantee moisture. Using a flavor injector, you can pump a mixture of beef broth, Worcestershire sauce, and seasonings directly into the muscle. This is like a secret insurance policy against dryness, especially if you’re working with a Choice grade brisket.
The Smoker Setup: Fire Management is Everything
Here’s where the real magic happens. Consistency is the name of the game. Your goal is to maintain a steady, low temperature for hours on end, which is a skill in itself.
Choosing Your Smoker: Offset, Pellet, Kamado, or Electric?
Your tool of choice depends on your commitment level. A traditional offset smoker is the purist’s choice; it uses indirect heat from a firebox and requires active fire management, but it delivers unparalleled flavor. Pellet grills are the ultimate set-and-forget option; they provide excellent convenience and consistent temperature control with a clean smoke flavor. Kamado-style cookers (like the Big Green Egg) are incredibly efficient and versatile, retaining heat and moisture beautifully. Finally, electric smokers are a great, affordable entry point for beginners, though they often produce a lighter smoke flavor.
The Low and Slow Philosophy: Temperature and Time
Forget everything you know about grilling. Low and slow is the mantra. Preheat your smoker to a steady 225°F to 250°F (107°C to 121°C). Now, the million-dollar question: “How long does it take?” The classic answer is, “It’s done when it’s done.” A good rule of thumb is 60 to 90 minutes per pound, but so many factors play a role. A 12-pound brisket could take 12 hours, or it could take 16. Trust the process, not the clock.
Brace yourself for the stall. Around 150°F to 170°F internal temperature, the brisket’s internal temperature will seemingly plateau for hours. This is completely normal! It happens because the meat is sweating, and evaporative cooling is fighting your smoker’s heat. Just wait it out; it will power through.
Choosing the Right Wood for Smoking Brisket
The wood you choose is your seasoning smoke. Post oak is the traditional wood of Texas for a reason; it burns clean and provides a mild, sweet smoke that doesn’t overpower the beef. Hickory offers a stronger, bacon-like flavor that pairs wonderfully with beef. Pecan is a bit sweeter and milder than hickory. Use mesquite with caution; it burns very hot and has an intensely strong flavor that can easily make the meat bitter if overused. The best advice? Stick with oak or hickory for your first try.
(External Link incorporated: For a deep scientific dive into the stall and the mechanics of cooking brisket, The Food Lab’s guide to brisket science is a fascinating read.)
The Process, Resting, and Serving
The Cooking Process: From Smoke to Rest
You’ve prepped, you’ve preheated, and now it’s game time. Place the brisket on the smoker, fat-side up if your heat source is below (to act as a shield), or fat-side down if you’re using an offset smoker with heat coming from the side. Then, close the lid and walk away! Resist the urge to peek constantly; every time you open the lid, you release heat and smoke, causing temperature fluctuations.
To Wrap or Not to Wrap? The Texas Crutch Debate
Once the brisket has a beautiful mahogany color and a firm bark (usually after 5-7 hours), you face a pivotal decision: to wrap or not to wrap? This technique is famously called the Texas Crutch.
Wrapping in pink butcher paper is a popular middle ground. It protects the brisket from drying out and helps power it through the stall, but it’s still breathable enough to preserve that crispy bark texture. Wrapping in aluminum foil creates more of a braising environment, speeding up the cook dramatically and ensuring a very juicy result, but at the cost of a softer bark. Going no-wrap is the bold choice for bark enthusiasts; it takes longer and has a higher risk of drying out but can yield the absolute best bark.
Probing for Perfection: How to Know When It’s Done
This is the most important step. Your thermometer is a guide, but your probe is the truth-teller. Start checking for tenderness when the internal temperature of the flat reaches around 195°F. Insert your probe or a skewer into the flat. Does it slide in with little to no resistance, like pushing into a jar of creamy peanut butter? Congratulations, it’s done! If it feels tight or tough, let it keep cooking. The final temperature will usually land between 200°F and 205°F, but always, always go by feel.
The Non-Negotiable Step: Resting Your Brisket
You’ve hit the finish line! But whatever you do, do not slice it yet. Resting your brisket is not a suggestion; it is mandatory. During the cook, the juices are forced to the center of the meat. Resting allows those juices to redistribute evenly throughout the entire brisket. If you slice immediately, all those precious juices will just run out onto the cutting board, leaving you with dry meat.
The best method is to wrap the finished brisket tightly in butcher paper (or foil), then wrap it in an old towel, and place it in an empty cooler (a “faux cambro”) to rest. It will stay piping hot for hours. A minimum rest time is one hour, but honestly, two to four hours is even better. This waiting period is the final, cruelest test of your patience, but it pays off immensely.
Slicing and Serving: The Grand Finale
The moment of truth has arrived. Unwrap your masterpiece and get ready to slice.
How to Slice a Brisket Correctly
First, locate the separation between the point and the flat. Separate the two muscles. Now, identify the direction of the meat’s grain (the muscle fibers). This is crucial! You must slice against the grain to shorten the fibers, ensuring each piece is tender and easy to chew.
For the flat, slice against the grain into pencil-width slices (about ¼-inch thick). For the point, you can either slice it against the grain for serving or chop it into cubes to make burnt ends. To make them, place the cubed point in a pan, add a bit more rub and some BBQ sauce, and return them to the smoker for about an hour until they’re caramelized and delicious.
Classic Side Dishes to Complement Smoked Brisket
No brisket plate is complete without the classic sides. Creamy, tangy coleslaw provides a refreshing crunch. Potry salad, either creamy or mustard-based, is a hearty staple. Sweet and savory baked beans are a perfect flavor pairing. And don’t forget the white bread, pickles, and sliced white onions—they’re traditional for a reason, cutting through the richness of the meat.
Troubleshooting and FAQs
Troubleshooting Common Smoked Brisket Problems
Even pros have off days. Here’s how to diagnose and fix common issues:
-
Problem: Dry Brisket.
-
Solution: It was likely undercooked. Contrary to intuition, a dry brisket often hasn’t cooked long enough for the fat and collagen to fully render into gelatin. Next time, cook until it’s truly probe-tender.
-
-
Problem: Tough Brisket.
-
Solution: This is absolutely a sign of undercooking. The collagen hasn’t broken down yet. It needs more time. Remember, temperature is a guide, but tenderness is the goal.
-
-
Problem: Burnt Bark.
-
Solution: Your fire was likely too hot or producing dirty smoke. Spritzing the brisket with water or apple cider vinegar every hour after the first three hours can help prevent burning and keep the surface moist.
-
-
Problem: Uneven Cooking.
-
Solution: The flat is done but the point is undercooked? Rotate your brisket in the smoker halfway through the cook. Also, ensure your heat source is consistent; you might have a hot spot in your smoker.
-
Frequently Asked Questions (FAQs)
How long does it take to smoke a brisket at 225°F?
As a general guideline, plan for 1 to 1.5 hours per pound. Therefore, a 12-pound packer brisket will typically take between 12 and 18 hours. However, the only true answer is: it will take as long as it needs to become tender. The stall can add several hours unpredictably.
Should I smoke my brisket fat side up or down?
This is a perennial debate! The logic is simple: position the fat cap between the meat and the heat source. If your smoker’s main heat comes from the bottom (like many cabinet smokers), place it fat side down to act as a shield. In an offset smoker with heat from the side, the orientation matters less, though many champions prefer fat side down.
What is the best internal temperature for smoked brisket?
Start checking for tenderness around 195°F. The sweet spot for most briskets is between 202°F and 205°F, but always rely on the probe test (like butter) as your final indicator. Some briskets may be ready at 198°F, while others need to hit 207°F.
Can I smoke a brisket without a smoker?
You can approximate it! If you have a standard charcoal or gas grill, you can set it up for indirect heat by pushing the coals to one side or only lighting one burner. Place a drip pan with water under the grates where the meat will be, add wood chips for smoke, and try to maintain a low temperature. It’s challenging but possible.
What are burnt ends and how do I make them?
Burnt ends are delicious, caramelized cubes of meat made from the point cut of the brisket. Once your brisket is done resting, separate the point from the flat. Cube the point into 1-inch pieces, place them in a pan, and toss them with more rub and a generous amount of BBQ sauce. Return the pan to the smoker (at around 275°F) for 1-2 hours, stirring occasionally, until they are sticky, crispy, and irresistible.
(External Link incorporated: To see the entire process in action from a master, Aaron Franklin’s legendary brisket tutorials on YouTube are an invaluable visual resource.)
Print
Smoked Brisket
Description
Smoked Brisket
Ingredients (10–12 servings)
-
1 whole beef brisket (10–12 lbs), trimmed (leave about ¼ inch fat cap)
-
¼ cup yellow mustard (binder, optional)
-
½ cup kosher salt
-
½ cup coarse black pepper
-
2 tbsp garlic powder
-
2 tbsp paprika (optional, for color)
-
Wood chunks or chips (oak, hickory, or mesquite work best)
Instructions
-
Prep the brisket:
-
Trim excess fat, leaving a thin fat cap.
-
Rub brisket with mustard (optional, helps seasoning stick).
-
Mix salt, pepper, garlic powder, and paprika. Coat brisket generously on all sides.
-
-
Preheat smoker:
-
Set smoker to 225°F (107°C). Add wood for smoke flavor.
-
-
Smoke (first stage):
-
Place brisket fat side up on the smoker grates.
-
Smoke until internal temp reaches 165°F (about 6–8 hours, depending on size).
-
-
Wrap:
-
Remove brisket, wrap tightly in butcher paper (preferred) or heavy-duty foil.
-
Return to smoker.
-
-
Smoke (second stage):
-
Continue cooking until internal temp reaches 200–205°F.
-
Probe the brisket—it should feel tender, like butter.
-
-
Rest:
-
Remove brisket from smoker. Keep wrapped and rest in a cooler or warm oven for at least 1 hour (up to 4 hours).
-
-
Slice & serve:
-
Slice against the grain into ¼-inch slices. Serve with barbecue sauce or as-is.
-