
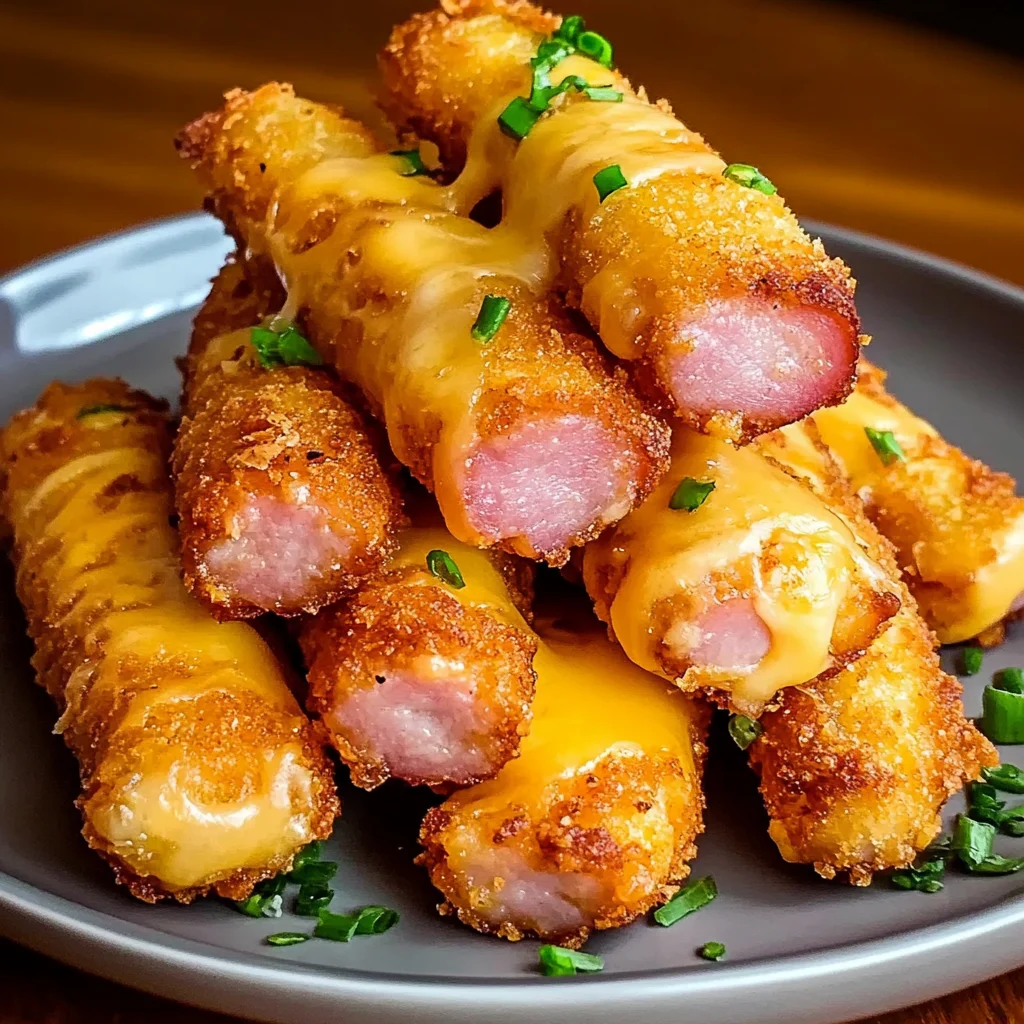
Ham and Cheese Sticks: The Ultimate Crispy Snack Guide
Introduction
Ham and cheese sticks are the ultimate crowd-pleasing appetizer that combines simplicity with irresistible flavor. These crispy, golden-brown treats feature savory ham wrapped around gooey melted cheese, coated in a crunchy exterior that delivers satisfaction with every bite. Whether you’re hosting a party, preparing game-day snacks, or simply craving something delicious, these handheld delights never disappoint.
Moreover, they’re incredibly versatile and easy to customize. You can prepare them ahead of time, freeze them for later, or whip them up fresh in under 30 minutes. making it perfect for family gatherings and kid-friendly events.
What Are Ham and Cheese Sticks?
Ham and cheese sticks are breaded and fried appetizers featuring ham wrapped around cheese sticks or cheese cut into rectangular shapes. The combination creates a perfect balance of salty, savory ham with rich, creamy cheese. Additionally, the crispy coating provides textural contrast that elevates the entire experience.
Origins and Popularity
While exact origins remain unclear, these snacks gained popularity in American appetizer culture during the 1970s and 1980s. They represent the perfect fusion of convenience and comfort food. Subsequently, variations have appeared in restaurants, sports bars, and home kitchens worldwide.
Key Components
Each ham and cheese stick consists of three main elements:
-
Protein layer: Thinly sliced deli ham
-
Cheese core: Mozzarella, cheddar, or string cheese
-
Crispy coating: Breadcrumb or panko exterior
Why You’ll Love This Recipe
Quick and Easy Preparation
You can assemble these appetizers in just 15 minutes. Furthermore, the cooking process takes only 10-12 minutes, making them ideal for last-minute entertaining.
Budget-Friendly Ingredients
Most ingredients are pantry staples or affordable deli items. Therefore, you can feed a crowd without breaking the bank.
Freezer-Friendly Convenience
Prepare large batches ahead of time and freeze them. Then, cook directly from frozen whenever cravings strike.
Customizable Flavors
Experiment with different cheese varieties, ham types, and seasonings. Consequently, you’ll never get bored with this versatile recipe.
Kid-Approved Taste
Children love the familiar flavors and fun finger-food format. Similarly, adults appreciate the nostalgic comfort food appeal.
Essential Ingredients Breakdown
Ham Selection
Deli Ham: Choose thin-sliced deli ham for easy wrapping. Look for varieties with minimal additives and good flavor.
Recommended Types:
-
Black Forest ham (slightly smoky)
-
Honey ham (subtly sweet)
-
Smoked ham (robust flavor)
-
Virginia ham (salty and traditional)
Cheese Options
Mozzarella Sticks: Pre-portioned string cheese or mozzarella sticks work perfectly. They melt beautifully and provide excellent stretch.
Alternative Cheeses:
-
Sharp cheddar (bold flavor)
-
Pepper jack (spicy kick)
-
Swiss cheese (nutty taste)
-
Colby jack (mild and creamy)
Coating Components
Flour Station: All-purpose flour helps the egg adhere to the ham surface.
Egg Wash: Beaten eggs create a sticky layer for breadcrumbs. Add a splash of milk for extra binding power.
Breadcrumbs: Panko breadcrumbs yield the crispiest results. Alternatively, use Italian-seasoned breadcrumbs for added flavor.
Seasonings and Extras
-
Garlic powder
-
Onion powder
-
Paprika
-
Black pepper
-
Dried Italian herbs
-
Grated Parmesan cheese
Kitchen Tools You’ll Need
Essential Equipment
-
Sharp knife
-
Cutting board
-
Three shallow dishes (for breading station)
-
Fork or tongs
-
Baking sheet (for oven method)
-
Deep fryer or heavy pot (for frying method)
-
Air fryer (optional)
-
Cooling rack
-
Paper towels
Optional But Helpful
-
Toothpicks (to secure ham)
-
Meat thermometer
-
Wire spider or slotted spoon
-
Parchment paper
Step-by-Step Preparation Guide
Ingredient Preparation
First, gather all ingredients and equipment. Then, set up your breading station before beginning assembly.
Quantities for 12 Sticks:
-
12 slices deli ham
-
12 mozzarella sticks or cheese portions
-
1 cup all-purpose flour
-
3 large eggs
-
2 cups panko breadcrumbs
-
½ cup grated Parmesan
-
1 teaspoon garlic powder
-
1 teaspoon onion powder
-
½ teaspoon paprika
-
Salt and pepper to taste
-
Cooking oil for frying
Assembly Process
Step 1: Prepare Cheese
Cut cheese into uniform sticks measuring approximately 3-4 inches long and ½ inch thick. Consistency ensures even cooking.
Step 2: Wrap with Ham
Lay one ham slice flat on your work surface. Place a cheese stick at one end. Roll tightly, ensuring complete coverage. Secure with a toothpick if needed.
Step 3: Set Up Breading Station
Arrange three shallow dishes in a row:
-
Dish 1: Flour seasoned with salt and pepper
-
Dish 2: Beaten eggs with 2 tablespoons milk
-
Dish 3: Panko mixed with Parmesan, garlic powder, onion powder, and paprika
Step 4: Coat Each Stick
Roll each ham-wrapped cheese stick in flour, shaking off excess. Dip into egg wash, coating completely. Finally, press into breadcrumb mixture, ensuring full coverage. Pat gently to help breadcrumbs adhere.
Step 5: Double Coating (Optional)
For extra crispiness, repeat the egg and breadcrumb steps. This creates a thicker, crunchier shell.
Step 6: Chill Before Cooking
Place coated sticks on a baking sheet. Refrigerate for 30 minutes or freeze for 15 minutes. Chilling helps the coating stick during cooking.
Coating Techniques for Extra Crunch
The Double-Dip Method
Applying two layers of egg wash and breadcrumbs creates an exceptionally crispy exterior. However, this requires patience and careful handling.
Adding Texture to Breadcrumbs
Mix crushed cornflakes or crackers with panko for varied texture. Additionally, toasted breadcrumbs provide deeper flavor.
Parmesan Enhancement
Adding grated Parmesan to breadcrumbs introduces savory notes and helps achieve golden-brown color. Furthermore, it creates a slightly cheesy crust.
Seasoning Variations
Experiment with these flavor combinations:
-
Cajun seasoning for heat
-
Ranch seasoning mix for tangy flavor
-
Everything bagel seasoning for bold taste
-
Lemon pepper for brightness
Cooking Methods Compared
Deep Frying
Temperature: Heat oil to 350°F (175°C).
Process: Fry 3-4 sticks at a time for 2-3 minutes until golden brown. Avoid overcrowding, which lowers oil temperature.
Advantages: Crispiest texture and fastest cooking time.
Considerations: Requires more oil and careful temperature monitoring.
Oven Baking
Temperature: Preheat oven to 400°F (200°C).
Process: Arrange sticks on a parchment-lined baking sheet. Lightly spray with cooking oil. Bake for 12-15 minutes, flipping halfway through.
Advantages: Healthier option with less mess and hands-off cooking.
Considerations: Less crispy than frying but still delicious.

Air Frying
Temperature: Set air fryer to 390°F (200°C).
Process: Arrange sticks in a single layer. Cook for 8-10 minutes, shaking basket halfway through.
Advantages: Combines crispiness of frying with healthier cooking method.
Considerations: May need to cook in batches depending on air fryer size.
Pan Frying
Temperature: Medium-high heat with ½ inch of oil.
Process: Cook 2-3 minutes per side until golden and crispy.
Advantages: Requires less oil than deep frying while achieving similar results.
Considerations: Needs more attention to prevent burning.
Flavor Variations to Try
Mediterranean Style
Wrap prosciutto around provolone cheese. Add dried oregano and basil to breadcrumbs. Serve with marinara sauce.
Spicy Jalapeño
Use pepper jack cheese and add crushed red pepper flakes to coating. Serve with cool ranch dressing.
BBQ Twist
Mix BBQ seasoning into breadcrumbs. Wrap honey ham around cheddar cheese. Serve with extra BBQ sauce for dipping.
Buffalo Ranch
Add buffalo seasoning to breading. Use sharp cheddar cheese. Serve with ranch dressing for dipping.
Italian Herb
Incorporate Italian seasoning, dried basil, and extra Parmesan into breadcrumbs. Wrap ham around fresh mozzarella.
Breakfast Version
Use Canadian bacon instead of ham. Wrap around cheddar cheese. Add dried thyme to coating. Perfect for brunch!
Serving Suggestions and Pairings
Dipping Sauces
Ham and cheese sticks pair wonderfully with various sauces:
Classic Options:
-
Honey mustard
-
Ranch dressing
-
Marinara sauce
-
Thousand Island dressing
-
Garlic aioli
Creative Choices:
-
Spicy mayo
-
Sweet chili sauce
-
Comeback sauce
-
Horseradish cream
-
Maple mustard
Side Dish Pairings
Complement these appetizers with:
-
Fresh garden salad
-
Coleslaw
-
Pickles and olives
-
Cherry tomatoes
-
Veggie sticks with dip
-
Potato wedges
-
Onion rings
Presentation Ideas
Arrange sticks standing upright in small cups filled with dipping sauce. Alternatively, lay them on a platter lined with parchment paper. Garnish with fresh herbs like parsley or chives.
Party Serving Tips
For gatherings, keep cooked sticks warm in a 200°F oven. Replenish platters frequently to ensure guests enjoy them at peak temperature. Moreover, label different varieties if serving multiple flavors.
Storage and Reheating Tips
Refrigerator Storage
Store cooked ham and cheese sticks in an airtight container for up to 3 days. Layer parchment paper between sticks to prevent sticking. Bring to room temperature before reheating for best results.
Freezing Raw Sticks
After breading, arrange unbaked sticks on a baking sheet. Freeze until solid (about 2 hours). Transfer to freezer bags or containers. Store for up to 3 months. Cook directly from frozen, adding 2-3 minutes to cooking time.
Freezing Cooked Sticks
Cool completely after cooking. Arrange in single layers with parchment paper between. Freeze in airtight containers for up to 2 months. While texture may be slightly less crispy, they still taste delicious.
Reheating Methods
Oven Method: Preheat to 375°F. Bake for 10-12 minutes until heated through and crispy.
Air Fryer Method: Cook at 350°F for 5-7 minutes.
Microwave (Not Recommended): This method makes coating soggy. Use only as a last resort.
Troubleshooting Common Issues
Problem: Cheese Leaking Out
Solution: Ensure ham wraps cheese completely with no gaps. Chill thoroughly before cooking. Don’t overcook, as excessive heat causes cheese to break through coating.
Problem: Coating Falls Off
Solution: Pat ham dry before breading. Press breadcrumbs firmly onto surface. Allow breading to set in refrigerator before cooking. Ensure oil reaches proper temperature before adding sticks.
Problem: Soggy Coating
Solution: Use panko breadcrumbs instead of regular breadcrumbs. Don’t overcrowd cooking vessel. Drain on wire rack rather than paper towels. Ensure oil temperature remains consistent.
Problem: Uneven Browning
Solution: Turn sticks halfway through cooking. Maintain proper oil temperature. Don’t cook too many at once. Space evenly in oven or air fryer.
Problem: Ham Unrolling
Solution: Secure with toothpicks before breading. Choose ham slices that aren’t too thin. Wrap tightly and press seam closed.
Nutritional Information
Per Serving (1 stick, oven-baked method)
-
Calories: 180-220
-
Protein: 12-14g
-
Carbohydrates: 15-18g
-
Fat: 8-10g
-
Calcium: 15% daily value
-
Sodium: 450-550mg
Nutritional Considerations
Ham and cheese sticks provide protein and calcium. However, they’re also relatively high in sodium. Balance your meal with fresh vegetables and limit portion sizes.
Healthier Modifications
Reduce calories and fat by:
-
Baking or air frying instead of deep frying
-
Using reduced-fat cheese
-
Choosing lower-sodium ham
-
Limiting coating thickness
-
Serving with vegetable-based dipping sauces
Frequently Asked Questions
Can I make ham and cheese sticks ahead of time?
Yes, absolutely! Assemble and bread the sticks up to 24 hours before cooking. Store covered in the refrigerator. Alternatively, freeze them for longer storage and cook directly from frozen.
What’s the best cheese for ham and cheese sticks?
Mozzarella is the most popular choice because it melts smoothly and has excellent stretch. However, cheddar, pepper jack, and Swiss also work wonderfully depending on your flavor preferences.
How do I prevent the cheese from leaking out during cooking?
Ensure the ham completely covers the cheese with no gaps. Chill the breaded sticks thoroughly before cooking. Additionally, avoid overcooking, which causes cheese to burst through the coating.
Can I bake these instead of frying?
Definitely! Baking is a healthier alternative. Preheat your oven to 400°F and bake for 12-15 minutes, flipping halfway through. Lightly spray with cooking oil for crispier results.
What dipping sauces pair best with ham and cheese sticks?
Honey mustard, ranch dressing, and marinara sauce are classic favorites. Furthermore, spicy mayo, sweet chili sauce, and garlic aioli offer delicious variations.
How long can I store cooked ham and cheese sticks?
Store them in an airtight container in the refrigerator for up to 3 days. Reheat in the oven or air fryer to restore crispiness.
Can I use different types of ham?
Yes! Black Forest ham, honey ham, smoked ham, and Virginia ham all work well. Choose based on your preferred flavor profile.
Are ham and cheese sticks kid-friendly?
Absolutely! Children love these finger foods because they’re familiar, tasty, and easy to eat. The simple ingredients make them appealing to young palates.
Conclusion
Ham and cheese sticks offer the perfect combination of simplicity, versatility, and delicious flavor. These crispy appetizers work beautifully for parties, family gatherings, game days, or anytime you want a satisfying snack. With endless customization options and multiple cooking methods, you can adapt this recipe to suit any occasion or dietary preference.
The best part is how easy these treats are to prepare. Basic ingredients, straightforward techniques, and minimal cooking time mean you’ll be serving restaurant-quality appetizers at home in under 30 minutes. Whether you choose to fry, bake, or air fry, the result is always golden, crispy perfection.
Remember to wrap the ham tightly around the cheese, chill thoroughly before cooking, and maintain proper cooking temperatures for best results. Don’t be afraid to experiment with different cheese varieties, seasonings, and dipping sauces to create your signature version.

Ham and Cheese Sticks
Description
Ham and Cheese Sticks
Ingredients
• 1 sheet puff pastry (thawed)
• 6–8 slices deli ham
• 6–8 slices Swiss or cheddar cheese
• 1 egg, beaten (for egg wash)
• Optional: sesame seeds or poppy seeds for topping
Instructions
-
Preheat oven to 400°F (200°C). Line a baking sheet with parchment paper.
-
Roll out puff pastry on a lightly floured surface. Cut into strips about 1–2 inches wide.
-
Lay a slice of ham and cheese on each strip. Fold the pastry over and press edges to seal.
-
Brush the tops with beaten egg and sprinkle seeds if using.
-
Bake 15–20 minutes until golden and puffed.
-
Serve warm with mustard, marinara, or your favorite dipping sauce.