
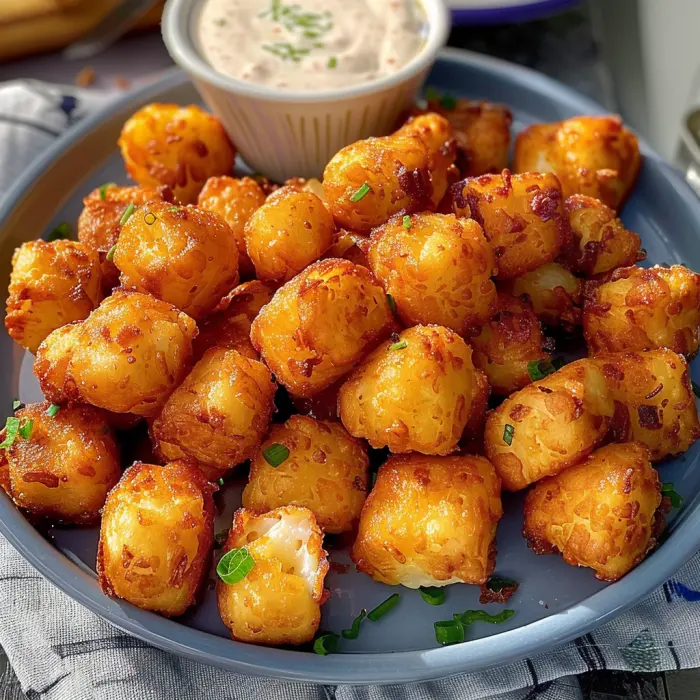
The Ultimate Guide to Homemade Tater Tots: Crispy, Golden, and Unbelievably Easy
Forget the freezer aisle! There’s something downright magical about pulling a tray of homemade tater tots out of the oven—or better yet, a basket of them from a bubbling pot of oil. They’re not just a side dish; oh no, they’re a declaration of love for crispy, golden, perfectly seasoned comfort food. This guide is your all-access pass to mastering this diner classic in your own kitchen. We’re talking about a from-scratch adventure that’s easier than you think and delivers a flavor and texture so superior, you’ll never look at that bag of frozen tots the same way again. So, tie on your apron, and let’s transform the humble spud into something spectacular.
Why Homemade Tater Tots Are a Game-Changer
Let’s be real, we’ve all reached for that familiar bag of frozen tater tots in a pinch. However, have you ever stopped to wonder what’s actually in them? Furthermore, have you noticed they can sometimes taste, well, a bit like cardboard? Making them from scratch, on the other hand, isn’t just a culinary flex; it’s a complete upgrade on every single level. Honestly, the difference is night and day.
The Joy of From-Scratch Cooking
Firstly, there’s an undeniable satisfaction that comes from creating a beloved classic with your own two hands. It’s the same feeling you get from baking your own bread or simmering your own pasta sauce—a connection to your food that a microwave dinner simply cannot provide. Consequently, you become the master of your spud destiny! You control the crispiness, the saltiness, and the overall flavor profile. Want them extra garlicky? Go for it! Prefer a smoky paprika kick? Why not? This isn’t just cooking; it’s edible artistry, and the result is a plate of hot, crispy tots that are bursting with real potato flavor.
Beyond the Freezer Aisle
Now, let’s talk about the elephant in the room: the quality. While convenient, most store-bought versions are packed with preservatives, stabilizers, and a laundry list of unpronounceable ingredients to ensure they survive a long shelf life. Your homemade version, however, requires just a handful of simple, whole ingredients: potatoes, a little starch, some basic seasonings, and that’s practically it! Moreover, the texture is in a league of its own. Forget the often-uniform, sometimes-mealy interior of the frozen kind. A properly made from-scratch tot boasts a shatteringly crispy exterior that gives way to a fluffy, tender, and incredibly satisfying center. It’s a textural symphony that makes every single bite an event.
A Brief, Crispy History of the Tater Tot
Believe it or not, this iconic food was born from sheer ingenuity and a desire to avoid waste. Way back in the 1950s, the brilliant founders of the Ore-Ida company, Nephi and Golden Grigg, faced a delicious dilemma. As they produced frozen french fries, they were left with enormous piles of leftover potato slivers and scraps. Instead of tossing them out, they decided to get creative. They chopped up the remnants, seasoned them, compressed them into tiny cylindrical shapes, and froze them. Originally, they called them “Golden Nuggets,” but thankfully, one of the founders’ sons suggested the much catchier name “Tater Tots.” And just like that, a legend was born!
From Humble Beginnings to a Cultural Icon
Initially, these little homemade tater tot precursors were a tough sell; restaurants saw them as mere leftovers. However, persistence paid off. Soon enough, their incredible taste and convenience won everyone over, making them a staple in school cafeterias and diners across America. Fast forward to today, and they’ve achieved a cult status that goes far beyond the lunch tray. Seriously, they’re the star of gourmet casseroles, loaded appetizer plates, and even high-end restaurant dishes. They’ve evolved from a simple solution for food waste into a beloved comfort food icon, and making them yourself is the ultimate tribute to their scrappy origins.
Gathering Your Arsenal: Essential Tools & Equipment
Alright, before we dive into shredding potatoes, let’s make sure you’ve got the right gear for the job. Don’t worry; you probably already own most of this stuff! Having the right tools on hand will make the process smoother and your results even better.
-
Box Grater or Food Processor: This is your number one tool. A box grater works perfectly fine (use the large shredding holes), but a food processor with a shredding disk will save you a ton of time and effort, especially if you’re doubling the batch.
-
Large Bowls & Kitchen Towels: You’ll need a bowl for an ice water bath and another for mixing. Most importantly, you’ll need a few clean kitchen towels or some sturdy paper towels for the absolutely critical step of wringing out the potato moisture.
-
Rimmed Baking Sheets & Parchment Paper: Essential for laying out your shaped tater tots before their freeze and for baking them to perfection if you’re not frying.
-
Pot or Dutch Oven: If you’re going the classic deep-frying route, a heavy-bottomed pot or a Dutch oven is ideal for maintaining a consistent temperature.
-
Spider Strainer or Slotted Spoon: This is the safest and easiest tool for lifting the hot tots out of the oil and letting the excess drip away.
-
Ice Water Bath: This isn’t just a fancy term; it’s a crucial step! A large bowl of cold water with ice cubes keeps your potatoes from turning an unappetizing pinkish-brown while you work.
Honestly, with these tools ready, you’re already more than halfway to homemade tater tot heaven. Now, let’s get to the good part: the potatoes themselves.
The Ultimate Homemade Tater Tots Recipe
This is it—the moment we’ve all been waiting for! This crispy tater tots recipe is your foundation, your blueprint for perfection. Follow these steps closely, and you will be rewarded beyond your wildest spud-related dreams.
Ingredients for Classic Tots (The Base)
Gather these simple ingredients. That’s right, simple! No mystery chemicals here.
-
2 lbs Russet potatoes (about 4 medium)
-
1 tbsp all-purpose flour
-
1 tsp cornstarch (the secret to extra crispiness!)
-
1 tsp onion powder
-
1/2 tsp garlic powder
-
1 1/2 tsp fine sea salt, plus more for sprinkling
-
1/4 tsp freshly ground black pepper
-
Neutral oil for frying (canola, vegetable, peanut) or high-heat cooking spray for baking
Ingredient Deep Dive: Why These Work
-
Russet Potatoes: This isn’t just a random choice! Russets are the undisputed champion for from-scratch tot-making due to their high starch and low moisture content. This magical combination is what creates that fluffy interior and allows for a supremely crispy exterior when cooked. Using a waxy potato like a Red Bliss is a one-way ticket to Soggy Town.
-
Cornstarch & Flour: This dynamic duo acts as your binding agents. The flour helps hold the shreds together, while the cornstarch is a powerhouse for creating that irresistible, crunchy, golden-brown crust. It’s the ultimate crispy cheat code.
-
The Seasonings: Onion and garlic powder distribute flavor evenly throughout the mixture far better than their fresh counterparts would, which could also add unwanted moisture. The salt and pepper are, of course, non-negotiable for deliciousness.
Step-by-Step Instructions
Step 1: Prep and Shred the Potatoes
First, peel your potatoes completely. Then, give them a good rinse under cold water. Now, here’s the key: immediately submerge them in a large bowl of ice water. This initial bath helps wash away some of the surface starch and, more importantly, prevents them from oxidizing and turning that unappealing grey color.
Step 2: The Critical Draining Step
This is the single most important step for achieving tot nirvana. Moisture is the enemy of crispiness.Drain your shredded potatoes thoroughly. Then, grab a few sturdy kitchen towels or some cheesecloth. Place a handful of shreds in the center, gather the edges, and twist—squeeze with all your might! You will be genuinely shocked at how much liquid comes out. Repeat this process until every last shred is as dry as a bone. Your future crispy self will thank you profusely.
Step 3: Combine and Season
Transfer your bone-dry potato shreds to a large, clean, and dry mixing bowl. Sprinkle the flour, cornstarch, onion powder, garlic powder, salt, and pepper evenly over the top. Now, use your hands or a fork to mix everything together until the potatoes are evenly coated in the starchy, seasoned mixture. Give it a taste test (it’s safe to eat raw); you can adjust the seasoning now if needed.
Step 4: Form the Tots
Line a rimmed baking sheet with parchment paper. Now, for the fun part: shaping! Grab about one tablespoon of the mixture. Squeeze it firmly in your palm to compact it tightly—this is crucial so they don’t fall apart during cooking. Then, gently roll it between your hands to form that classic, beloved cylindrical tot shape. Place it on the prepared baking sheet. Repeat this process until all your mixture is used up, leaving a little space between each tot on the sheet.
Step 5: The Chilling Period
Do not skip this step! Place the entire baking sheet of shaped tater tots into your freezer for at least 30 minutes. This solidifies them, helping them hold their perfect shape through the cooking process. It’s like sending them to boot camp before they head into battle (the hot oil).
Step 6: Choosing Your Cooking Method
Ah, the grand finale! You have options here, and they’re all fantastic. This is where you decide your tot’s destiny.
Mastering the Methods & Pro Tips
So your tots are frozen, and you’re ready for the magic to happen. But wait—how should you cook them? Each method has its own perks, and honestly, you can’t go wrong.
The Classic Deep Fry (For Maximum Crisp)
If you’re seeking the ultimate diner-style experience, this is the way to go. It delivers an unbeatable, shatteringly crispy exterior with a cloud-like interior.
-
Heat the Oil: Pour about 2-3 inches of neutral oil (like canola or vegetable) into a heavy-bottomed pot or Dutch oven. Attach a deep-fry or candy thermometer to the side. Heat the oil over medium-high heat until it reaches a steady 375°F (190°C).
-
Fry in Batches: Gently lower a batch of your frozen tater tots into the hot oil using a spider strainer or slotted spoon. Do not overcrowd the pot! This will cause the temperature to plummet and make your tots greasy.
-
Cook to Golden Brown: Fry for 2 to 4 minutes, agitating them occasionally, until they are a deep, golden brown and perfectly crispy.
-
Drain and Season: Lift them out, let the excess oil drip off, and immediately transfer them to a wire rack set over a paper towel-lined baking sheet. Sprinkle with a pinch of salt while they’re still piping hot.
The Health-Conscious Bake (Still Deliciously Crispy)
Prefer to avoid frying? No problem! Baking is a fantastic, hands-off method that still yields wonderfully crispy results.
-
Preheat: Preheat your oven to a nice and hot 425°F (220°C).
-
Arrange: Place your frozen homemade tater tots on a parchment-lined baking sheet. Make sure they aren’t touching.
-
Oil Them Up: This is key for browning! Generously spray the tops of the tots with cooking spray or lightly brush them with oil.
-
Bake: Bake for 20-25 minutes, then carefully flip each tot over. Return them to the oven for another 15-20 minutes, until they are browned and crispy all over.
The Modern Air Fryer (Best of Both Worlds)
For those who love a crispy result with less oil, the air fryer is your new best friend.
-
Preheat: Preheat your air fryer to 400°F (200°C). This helps get them crispy from the start.
-
Cook: Place the frozen tots in the basket in a single layer. Air fry for 12-18 minutes, shaking the basket vigorously halfway through the cooking time to ensure even browning.
-
Check: They’re done when golden brown and hot all the way through.
| Method | Crispiness Level | Hands-On Time | Cook Time | Best For |
|---|---|---|---|---|
| Deep Frying | ★★★★★ (Extreme) | High | Fast (2-4 min/batch) | Ultimate indulgence, special treats |
| Baking | ★★★☆☆ (Good) | Low | Slow (35-45 min) | Health-conscious, hands-off cooking |
| Air Frying | ★★★★☆ (Great) | Medium | Medium (12-18 min) | Great balance of speed, health, and crunch |
Pro Tips for Totally Perfect Tots Every Time
You’ve got the basics down, but these next-level tips will elevate your tot game from great to legendary.
-
The Moisture is the Enemy (Yes, Again!): We can’t stress this enough. The single biggest reason for soggy tater tots is insufficiently dried potatoes. Wring those shreds out until your arms ache! It’s a total arm workout, but it’s worth it.
-
The Parboiling Alternative: Want an even fluffier interior? Try this chef’s trick: instead of shredding raw potatoes, peel and cube them. Boil them until they are just tender enough to pierce with a fork but not falling apart. Drain, let them cool completely, then shred them. The result is a more cohesive, mashed-potato-like interior.
-
Seasoning is Key: Don’t be shy with the seasonings! Potatoes need a good amount of salt and flavor. Always taste your mixture before forming the tots. You can fry a tiny bit in a pan to test for seasoning and crispiness.
-
Don’t Crowd the Pot/Pan: Whether you’re frying or baking, giving your tots enough space is non-negotiable. Crowding leads to steaming, and steaming is the arch-nemesis of crispiness. Cook in batches for the best results.
-
The Freeze-for-Later Trick: This recipe is perfect for making ahead. After you shape the tots and freeze them on the sheet pan for 30 minutes, you can transfer them to a large zip-top freezer bag. They’ll keep perfectly for up to 3 months! Cook them straight from frozen—no need to thaw.
Creative Flavor Variations & Serving Ideas
Alright, you’ve mastered the classic. Now, let’s get creative! The basic tater tot recipe is a blank canvas just begging for your culinary artistry. Here are some wildly popular flavor variations to get you started.
Cheesy Bacon Tots
A no-brainer combination that is always a crowd-pleaser. Simply add 1/2 cup of shredded sharp cheddar cheese and 1/4 cup of finely chopped, cooked bacon to your potato mixture before shaping. The cheese gets all melty and glorious, while the bacon adds a smoky, salty crunch.
Loaded Baked Potato Tots
Why have a loaded baked potato when you can have a handful of loaded tots? Incorporate 1/3 cup of shredded cheddar, two tablespoons of finely chopped chives, and a tablespoon of powdered sour cream (or a very, very small amount of real sour cream, but be cautious of adding moisture!) into the mix. Serve with a side of ranch dressing for dipping.
Spicy Jalapeño Popper Tots
For those who like a little kick! Add two tablespoons of finely diced pickled jalapeños (for flavor) and one tablespoon of fresh jalapeño (for heat, seeds removed for less spice) to the bowl. For maximum creaminess, try mixing in two tablespoons of softened cream cheese. These are absolutely incredible with a cool cilantro-lime dipping sauce.
Sweet Potato Tots
A fantastic and slightly healthier twist! Simply substitute russet potatoes with sweet potatoes. They have a different moisture content, so you may need a touch more cornstarch to bind them. Spice them with a pinch of cinnamon and smoked paprika for a sweet-and-smoky flavor profile that’s utterly addictive.
“Everything Bagel” Tots
Why should bagels have all the fun? After you shape your classic tots, roll them lightly in a generous coating of Everything Bagel seasoning before the freezing step. The sesame seeds, garlic, onion, and poppy seeds create an incredible texture and burst of flavor in every single bite.
The Perfect Pairing: Dipping Sauces & Serving Ideas
What’s a tot without an amazing dip? Honestly, it’s like a burger without a bun. Here are some ideas to make your homemade tater tots the star of the show.
Sauces:
-
Classic: Ketchup, of course! But try mixing a little sriracha into it.
-
Creamy: Garlic aioli, sriracha mayo, or a cool dill ranch dip.
-
Cheesy: A warm, velvety beer cheese sauce is pure decadence.
-
Smoky: Your favorite BBQ sauce, or a mix of BBQ and mayo for a tangy comeback sauce.
Serving Ideas:
-
The Classic Side: Obviously, they’re the perfect partner for burgers, hot dogs, grilled chicken, or sandwiches.
-
Party Appetizer: Pile them high on a platter with an assortment of dipping sauces. They’ll be the first thing to disappear at any party.
-
Breakfast/Brunch Hero: Serve them alongside eggs, bacon, and toast for the ultimate weekend breakfast. Or, go all out and build a plate of breakfast nachos with a base of tots, topped with scrambled eggs, cheese, and salsa.
-
The Casserole: Use your homemade tater tots as the topping for an next-level tater tot casserole or hotdish. They’ll hold their shape and provide amazing texture.
Homemade Tater Tots FAQ
You’ve got questions, we’ve got answers! Here are the solutions to the most common head-scratchers and dilemmas on the journey to tot perfection.
Why are my homemade tater tots falling apart?
Answer: Oh, this is a frustrating one! Typically, three things are to blame:
-
Not enough moisture removed: This is culprit #1. Excess water prevents the binding agents (flour and cornstarch) from doing their job.
-
Not compacting them firmly enough: You really have to squeeze the life out of that tablespoon of mixture when you’re shaping it. A loose tot is a doomed tot.
-
Skipping the freeze: The 30-minute chill in the freezer is non-negotiable. It solidifies the shape and is essential for structural integrity.
Can I make tater tots without a deep fryer?
Answer: Absolutely, yes! While deep-frying delivers the ultimate classic crunch, both baking and air frying are excellent alternatives. They produce a slightly different, but still wonderfully crispy and delicious, result with significantly less oil. Check out the “Mastering the Methods” section above for detailed instructions on both.
Can I make gluten-free tater tots?
Answer: Easily! This recipe is very forgiving. Simply swap the all-purpose flour for your favorite gluten-free 1:1 baking flour blend. You could also use a teaspoon more cornstarch instead. Just double-check that all your other ingredients (like your spices) are certified gluten-free to be safe.
How do I store and reheat leftover tater tots?
Answer: Leftovers? That’s a rare occurrence! But if it happens:
-
Storage: Let them cool completely, then store them in an airtight container in the refrigerator for up to 3 days.
-
Reheating: Do not use the microwave! It will turn them soft and sad. To bring back the crispy magic, reheat them in an air fryer at 375°F for 3-4 minutes or in a conventional oven at 400°F for about 10 minutes. They’ll come out nearly as good as new.
What’s the best potato for tater tots?
Answer: For the quintessential crispy tater tots recipe, Russet potatoes are the undisputed champion. Their high starch and low moisture content is the scientific secret to achieving that fluffy interior and golden-brown crust. In fact, understanding the science behind choosing the right potato is key to many potato dishes. For reference, you can always check the nutritional information for Russet potatoes to see their composition. Using a waxy potato like Red Bliss or Yukon Gold will result in a gummy, less crispy tot because they hold too much water.
Conclusion: Your New Favorite Side Dish
And there you have it! From their fascinating history as a solution for food waste to your very own plate of golden-brown glory, you are now a certified homemade tater tot expert.
Sure, it requires a bit more effort than tearing open a bag. But the payoff—the incomparable taste, the satisfying crunch, the pride of creating something incredible from a few simple ingredients—is worth every single second. You’ve got the recipe, the pro tips, and a world of flavorful variations at your fingertips.
So, what are you waiting for? Preheat that oven, heat that oil, and get ready to make the best, most unforgettable tater tots of your life. Your taste buds will throw a party, and you’ll be the guest of honor.
Print
Homemade Tater Tots
Description
Homemade Tater Tots
Ingredients (about 4 servings)
-
2 lbs (900g) russet potatoes, peeled
-
2 tbsp all-purpose flour (or cornstarch)
-
1 tsp garlic powder
-
1 tsp onion powder
-
½ tsp paprika (optional)
-
Salt and black pepper, to taste
-
1–2 tbsp fresh parsley, finely chopped (optional)
-
Oil, for frying (vegetable or canola)
Instructions
-
Par-cook potatoes:
Place peeled potatoes in a pot, cover with water, and bring to a boil. Cook for 6 minutes only – they should be just slightly tender, not fully cooked. Drain and let cool completely. -
Grate:
Once cooled, grate potatoes on the large holes of a box grater. Spread grated potatoes on a clean towel and squeeze out as much moisture as possible. -
Season mixture:
Place grated potatoes in a bowl. Add flour, garlic powder, onion powder, paprika, salt, pepper, and parsley. Mix gently until combined (don’t overmix). -
Shape tots:
Scoop about 1 tablespoon of mixture and form into small cylinders (classic tot shape). Press lightly so they hold together. -
Fry:
Heat oil in a deep skillet or pot to 375°F (190°C). Fry tots in batches for 3–4 minutes until golden and crispy. Remove with a slotted spoon and drain on paper towels. -
Serve:
Sprinkle with extra salt while hot. Serve with ketchup, ranch, or your favorite dipping sauce.